Blog

  • spdr-etf-holdings

    spdr-etf-holdings

    These Racket programs will download the SPDR ETF holdings XLS documents and insert the holding data into a PostgreSQL database.
    The intended usage on Windows with Microsoft Excel is:

    $ racket extract.rkt
    $ racket transform-load-com.rkt

    On other platforms, you will need to do something like the following (and will need some bit of software to do the XLS->CSV transformation):

    $ racket extract.rkt
    $ for f in `ls /var/local/spdr/etf-holdings/date/` ; do libreoffice --headless --convert-to csv --outdir /var/local/spdr/etf-holdings/date $f ; done
    $ racket transform-load-csv.rkt

    If you have libreoffice installed, you can instead just do the following as XLS->CSV conversion using libreoffice is supported within the process:

    $ racket extract.rkt
    $ racket transform-load-csv.rkt -c

    You will need to provide a database password for the transform-load-*.rkt programs. The available parameters are:

    $ racket transform-load-csv.2019-11-02.rkt -h
    racket transform-load-csv.2019-11-02.rkt [ <option> ... ]
     where <option> is one of
      -b <folder>, --base-folder <folder> : SPDR ETF Holdings base folder. Defaults to /var/local/spdr/etf-holdings
      -c, --convert-xls : Convert XLS documents to CSV for handling. This requires libreoffice to be installed
      -d <date>, --folder-date <date> : SPDR ETF Holdings folder date. Defaults to today
      -n <name>, --db-name <name> : Database name. Defaults to 'local'
      -p <password>, --db-pass <password> : Database password
      -u <user>, --db-user <user> : Database user name. Defaults to 'user'
      --help, -h : Show this help
      -- : Do not treat any remaining argument as a switch (at this level)
     Multiple single-letter switches can be combined after one `-`. For
      example: `-h-` is the same as `-h --`

    The provided schema.sql file shows the expected schema within the target PostgreSQL instance.
    This process assumes you can write to a /var/local/spdr folder. This process also assumes you have loaded your database with NASDAQ symbol
    file information. This data is provided by the nasdaq-symbols project.

    Dependencies

    It is recommended that you start with the standard Racket distribution. With that, you will need to install the following packages:

    $ raco pkg install --skip-installed gregor http-easy tasks threading

    Format and URL updates

    On 2020-01-01, the URL for SPDR ETF documents changed; extract.2020-01-01.rkt uses this new location.

    On 2019-11-02, columns were added to the SPDR ETF documents; transform-load.2019-11-02.rkt can process these new columns.

    Visit original content creator repository
    https://github.com/evdubs/spdr-etf-holdings

  • panel-images

    Pelican/Pterodactyl/WISP Docker Images

    Docker images that can be used with the Pelican/Pterodactyl/WISP Game Panel. You can request more images by opening a new issue. These are mostly created for myself.
    Special thanks to Trenutoo

    Additional Pterodactyl images can be found at Pelican Yolks, Pterodactyl Yolks.

    How to add image to your egg

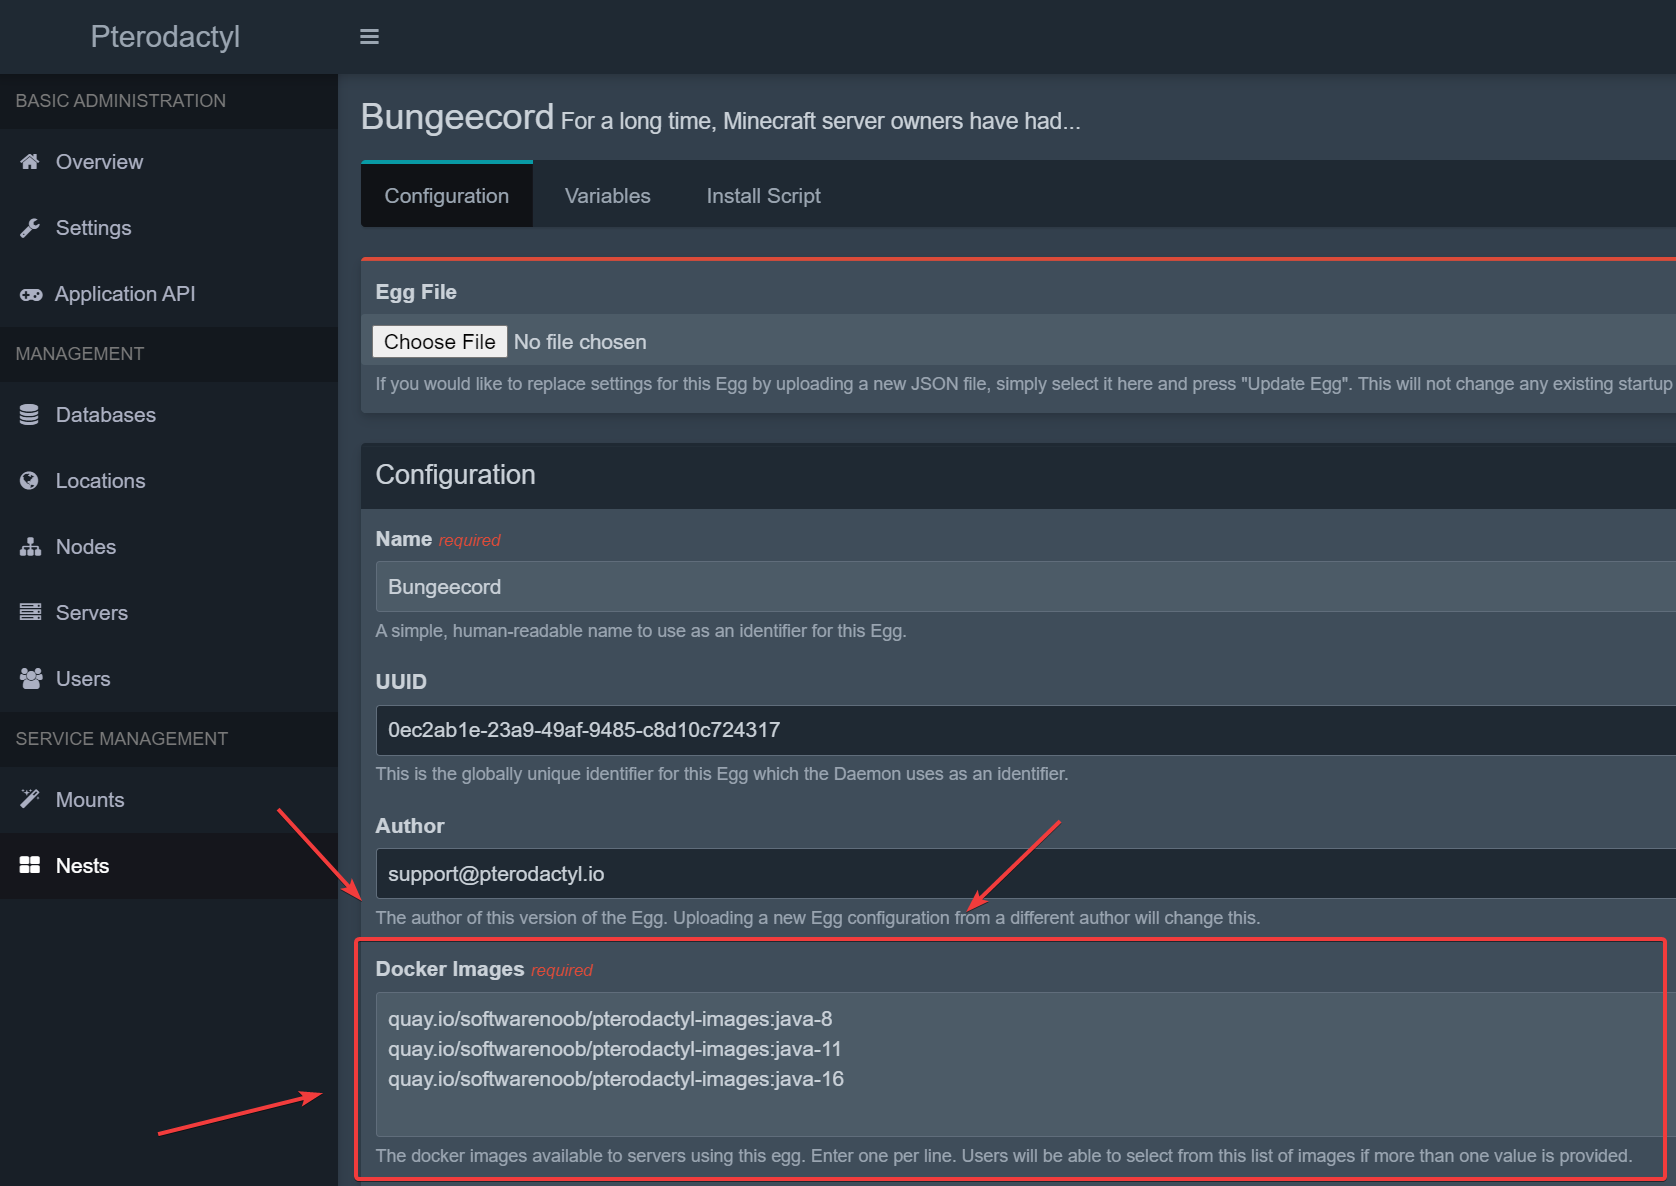
    Navigate to Admin Panel -> Nests -> Select your egg. Add Docker image URL(s) from the available list into the Docker Images section.

    image

    Supported Platforms

    Image Supported platforms
    Java Azul Zulu AMD64, ARM64
    Java GraalVM AMD64, ARM64
    Java OpenJ9 AMD64
    Node.js AMD64, ARM64
    Python AMD64, ARM64

    Java Azul Zulu [AMD64/ARM64]

    Java GraalVM [AMD64/ARM64]

    NOTE: Java 8 is AMD64 only due to lack of support from upstream

    Java OpenJ9 [AMD64]

    Node.js [AMD64/ARM64]

    • Nodejs 12
      • ghcr.io/bijju089/panel-images:nodejs_12
    • Nodejs 14
      • ghcr.io/bijju089/panel-images:nodejs_14
    • Nodejs 15
      • ghcr.io/bijju089/panel-images:nodejs_15
    • Nodejs 16
      • ghcr.io/bijju089/panel-images:nodejs_16
    • Nodejs 17
      • ghcr.io/bijju089/panel-images:nodejs_17
    • Nodejs 18
      • ghcr.io/bijju089/panel-images:nodejs_18
    • Nodejs 19
      • ghcr.io/bijju089/panel-images:nodejs_19
    • Nodejs 20
      • ghcr.io/bijju089/panel-images:nodejs_20
    • Nodejs 21
      • ghcr.io/bijju089/panel-images:nodejs_21
    • Nodejs 22
      • ghcr.io/bijju089/panel-images:nodejs_22

    Python [AMD64/ARM64]

    Visit original content creator repository https://github.com/bijju089/panel-images
  • rice-discuss-frontend

    This project was bootstrapped with Create React App.

    Available Scripts

    In the project directory, you can run:

    yarn start

    Runs the app in the development mode.
    Open http://localhost:3000 to view it in the browser.

    The page will reload if you make edits.
    You will also see any lint errors in the console.

    yarn test

    Launches the test runner in the interactive watch mode.
    See the section about running tests for more information.

    yarn build

    Builds the app for production to the build folder.
    It correctly bundles React in production mode and optimizes the build for the best performance.

    The build is minified and the filenames include the hashes.
    Your app is ready to be deployed!

    See the section about deployment for more information.

    yarn eject

    Note: this is a one-way operation. Once you eject, you can’t go back!

    If you aren’t satisfied with the build tool and configuration choices, you can eject at any time. This command will remove the single build dependency from your project.

    Instead, it will copy all the configuration files and the transitive dependencies (Webpack, Babel, ESLint, etc) right into your project so you have full control over them. All of the commands except eject will still work, but they will point to the copied scripts so you can tweak them. At this point you’re on your own.

    You don’t have to ever use eject. The curated feature set is suitable for small and middle deployments, and you shouldn’t feel obligated to use this feature. However we understand that this tool wouldn’t be useful if you couldn’t customize it when you are ready for it.

    Learn More

    You can learn more in the Create React App documentation.

    To learn React, check out the React documentation.

    Code Splitting

    This section has moved here: https://facebook.github.io/create-react-app/docs/code-splitting

    Analyzing the Bundle Size

    This section has moved here: https://facebook.github.io/create-react-app/docs/analyzing-the-bundle-size

    Making a Progressive Web App

    This section has moved here: https://facebook.github.io/create-react-app/docs/making-a-progressive-web-app

    Advanced Configuration

    This section has moved here: https://facebook.github.io/create-react-app/docs/advanced-configuration

    Deployment

    This section has moved here: https://facebook.github.io/create-react-app/docs/deployment

    yarn build fails to minify

    This section has moved here: https://facebook.github.io/create-react-app/docs/troubleshooting#npm-run-build-fails-to-minify

    Visit original content creator repository
    https://github.com/rice-apps/rice-discuss-frontend

  • Čapek

    Čapek

    Python library for developing TORCS racing robots.

    Getting started

    1. Install TORCS.

      The most convenient way is to install TORCS from this repository.
      The repository contains the most recent version of the simulator with SCR
      patches that allow communicating with TORCS via UDP.

      $ git clone https://github.com/fmirus/torcs-1.3.7.git
      $ sudo apt-get install libglib2.0-dev libgl1-mesa-dev libglu1-mesa-dev \
           freeglut3-dev libplib-dev libopenal-dev libalut-dev libxi-dev \ 
           libxmu-dev libxrender-dev libxrandr-dev libpng-dev
      $ cd torcs-1.3.7
      $ ./configure
      $ make
      $ sudo make install
      $ sudo make datainstall
      
    2. Install Čapek.

      $ pip install capek --user
      
    3. Program a robot’s logic.

      Reference robots are located in the examples directory.

    4. Test the robot.

      1. Start TORCS.
      2. Select Race → Practice → Configure Race → Accept.
      3. Drop scr_server 1 to the Selected menu.
        This is the robot.
      4. Select Accept → Accept → New Race.
      5. Observe.
    5. Fix, if necessary.

    Creating robots

    To create a robot using Čapek, you have to re-implement the Driver class.
    The common structure of a robot is demonstrated below.

    from capek import Driver, Client
    
    class MyDriver(Driver):
        # ...
        # Initialize necessary classes or variables.
        # ...
    
        def drive(self, state, control):
            # ...
            # Define behavior on gear change, steering, etc.
            # ...
    
            if state.speed_X < 300:
                control.accel = 1  
            else:
                control.accel = 0
    
            # Changes in control are sent to TORCS on the next tick.
    
            return control
    
    client = Client(verbosity=1)
    # Enters loop until reaches maximum learning episodes.
    # Or is interrupted.
    client.run(driver=MyDriver)

    The only methods that are supposed to be re-implemented are drive, on_shutdown and on_restart.
    The two latter exist because of convention with C++ and Java clients.

    Visit original content creator repository
    https://github.com/dikuchan/capek