I have not active api that why it not work on live site
AIVANA – Aivart is a web application that lets you generate unique and creative artwork from textual prompts, using OpenAI’s DALL-E API. With AIVANA – Aivart, you can explore the possibilities of generative art and see your words come to life in stunning images that are both unexpected and delightful.
TEXT-TO-IMAGE GENERATE: AIVANA – Artify allows you to enter any text prompt and generate a corresponding image using the DALL-E API.
INTERACTIVE INTERFACE: AIVANA – Artify’s user-friendly interface lets you easily enter text, preview and download the generated images, and share them on social media.
CUSTONIZABLE OPTIONS: AIVANA – Artify gives you control over various parameters, such as image size, background color, and number of image samples, to tailor your art generation experience to your liking.
MERN STACK: AIVANA – Artify is built using the MERN stack, a popular web development framework that combines MongoDB, Express, React, and Node.js, to provide a fast and scalable application that can handle a large number of users and requests.
Getting started
To get started with AIVANA – Artify, you will need to have a valid OpenAI API key, which you can obtain from the OpenAI website. Once you have your API key, follow these steps:
Clone or download this repository to your local machine.
Install the necessary dependencies using npm install in both ‘server’ & ‘client’.
Create a .env file in the server directory of the project and add your API keys as :-
OPENAI_API_KEY=””
MONGODB_URL=””
CLOUDINARY_CLOUD_NAME=””
CLOUDINARY_API_KEY=””
CLOUDINARY_API_SECRET=””
CLOUDINARY_URL=””
Replace https://artify-teyv.onrender.com in client’s CreatePost.jsx and Home.jsx by https://localhost:8080.
Start the server using npm start & client using npm run dev.
Open your web browser and navigate to http://localhost:5173 to see the AIVANA – Artify app in action.
Getting API’s
Create account and get api from CLOUDINARY https://cloudinary.com/
Create account and get api from MONGODB https://www.mongodb.com/atlas/database
Create account and get api from OPENAI https://platform.openai.com/account/api-keys
Contributing
We welcome contributions from the community to help improve AIVANA – Artify and make it even more amazing. Whether you’re a developer, designer, or artist, you can contribute in various ways, such as:
Reporting bugs and issues
Suggesting new features and improvements
Creating pull requests to fix bugs or add new features
Sharing your generated art on social media and spreading the word about AIVANA – Artify
License
AIVANA – Artify is open-source software licensed under the Apache-2.0 license, which allows for free use, modification, and distribution of the codebase, subject to certain conditions. By contributing to AIVANA – Artify, you agree to abide by the terms of this license and to respect the intellectual property of the original authors and contributors.
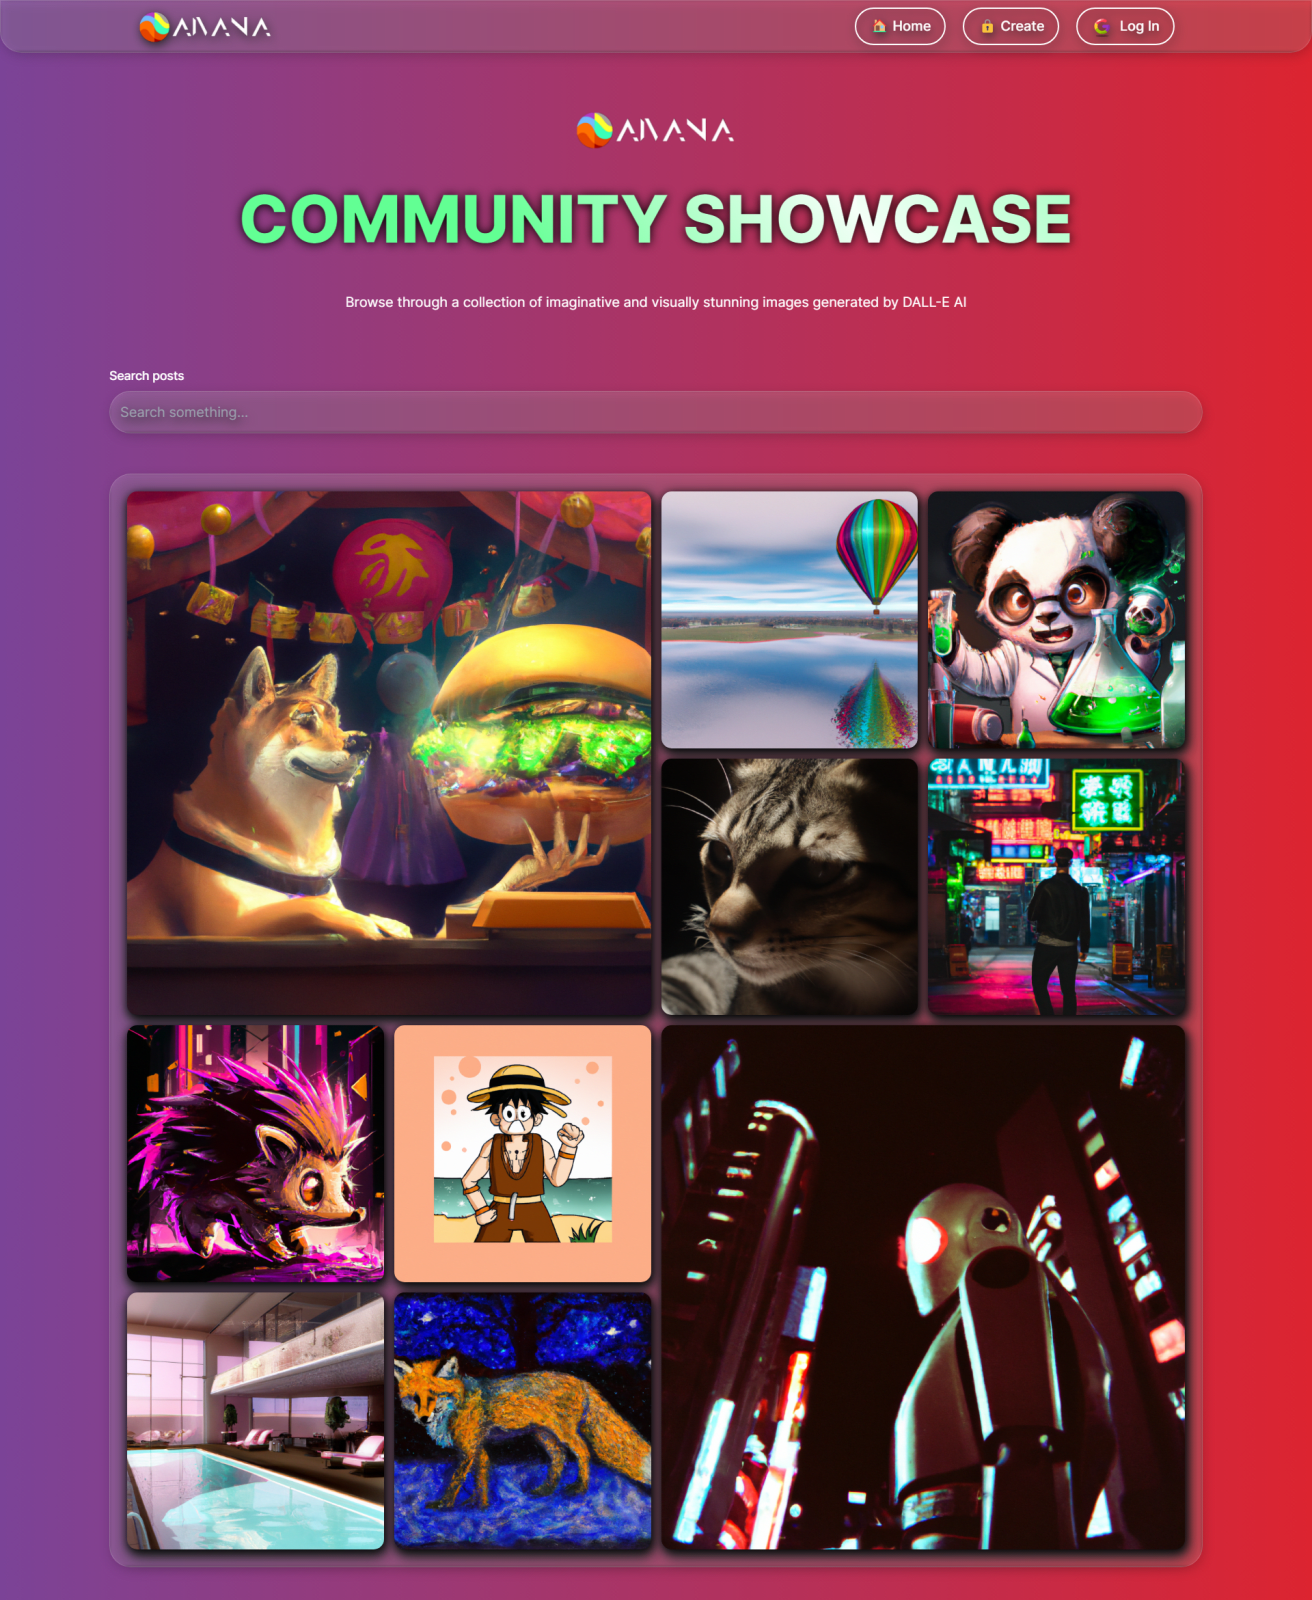
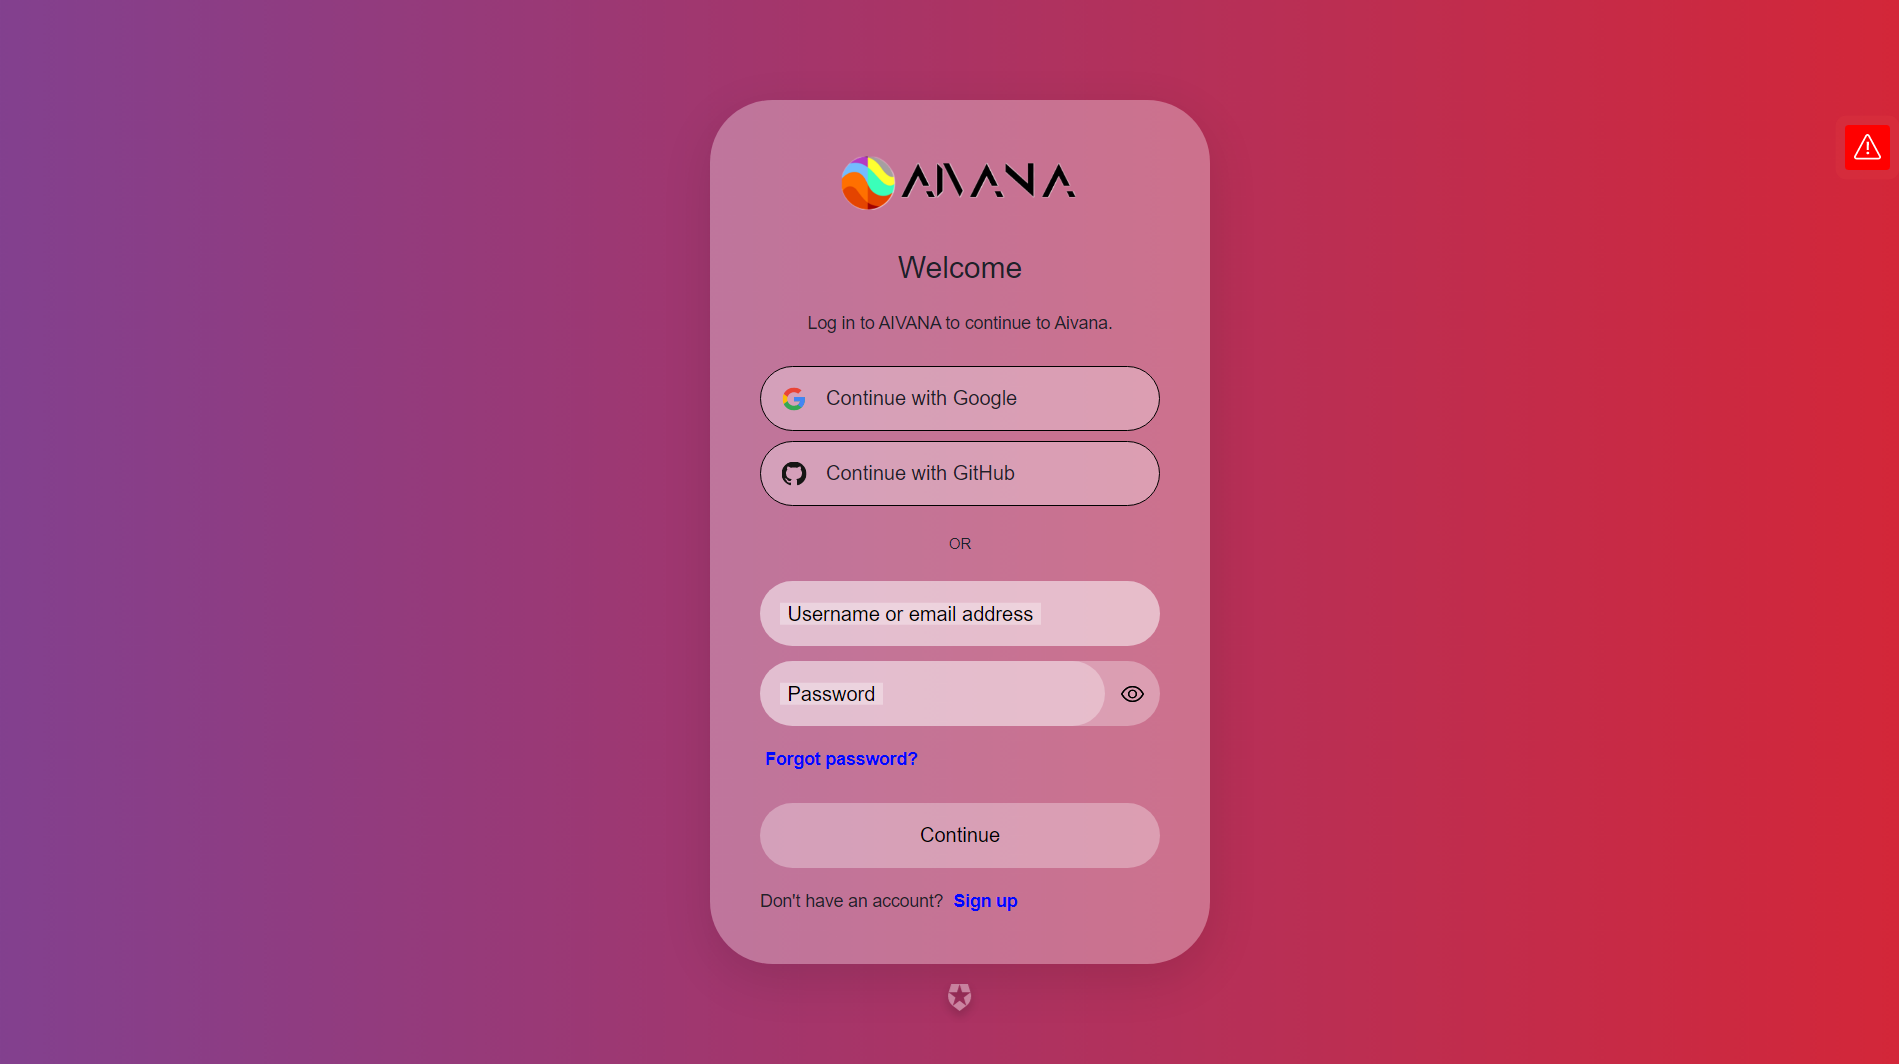
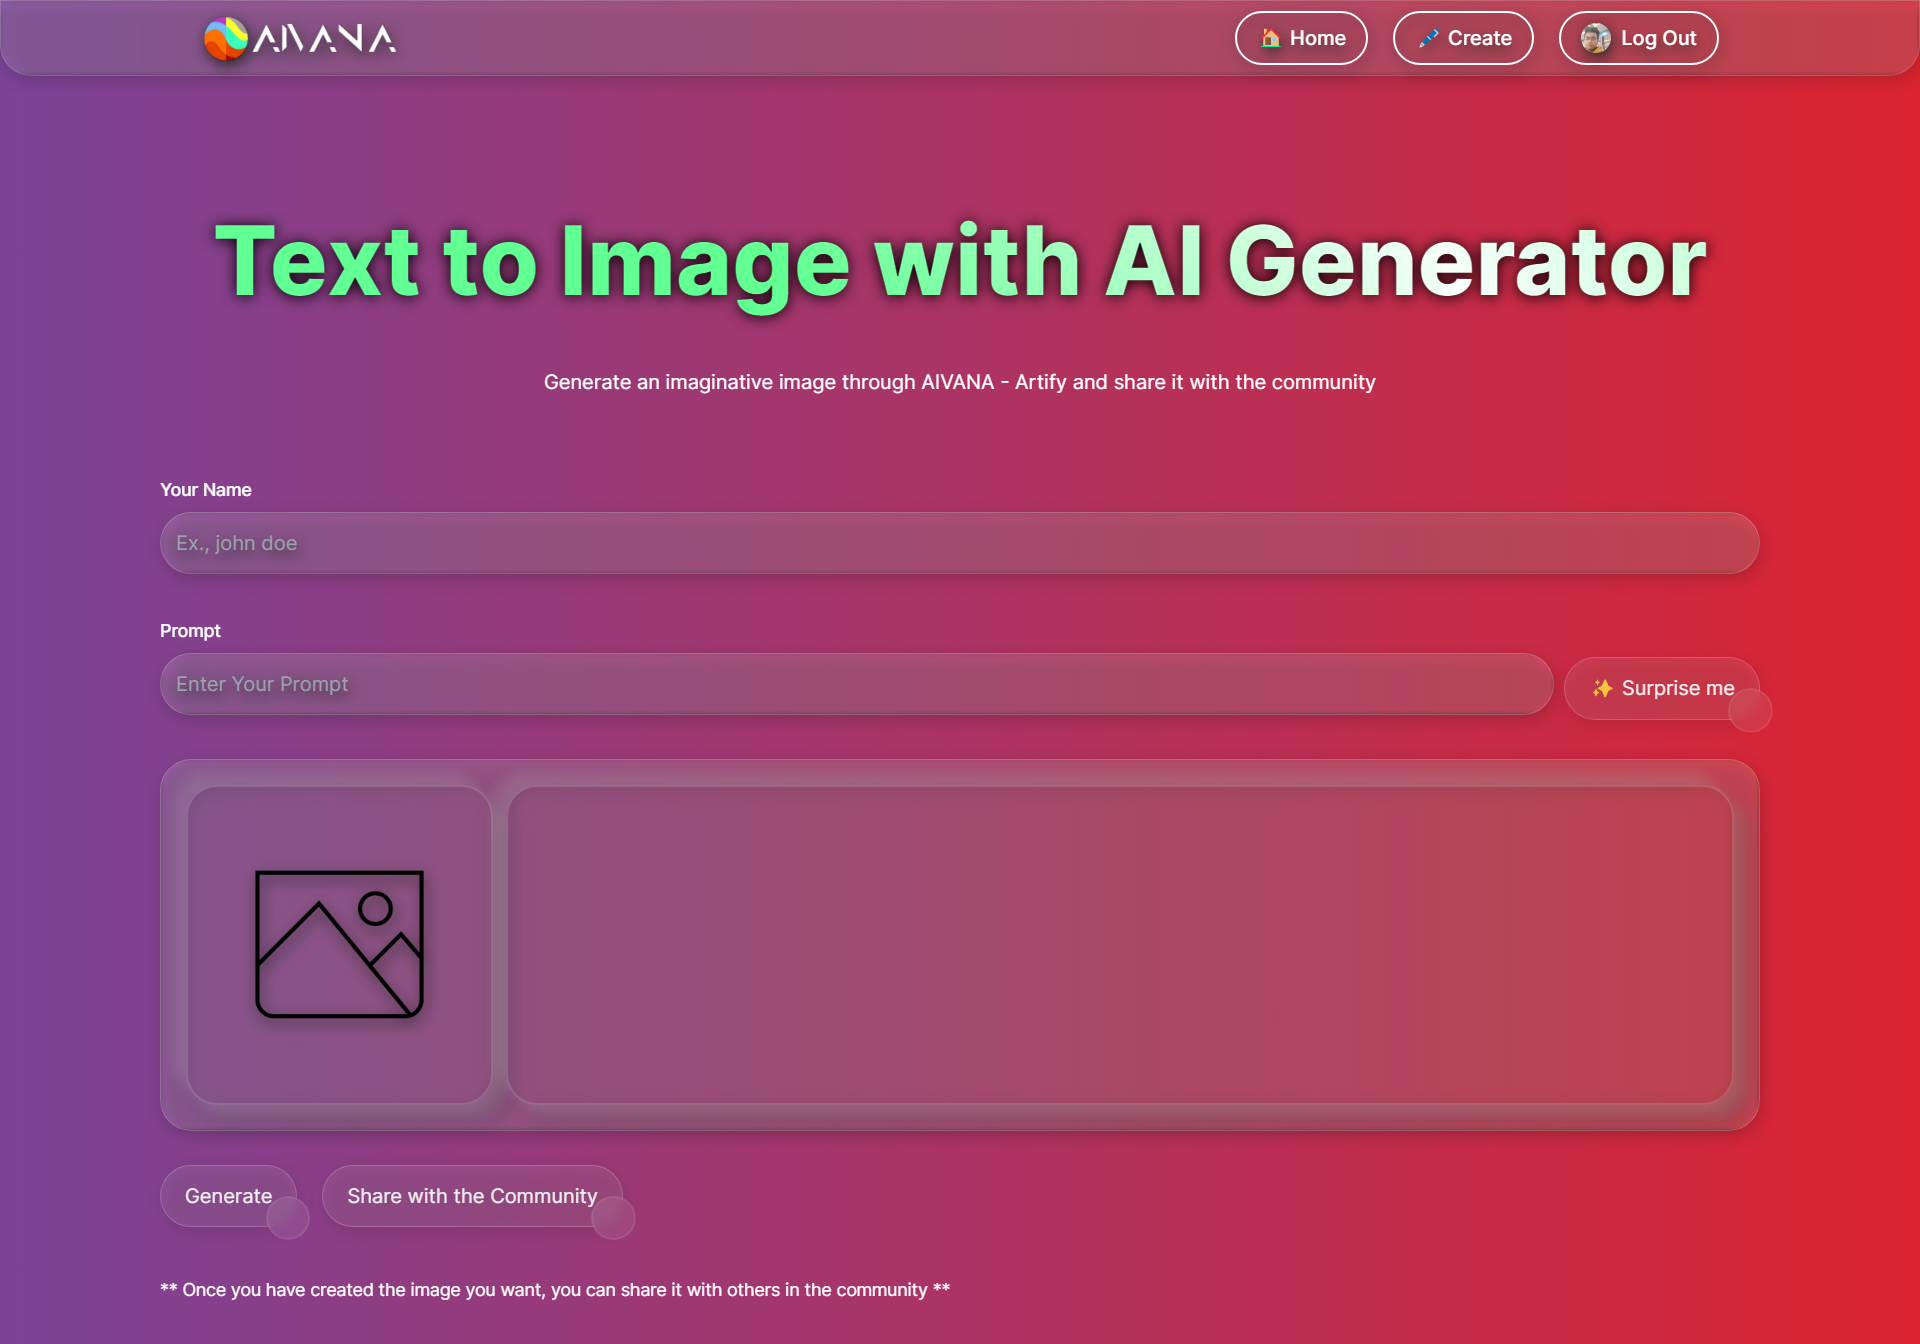
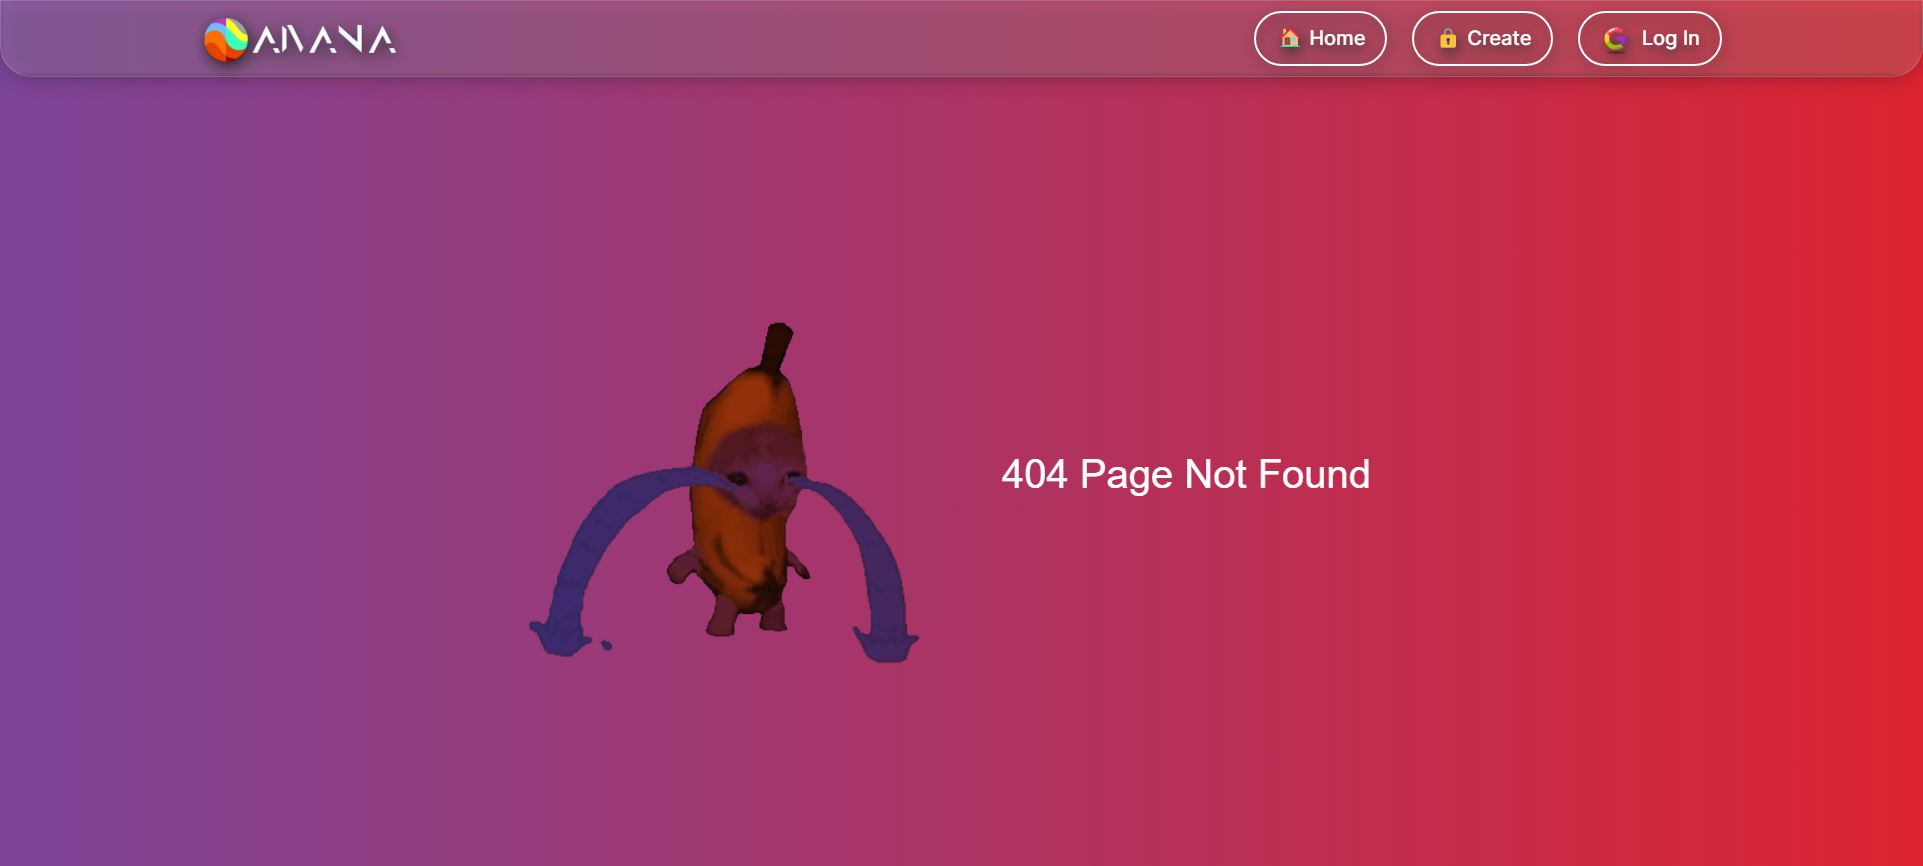
Screenshots
Home Page (you can access this page even without login)
Login Page
Create Page (only accessable after login)
404 Page (when you enter wrong url with the domain)
⚠️ Since Sozi 20.10, export features are integrated in the Sozi presentation editor.
Development of the standalone Sozi-export tool is halted and there is no plan
to do any maintenance work on it.
Export Sozi presentations to PDF, PPTX or video
This tool is separate from the Sozi presentation editor.
Install
The PDF exporter depends on pdfjam, a shell script for manipulating PDF files.
The video exporter is based on libav.
Users of Debian-based distributions can install the texlive-extra-utils and libav-tools packages.
sudo apt install texlive-extra-utils libav-tools
The Sozi export tool is available as an NPM package.
Install node.js 0.10 or later
(Linux users can use the NodeSource distributions),
then:
sudo npm install -g sozi-export
With NPM 5, the installation is known to fail with this message:
-W, --width <number> Page width (defaults to 29.7)
-H, --height <number> Page height (defaults to 21)
-r, --resolution <number> Pixels per width/height unit (defaults to 72)
-p, --paper <size> A LaTeX paper size (defaults to a4paper)
-P, --portrait Set the paper orientation to portrait (disabled by default)
-c, --png-compression <number>, Compression level of the generated PNG files (0 to 100, higher means smaller files, defaults to 100)
-i, --include <list> Frames to include (defaults to ‘all’)
-x, --exclude <list> Frames to exclude (defaults to ‘none’)
The width, height and resolution options specify the geometry of the browser window
where the presentation is rendered.
The paper and portrait options specify the page format to use in the final PDF document.
The include option is always applied before the exclude option.
Frames lists have the following syntax:
all selects all frames in the presentation.
none selects no frame.
A comma-separated list of frame numbers or ranges.
A range is in the form first:last or first:second:last where first, second and last are frame numbers.
For instance : -i 2,4:6,10:12:18 will include frames 2, 4, 5, 6, 10, 12, 14, 16, 18.
Convert a Sozi presentation to PPTX
sozi-to-pptx [options] presentation.sozi.html
Options:
-h, --help Usage information
-o, --output <file> Output file
-W, --width <number> Page width (defaults to 29.7)
-H, --height <number> Page height (defaults to 21)
-r, --resolution <number> Pixels per width/height unit (defaults to 72)
-c, --png-compression <number>, Compression level of the generated PNG files (0 to 100, higher means smaller files, defaults to 100)
-i, --include <list> Frames to include (defaults to ‘all’)
-x, --exclude <list> Frames to exclude (defaults to ‘none’)
The width, height and resolution options specify the geometry of the browser window
where the presentation is rendered.
The include option is always applied before the exclude option.
Frames lists have the following syntax:
all selects all frames in the presentation.
none selects no frame.
A comma-separated list of frame numbers or ranges.
A range is in the form first:last or first:second:last where first, second and last are frame numbers.
For instance : -i 2,4:6,10:12:18 will include frames 2, 4, 5, 6, 10, 12, 14, 16, 18.
Convert a Sozi presentation to video
sozi-to-video [options] presentation.sozi.html
Options:
-h, --help Usage information
-o, --output <file> Output video file, or target folder when exporting to a sequence of images
-i, --images Export as a sequence of PNG files instead of a single video file
-W, --width <number> Video width, in pixels (defaults to 1024)
-H, --height <number> Video height (defaults to 768)
-b, --bit-rate <number> Video bit rate (defaults to 2M)
-c, --png-compression <number>, Compression level of the generated PNG files (0 to 100, higher means smaller files, defaults to 100)
Known issues and limitations
This tool uses a headless web browser for rendering. PhantomJS and SlimerJS both have benefits and limitations:
PhantomJS can render a web page to a PDF document, which preserves the vector graphics and text.
However, PhantomJS 1.9.19 fails to render the SVG content of a Sozi presentation.
SlimerJS renders SVG content correctly but it does not support the PDF format.
Currently, the PDF and PPTX export tools render each frame to a PNG image and joins them into a single document.
Dac-Man: A framework to track, compare and analyze large scientific data changes
Dac-Man is a framework to enable tracking, comparing and analyzing changes
in large scientific data sets.
You can find the changes between two datasets using the command-line utility:
dacman diff <old datapath> <new datapath>
Features
Dac-Man is much more powerful than a simple diff utility.
It is extremely fast: it can retrieve changes from terabytes of data within seconds.
It can be used on desktops, as well as on large supercomputers.
It allows users to associate user-defined metadata for any dataset.
It is capable of identifying both file and data level changes.
It allows users to plugin their own scripts for richer change analysis.
It identifies changes between non-co-located datasets without the need for transferring the data, i.e., datasets need not be moved to a common location for comparison.
Documentation
Installation and usage instructions,
as well as commented examples illustrating Dac-Man’s features,
are available on Dac-Man’s documentation website.
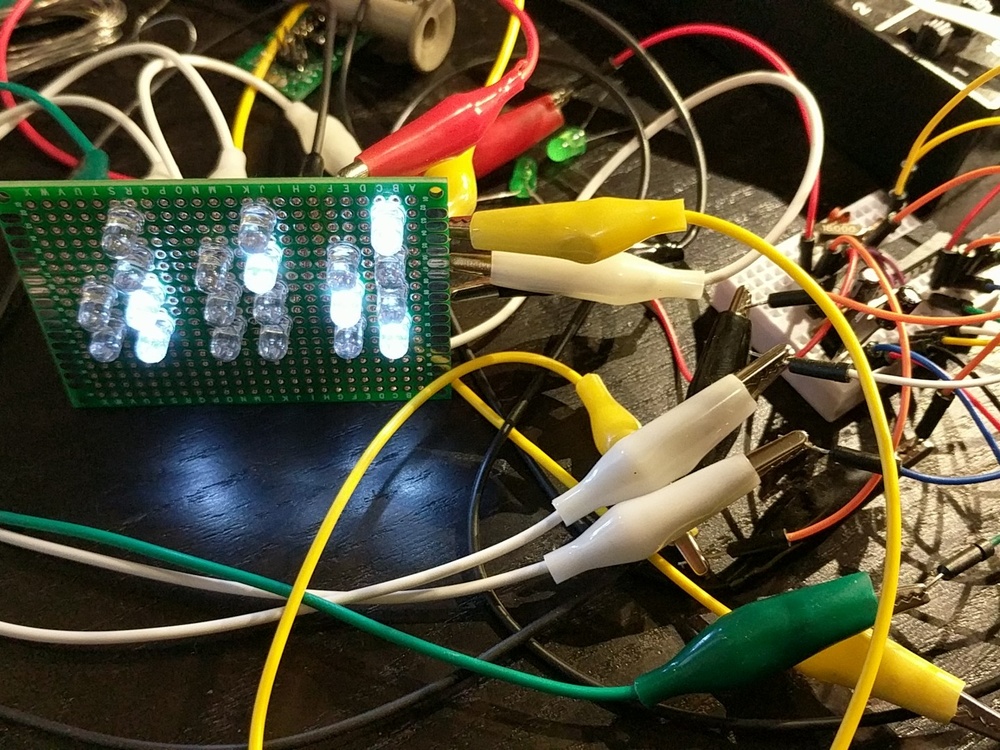
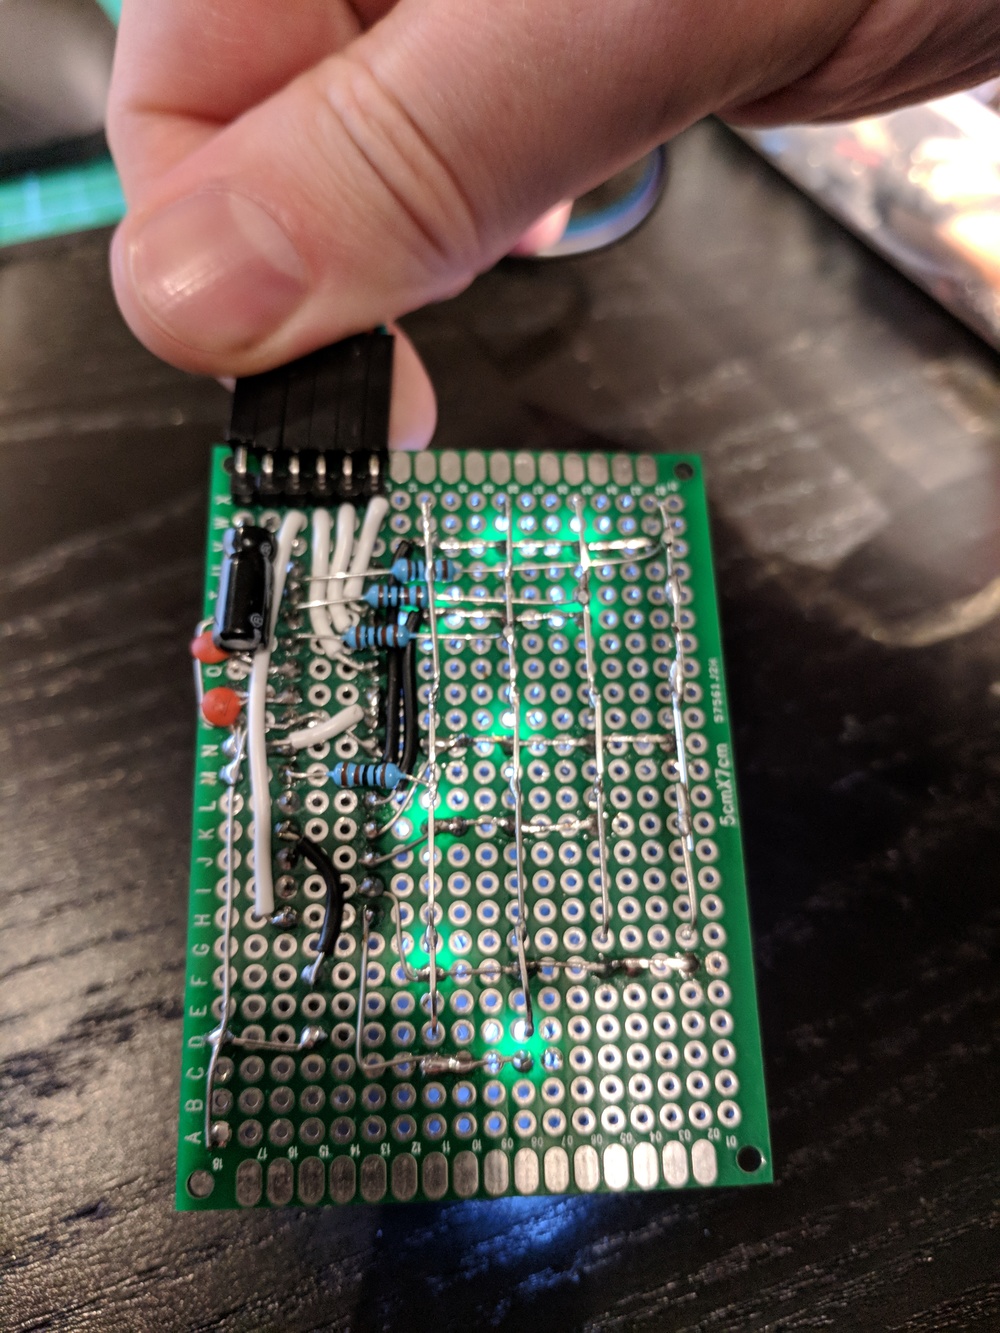
While in school I implemented a binary clock with a pic16f874 assembler and after playing a while with arduinos I wanted to replicate it with arduino.
Getting started
Finding information about avr assembler is not that easy so I decided to write down my journey of this project. The decision to start doing this came yesterday night 20.12.2017 and this might take a while 🙂
After quite a lot of googling I settled on Avra and avrdude combination
to my surprise ”’dnf install avra avrdude”’ on fedora worked nicely.
For editor I’ve been using vscode for a while, so somekind of asm higlight would be nice. Didn’t find anything good yet. Simulator would also be nice but it seems there arent that many options outside Atmel Studio, just found http://savannah.nongnu.org/projects/simulavr which might be worth looking into.
Started this repo, found out that attiny88 is not supported by avra, switched to attiny85 (might need to add a shift register into the mix…)
Added makefile and asm file that does nothing and got it “working”
Day2 (and 3)
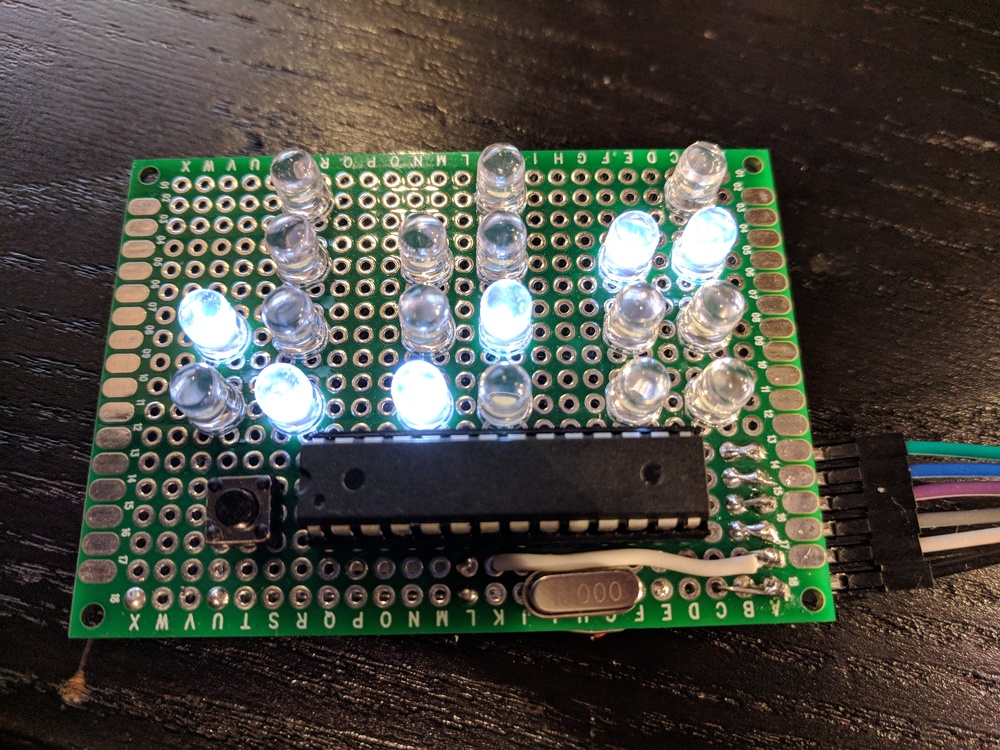
After fumbling around I decided to try atmel studio and switch to atmega328p (as I had those laying around). And after reading the datasheet too many times and trying various things I finally have a working prototype.
Day4 (and 5)
Debouncing a button with interrupts is a pita. switched to another debouncing scheme.
Also noticed that I didn’t save the sreg in the isr which caused random things to happen 🙂
But now its more or less ready 🙂
Day something
Cleaned up the code and commented it a bit more.
Also fixed avra builds and the makefile.
The clock has been running on my bench for few days and it seems to keep time quite well.
Final thoughs
After all of this what did I learn?
Select a tool that is well supported (and a chip you already have in stock 🙂
Thinking in bits takes a while to get used to again (its been a while)
Simulator is really nice when learning
The code is still kind of a mess and I bet it needs more documentation (wont probably understand it after few months)
This is a simple yet very fast word counter written in Rust.
The counter reads all text from a given file, counts all words,
and prints the number of occurrences for each word in alphabetical order.
All counting work is split across all CPU cores to count as quickly as possible,
and is done in a map/reduce-like manner.
Words contain any alpha numeric character, and are separated by any
non-alphanumeric character. Spaces, punctuation and so on are not counted.
The goal of this project is to show how powerful the Rust language can be with
minimal effort.
Benchmark
Here are some basic benchmarks with files from the samples
directory.
These benchmarks were done with the hyperfine tool,
each timing 10 runs.
# 511KB with 115478 words
hyperfine 'wrdcntr samples/book.txt --no-output'
# Time (mean ± σ):   10.4 ms ±  1.4 ms
# Range (min … max):  8.7 ms … 19.0 ms
# [User: 22.0 ms, System: 2.4 ms]

# 30MB with 7205401 words
hyperfine 'wrdcntr samples/many_books.txt --no-output'
# Time (mean ± σ):   344.6 ms ±   9.9 ms
# Range (min … max): 333.9 ms … 370.2 ms
# [User: 865.0 ms, System: 37.7 ms]

# 35KB with 7074 words
hyperfine 'wrdcntr LICENSE --no-output'
# Time (mean ± σ):   2.4 ms ±  1.0 ms
# Range (min … max): 1.3 ms … 12.5 ms
# [User: 3.2 ms, System: 1.2 ms]
# Note: possibly inaccurate, because timings were less than 5ms
These benchmarks were done on a machine running Linux with a
4-core i5-4670K @4.1Ghz CPU and 16GB RAM.
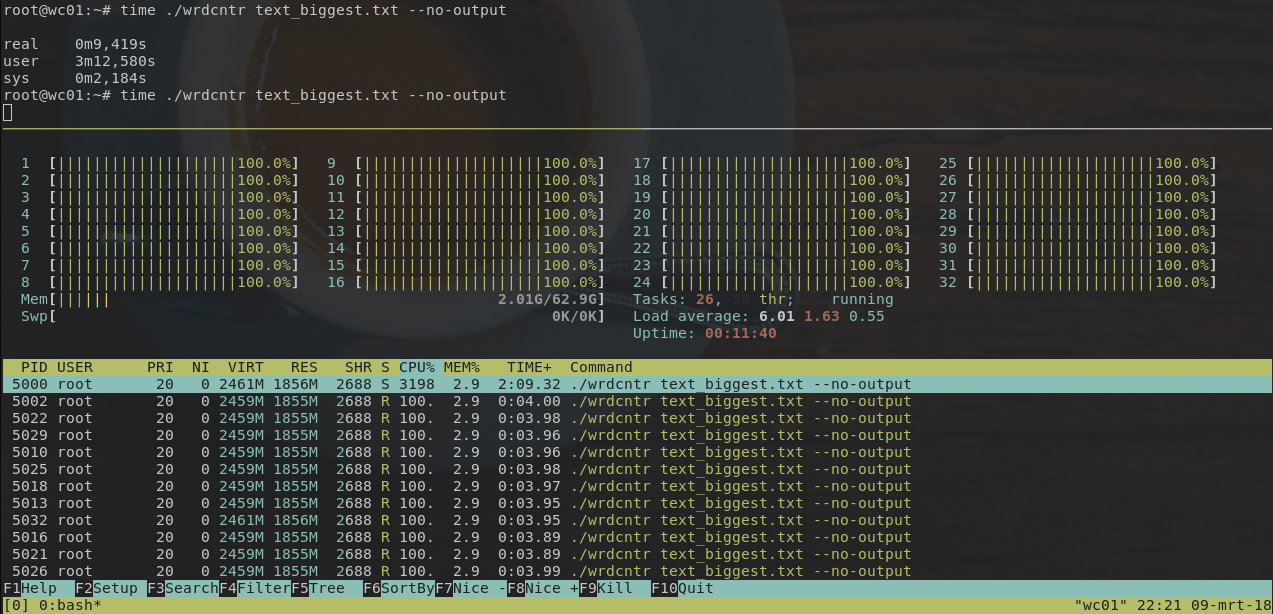
Counting files of 1GB is also fast, and nicely saturates all cores:
For installation, the project must be compiled from source.
Git and Rust cargo are required.
Install the latest version of Rust with rustup.
Then, clone and install wrdcntr with:
# Clone the project
git clone https://github.com/timvisee/wrdcntr.git
cd wrdcntr

# Install wrdcntr
cargo install -f

# Start using wrdcntr
wrdcntr --help

# or run it directly from Cargo
cargo run --release -- --help
Or just build and invoke the binary directly (Linux/macOS):
# Clone the project
git clone https://github.com/timvisee/wrdcntr.git
cd wrdcntr

# Build the project (release version)
cargo build --release

# Start using wrdcntr
./target/release/wrdcntr --help
License
This project is released under the GNU GPL-3.0 license.
Check out the LICENSE file for more information.
QWORD original;

void HOOKCALLBACK Detour(int arg1, int arg2) {
    printf("hooked\n");
    return reinterpet_cast<decltype(&Detour)>(original)(arg1, arg2);
}

bool status = CaveHook(0x123, &Detour, reinterpret_cast<LPVOID*>(&original));
if (!status) {
    fprintf(stderr, "%d\n", CaveLastError());
}
Enhanced example
QWORD original;

void HOOKCALLBACK Detour(int arg1, int arg2) {
    printf("hooked\n");
    return reinterpet_cast<decltype(&Detour)>(original)(arg1, arg2);
}

HOOK_DATA data{};
bool status = CaveHookEx(0x123, &Detour, reinterpret_cast<LPVOID*>(&original), &data);
if (!status) {
    fprintf(stderr, "%d\n", CaveLastError());
} else {
    printf("Hook placed at address=%p,detour=%p,trampoline=%p,prologue:", data.Target, data.Detour, data.Trampoline);
    for (SIZE_T i = 0; i < data.Prologue.Length; i++)
        printf("%02X ", data.Prologue.Buffer[i]);
    printf("\n");
}
How it works?
From my blog
Introduction
Who knows, what we need in this life.
Personally, I usually use hooks in my projects, but up to this point, I was using someone else’s library. That’s why I wanted to make my own library and share my experience to other people
Let’s go!
Theory
Hooks – A technology for intercepting someone else’s function in same process. They can be used for fixing bugs in old games or substitute information from calls.
Let’s imagine there is a function that we want to hook:
In order, to hook it, we just need to place jmp at the beginnning of it. It’s recommended that the hook be 5 bytes long.
Spoiler
But why? Based on my experience, after hooking the DX11 Present, Discord overlay calls from Present+5, which is brokes my old hook with 14 bytes long.
A jmp of 5 bytes in length is calculated relative to target function. It adds to destination address current rip + instruction size (5). Okay, adding it:
Done. The theory ends there. If no kidding, then this is really, in a sense, the end. And then I want to call the original function and that’s the start of shit.
Let’s figure out in order what our jmp has ruined:
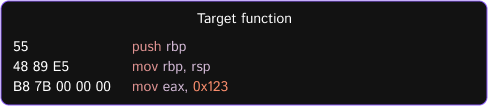
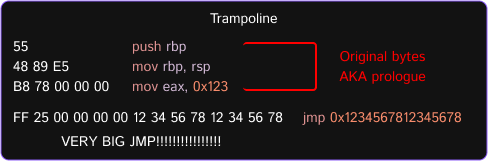
1. Prologue / Copy original bytes
As you can see, the prologue (first 5 bytes) have been removed. It breaks the function logic and we need to save the prologue. We can’t copy exactly 5 bytes, because next instruction can be bigger than 5 bytes.
If you don’t understand, see the pictures:
Explanation of 2 picture: We copied 2 instructions and piece of 3 instruction. Is it possible to copy just a piece? We will just have 1 byte lying around in memory, which will cause an error (access violation).
Therefore downloading a disassembler library (I do not recommend Zydis, because after disassembling my function it saw fit to clean uo the fuck knows that and give me an access violation) and disassembling the target function while prologue length is bigger whan 5 bytes of jmp.
(omg, I worded the sentence too badly, just see the code)
BYTE* FindPrologue(QWORD target, SIZE_T jmpLength, SIZE_T* resultLength) {
	SIZE_T prologueLength = 0;
	for (SIZE_T i = 0; i < count; i++) {
		if (prologueLength > jmpLength)
			break; // "while prologue length is bigger whan 5 bytes of jmp"

		prologueLength += instructions[i].size;
	}

	*resultLength = prologueLength;
	BYTE* prologue = new BYTE[prologueLength];
	memcpy(prologue, reinterpret_cast<LPCVOID>(address), prologueLength);

	return prologue;
}
2. Where insert original bytes?
Good question is, where do we insert these bytes? The answer to it is the name of this hook – Trampoline. We need to allocate the buffer, which is named Trampoline with size of copied bytes + size for jmp (hehehe, in trampoline I will use big jmp (14 bytes)). Do it!
I think this is the best chapter
But what is still wrong, why are you still getting access violation? I think if I hadn’t told you, you wouldn’t have guessed. And yes, until I downloaded the disassembler library and looked at what is actually hidden behind the beautiful code in x64dbg… JMP, MOV and etc IS NOT DIRECTIONAL
(Think I’m weird, but I didn’t know that)
Explanation: In x64dbg you see jmp 0x123 or mov rax, 0x456 but it encodes absolutally in a different way. jmp [rip+0x10]mov rax, rip + size + imm
And yes, you understand me correctly, they were calculated once and remained in place after copying them into the trampoline.
LET’S GOOOOOOOOOOOOO
voidRelocateInstructions(QWORD target, LPVOID trampoline, SIZE_T prologueLength) {
// disassemble trampoline with size of prologuefor (SIZE_T i = 0; i < count; i++) {
cs_insn instruction = instructions[i];
QWORD old = target + (reinterpret_cast<QWORD>(trampoline) - instruction.address);
for (BYTE j = 0; j < instruction.detail->x86.op_count; j++) {
cs_x86_op operand = instruction.detail->x86.operands[i];
if (operand.type == X86_OP_MEM && operand.mem.base == X86_REG_RIP) { // Rip relative addressing
LONGLONG displacement = operand.mem.disp;
QWORD calculatedValue = old + displacement + instruction.size;
DWORD result = static_cast<DWORD>(calculatedValue - instruction.address - instruction.size);
memcpy(reinterpret_cast<LPVOID>(instruction.address + 2), &result, sizeof(result));
} elseif ((instruction.bytes[0] & 0xFD) == 0xE9) {
QWORD destination = old + instruction.size + instruction.detail->x86.operands[0].imm; // destination stoles in operand with index 0
DWORD result = destination - (instruction.address + instruction.size * 2);
memcpy(reinterpret_cast<LPVOID>(instruction.address + 1), &result, sizeof(result));
}
}
}
}
Braindrop is a terminal-based client application for the raindrop.io
bookmarking service. It provides the ability to
manage and search your bookmarks in the terminal.
Braindrop is and generally always will be fairly opinionated about the
“best” way to make use of Raindrop (AKA how I like to use it); but where
possible I want to keep it quite general so it will be useful to anyone.
Note
Braindrop isn’t designed as a thin client for the Raindrop API; it isn’t a
terminal-based browser that does all the work on the server. It is
designed to download your data if it looks like it’s newer on the server,
and then work locally, sending updates back to the server.
If you have a huge Raindrop collection then this might not be the tool
for you.
The package is available via Homebrew. Use the following commands to install:
$ brew tap davep/homebrew
$ brew install braindrop
Once installed run the braindrop command.
Getting started
Braindrop only works if you have a raindrop.io
account; there is a perfectly usable free tier. If you don’t have an
account, go get one first.
To use Braindrop you will need an API access token. You can generate one in
your account settings, under Integrations. In Integrations:
Look for the For Developers section
Click on Create new app
Enter a name for the new app (call it Braindrop for example, so you know
what you’re using it for).
Accept the API use terms and guidelines and press Create
Click on the freshly-created application in the list
Near the bottom of the dialog that appears, click on Create test token
and say OK.
Copy the test token to your clipboard (or don’t worry if you misplace it,
you can always come back here to get it again).
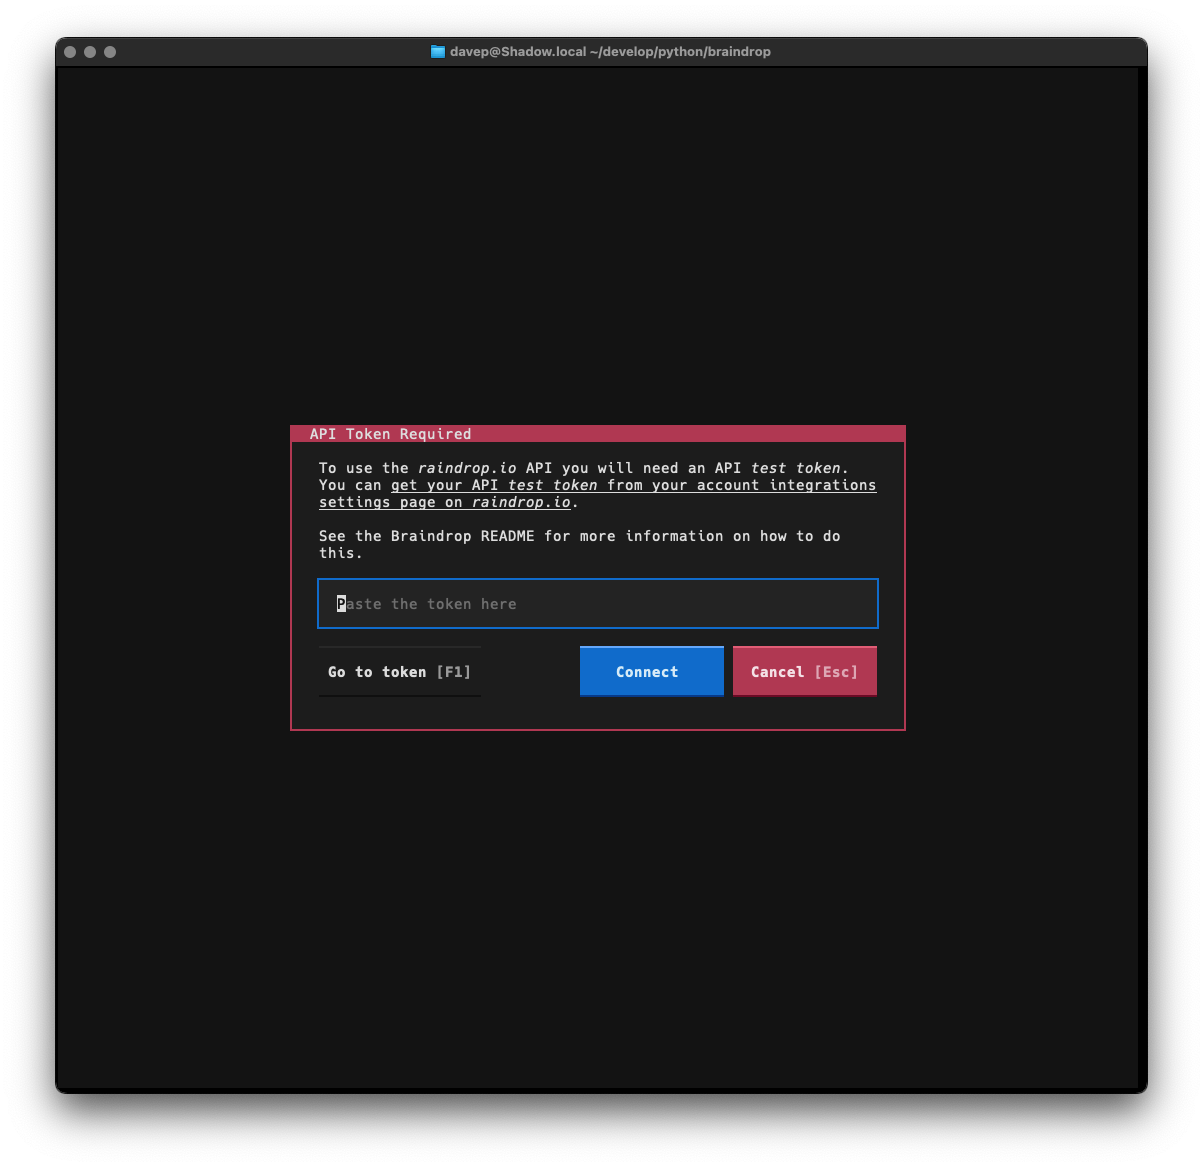
Having done the above, when you run up Braindrop the first time it will ask
for this token:
Paste the token into the input field and select Connect. Braindrop will
then download your data and you will be good to go.
NOTE: if it’s your preference, you can set the token in an environment
variable called BRAINDROP_API_TOKEN.
Using Braindrop
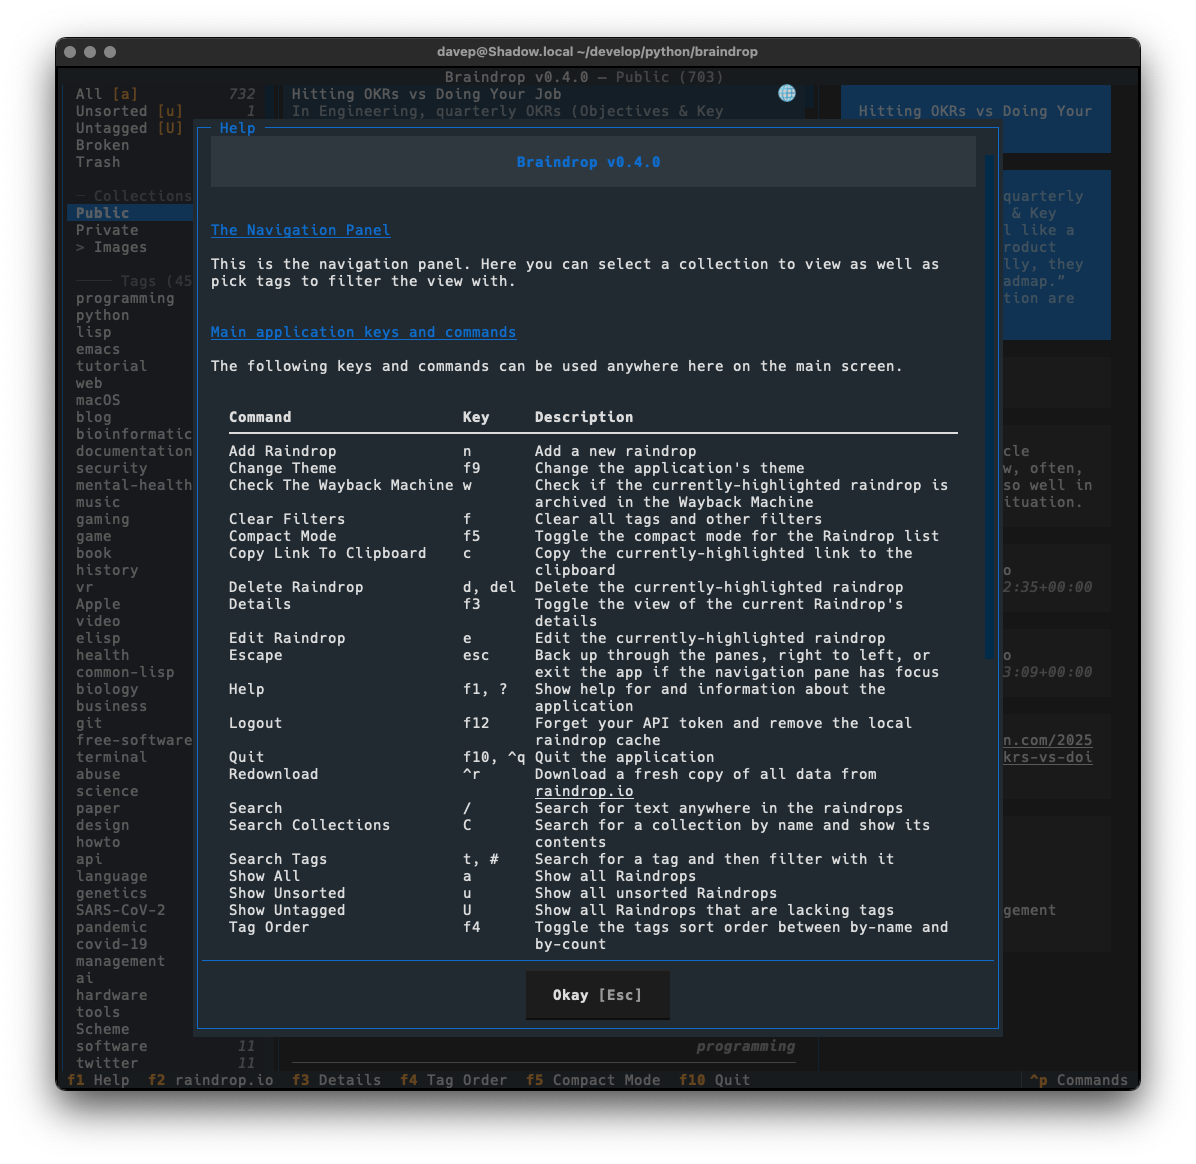
The best way to get to know Braindrop is to read the help screen, once in the
main application you can see this by pressing F1.
File locations
Braindrop stores files in a braindrop directory within both
$XDG_DATA_HOME and
$XDG_CONFIG_HOME.
If you wish to fully remove anything to do with Braindrop you will need to
remove those directories too.
Expanding for the common locations, the files normally created are:
~/.config/braindrop/configuration.json — The configuration file.
~/.local/share/braindrop/.token — The file that holds your API token.
~/.local/share/braindrop/raindrops.json — The locally-held Raindrop data.
🚀 Basic starter code for a fullstack app based on Prisma, Auth0, React, GraphQL & Apollo Client.
Goals
My idea of a possible authentication and authorization flow for Prisma’s Instagram (blog?) clone. I am not an expert and put together this repo as a learning exercise.
Basic Auth0 Console Knowledge — this demo is short on how to configure the Auth0 console, but even a novice Auth0 user should get it. I did! This is my first project using Auth0.
Getting started
# 1. Clone it
git clone git@github.com:LawJolla/prisma-auth0-example.git
# 2. Navigate into the foldercd prisma-auth0-example
#3 Install dependencies. NPM should work if not using yarn
yarn install
#4 Install server dependenciescd server
yarn install
#5 Make .env file
touch .env
#6 open .env in your editor of choice, e.g.
code .env
Make your prisma secret
PRISMA_SECRET=”myapp123″
#7 Deploy Prisma cluster
prisma deploy

#8 Copy HTTP endpoint from Prisma, e.g. https://us1.prisma.sh... or localhost...
.env file
Your .env now file now also needs the following:
PRISMA_ENDPOINT="YOUR_COPIED_ENDPOINT" # e.g. https://us1-prisma.sh...
AUTH0_DOMAIN="YOUR_AUTHO_DOMAN" # e.g. yourdomain.auth0.com
AUTH0_AUDIENCE="YOUR_API/AUDIENCE" # e.g. https://yourdomain.auth0.com/api/v2/
AUTH0_ISSUER="https://YOUR_AUTH0_DOMAIN" # e.g. https://yourdomain.auth0.com/
Your Auth0 console will provided the needed information above.
Make sure your audience is an API and not https://...auth0.com/userinfo. That will not return an access token. Only an API will.
#8 Start the server
yarn dev
#9 Configure your client Auth0 variablescd ..
cd src/auth
#10 Create an auth0-variables file
touch auth0-variables
#11 Edit auth0-variables.js in your favorite editor, e.g.
code auth0-variables
auth0-variables.js
Copy and paste the AUTH_CONFIG below, and fill in the variables, and save
export const AUTH_CONFIG = {
  api_audience: 'YOUR_API_AUDIENCE`, #same as above in server
  domain: 'YOUR_DOMAIN', // e.g. your-domain.auth0.com
  clientId: 'YOUR_CLIENT_ID', // e.g. string of characters from Auth0 for your API
  callbackUrl: "http://localhost:8000/callback" // make sure Auth0 has http://localhost:8000 as a callback url
}
#11 Start the client
yarn start

#12 Navigate to localhost:8000

#13 See what errors you get 🤣
#Directive Permissions
This demo uses the new-ish GraphQL directive permission pattern. Here’s a great video from Ryan Chenkie, a developer at Auth0, describing how it works.
Tl;dr: Simply decorate your fields / queries / mutations with directives, and let the directive resolvers handle the rest!
mind-fcl — An extension of the Flexible Collision Library
FCL was forked and a large part of the code has been rewritten. This library is the backbone for the manipulation planner of Mech-Mind Robotics and has been used in thousands of robot workstations that we have deployed.
New Features
Compared to the original FCL library, the main new features are:
a new incremental penetration distance algorithm described in this paper
a new implementation of the convex collision algorithms (GJK/EPA/MPR, in this subdir). The new EPA is 2x faster than libccd in the original FCL library
optional header-only integration, Eigen is the only dependency (libccd is no-longer required)
the support of new geometry shapes such as height map and tetrahedron mesh
re-write and performance optimization of traversal collision detection algorithms for bvh/octree/heightmap
better multi-threading support with a new broadphase AABB-tree and read-only narrowphase interface
Please make sure Eigen is installed on your system and can be found in the include path. After that, you can simply copy the /include directory (which contains fcl/fcl.h and others) to your own project. In this way, there is no binary library to link to.
Alternatively if you want to build a library, CMakeLists.txt can be used to generate makefiles in Linux or Visual studio projects in windows. In command line, run
mkdirbuildcdbuildcmake..
Next, in linux, use make to compile the code. In windows, there will generate a visual studio project and then you can compile the code.
Usage
The narrowphase interface fcl::collide is almost the same as the original FCL library. In some cases, it can be used as a drop-in replacement. Please refer to the document in the origial FCL.
For the broadphase, a new AABB tree inspired by JoltPhysics is implemented for better concurrency support. The test code might be a good starting point.
Design Decisions
We have learned a lot regarding collision detection from our experience of deploying of robot manipulators. A summary of several design decisions behind this library is here
Contact
If you find a bug or have a new feature request, please send me an email.
These Racket programs will download the SPDR ETF holdings XLS documents and insert the holding data into a PostgreSQL database.
The intended usage on Windows with Microsoft Excel is:
You will need to provide a database password for the transform-load-*.rkt programs. The available parameters are:
$ racket transform-load-csv.2019-11-02.rkt -h
racket transform-load-csv.2019-11-02.rkt [ <option> ... ]
where <option> is one of
-b <folder>, --base-folder <folder>: SPDR ETF Holdings base folder. Defaults to /var/local/spdr/etf-holdings
-c, --convert-xls : Convert XLS documents to CSV for handling. This requires libreoffice to be installed
-d <date>, --folder-date <date>: SPDR ETF Holdings folder date. Defaults to today
-n <name>, --db-name <name>: Database name. Defaults to 'local'
-p <password>, --db-pass <password>: Database password
-u <user>, --db-user <user>: Database user name. Defaults to 'user'
--help, -h : Show this help
-- : Do not treat any remaining argument as a switch (at this level)
Multiple single-letter switches can be combined after one `-`. For
example: `-h-` is the same as `-h --`
The provided schema.sql file shows the expected schema within the target PostgreSQL instance.
This process assumes you can write to a /var/local/spdr folder. This process also assumes you have loaded your database with NASDAQ symbol
file information. This data is provided by the nasdaq-symbols project.
Dependencies
It is recommended that you start with the standard Racket distribution. With that, you will need to install the following packages:
$ raco pkg install --skip-installed gregor http-easy tasks threading
Format and URL updates
On 2020-01-01, the URL for SPDR ETF documents changed; extract.2020-01-01.rkt uses this new location.
On 2019-11-02, columns were added to the SPDR ETF documents; transform-load.2019-11-02.rkt can process these new columns.