Blog

  • kotidien

    Kotidien

    Kotidien

    Kotidien est une application dédiée à la gestion de votre argent. Comptes bancaires, cartes de paiements autonomes, et portefeuille d’espèces. Totalement libre et gratuite, elle vous permets de tenir vos comptes d’une main de fer. Écrite en Python 3 et compatible Linux (intégration parfaite sous KDE via l’utilisation de QT 5.12), Microsoft Windows 7 et supérieurs, Mac OS 10.11 et supérieurs. Kotidien vous donne un accès permanent et en temps réel sur vos différents soldes, permets aussi d’automatiser l’écriture de vos transaction récurrentes, de pointer celles mises à jour sur votre interface bancaire, etc 
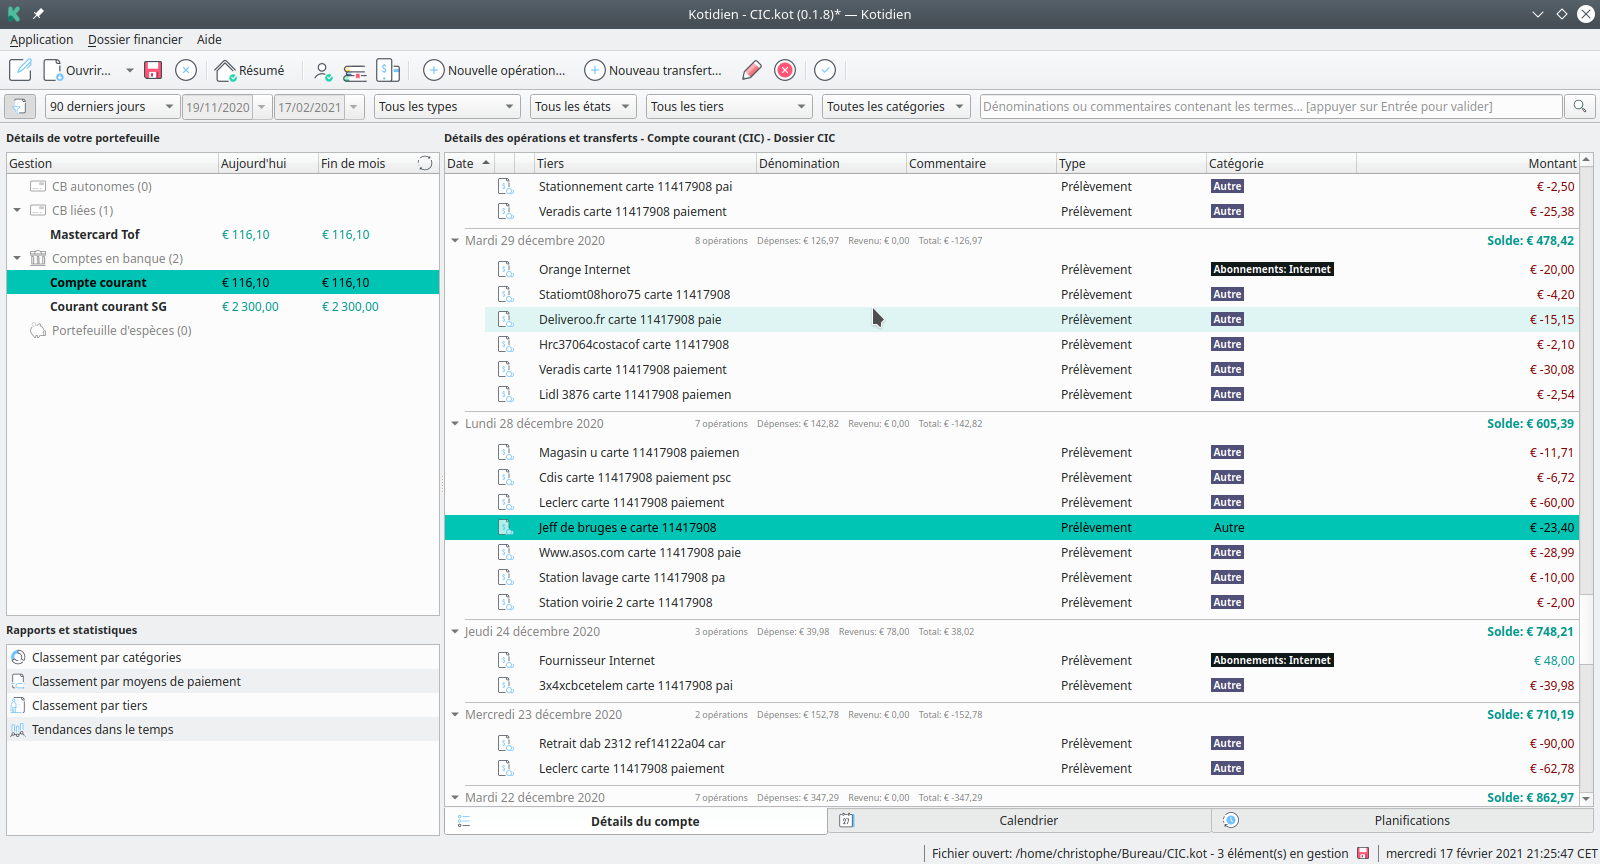
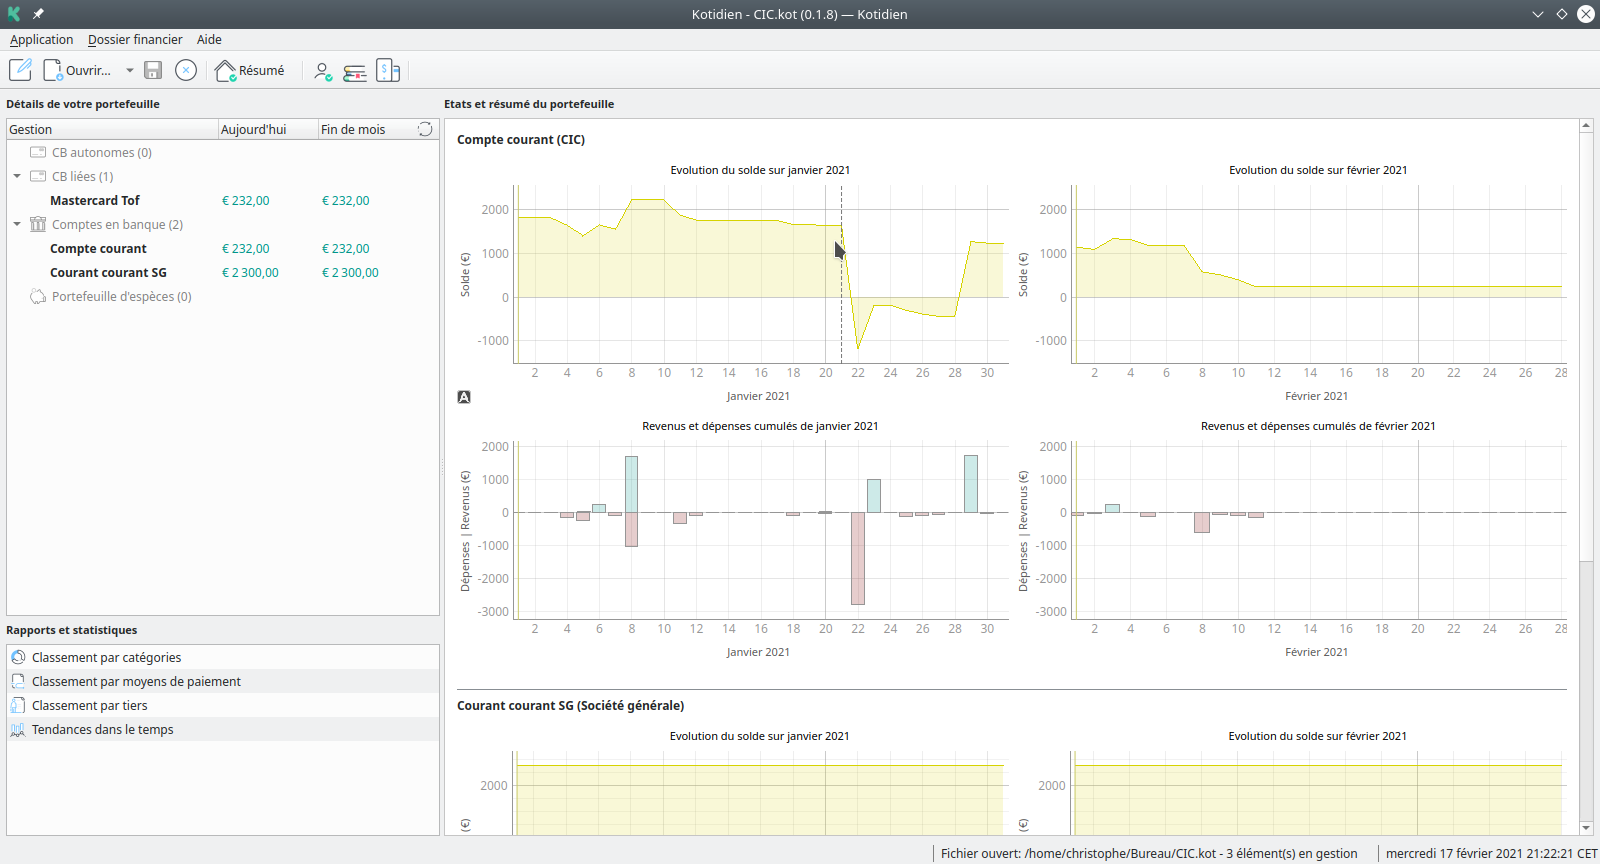
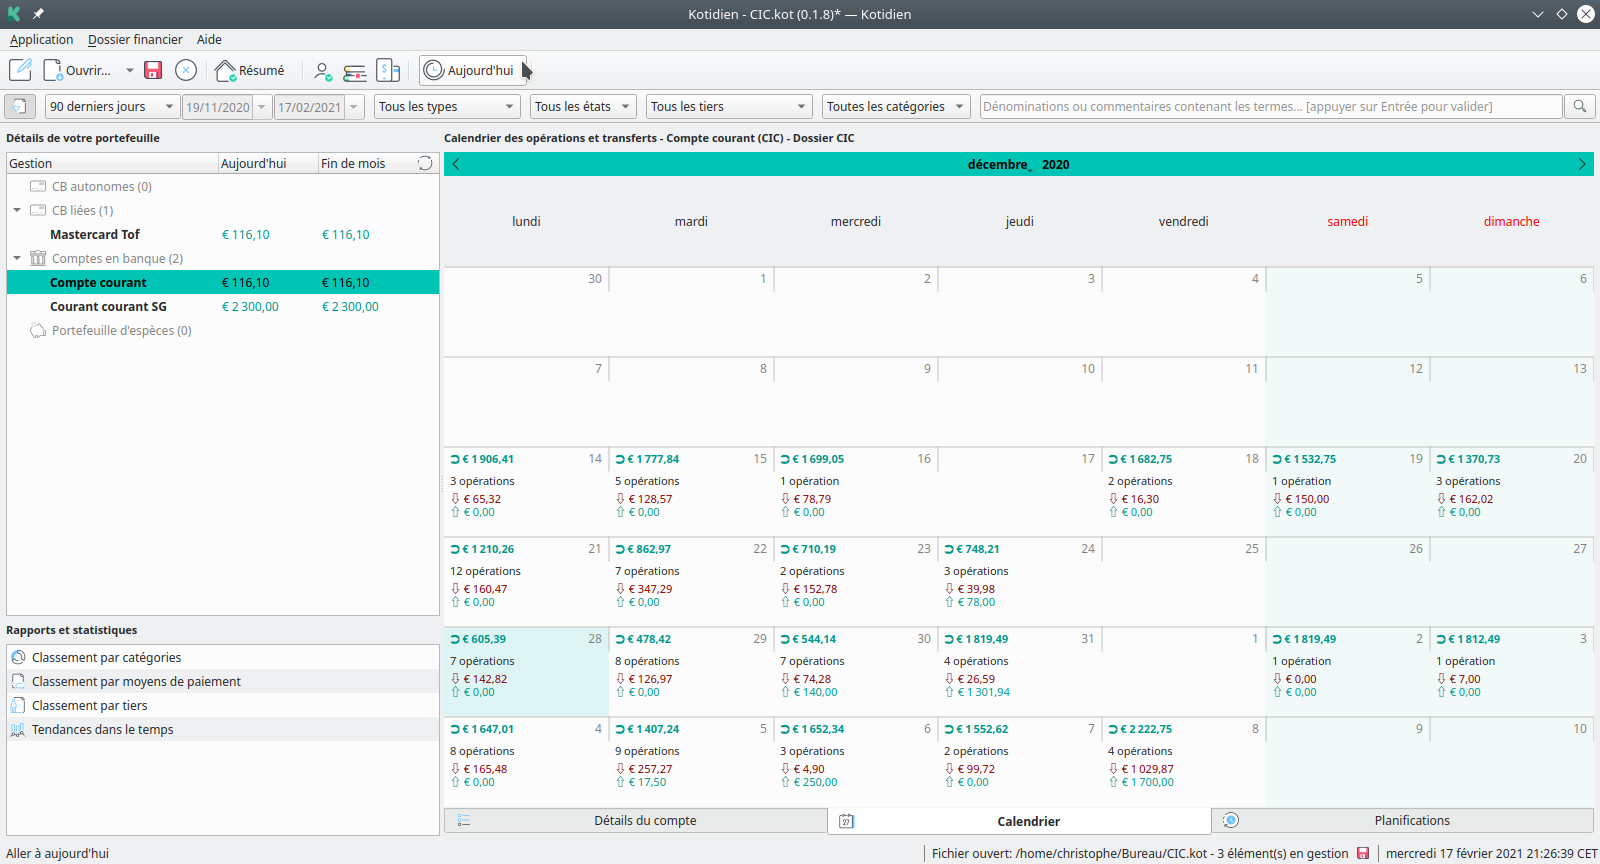
Agencées au jour le jour, supplantées par une vue calendrier, et synthétisées sur des graphiques clairs, toutes vos transactions sont réunies au sein de Kotidien. La complétion automatique des différentes informations permet une saisie plus rapide des données. Plusieurs languages vous sont proposés avec par défaut le Français.

    Points forts

    • Protection du dossier financier Kotidien par mot de passe
    • Copie de sauvegarde (.bak) automatique à chaque ouverture d’un dossier.
    • Facilement transportable, ne nécessite pas d’installation!
    • Assistant de création de dossiers financiers
    • Supporte les comptes en banques, cartes de paiements autonomes et – portefeuilles d’espèces.
    • Personnalisation des types de transactions (carte bancaire, virement, prélèvement, etc.)
    • Personnalisation des catégories et sous catégories
    • Personnalisation des tiers
    • Calcul automatique du solde du jour
    • Prévision automatique du solde “fin de mois”
    • Classement des transactions par jours
    • Anticipation du solde à date souhaitée
    • Possibilité d’ajouter titre, mémo et commentaire pour chaque transaction
    • Complétion automatique des données pour une écriture rapide des transactions
    • Gestion du découvert
    • Gestion des transferts entre comptes bancaires d’un même dossier Kotidien
    • Planification automatique de transactions avec répétitions programmables
    • Importation et exportation des données au format CVS programmable
    • Importation et exportation des données au format OFX compatible Money 98-2003
    • Résumé graphique des différentes évolutions de votre dossier financier
    • Statistiques graphiques complètes
    • Fichier d’aide disponible directement depuis l’application
    • Traduction de l’application en plusieurs langues. Français par défaut.
    • Possibilité de personnaliser l’apparence de Kotidien pour redistribuer l’application aux couleurs de votre système.
    • Incorporation facile par dossier ‘vendor’
    • Totalement libre et gratuit! Licence open-source GNU GPL v3
    • Écrite en Python, utilise QT. Supporte Windows , Linux et Mac OS.

    Kotidien - Liste des transactions

    Kotidien - Accueil et résumé

    Kotidien - Vue calendrier

    Installation et utilisation

    Compatibilité

    • Microsoft Windows 32bits / 64bits – (7, 8, 10)
    • Linux 64bits – (libc6 2.29+ > Ubuntu 19.04+, Debian 11+, Fedora 31+, openSUSE Tumbleweed+)

    Exécution

    Aucune installation n’est nécessaire. Décompressez l’archive dans le dossier de votre choix et exécutez le fichier Kotidien ou Kotidien.exe pour lancer l’application

    # linux
    $ chmod +x Kotidien
    $ ./Kotidien
    
    # windows
    > Kotidien.exe

    Important

    • Pour la version Linux, requiert libc6 2.29 ou supérieur (GLIBC_2.29+)

    Aide et utilisation

    un forum de discussion ainsi que des pages d’aides sont mis en place sur SourceForge.

    Rendez-vous sur Aide et Discussion

    Eléments externes

    Icones utilisées par l’application.

    Licence CC BY-ND 3.0

    pycountry provides the ISO databases for the standards:

    639-3 Languages 3166 Countries 3166-3 Deleted countries 3166-2 Subdivisions of countries 4217 Currencies 15924 Scripts The package includes a copy from Debian’s pkg-isocodes and makes the data accessible through a Python API.

    Translation files for the various strings are included as well.

    Licence GNU Lesser General Public License v2

    A simple currency module to:

    • Retrive various info about currency
    • Format currency price
    • Convert between currencies

    Licence BSD License

    PyQtGraph is a pure-python graphics and GUI library built on PyQt4/PyQt5/PySide/PySide2 and numpy.

    It is intended for use in mathematics / scientific / engineering applications. Despite being written entirely in python, the library is very fast due to its heavy leverage of numpy for number crunching, Qt’s GraphicsView framework for 2D display, and OpenGL for 3D display.

    Licence MIT

    fpdf2 is a minimalist PDF creation library for Python:

    It is a fork and the successor of PyFPDF. Compared with other PDF libraries, fpdf2 is simple, small and versatile, with advanced capabilities, and is easy to learn, extend and maintain.

    Licence GNU Lesser General Public License v3

    ofxtools is a Python library for working with Open Financial Exchange (OFX) data – the standard format for downloading financial information from banks and stockbrokers. OFX data is widely provided by financial institutions so that their customers can import transactions into financial management software such as Quicken, Microsoft Money, or GnuCash.

    If you want to download your transaction data outside of one of these programs – if you wish to develop a Python application to use this data – if you need to generate your own OFX-formatted data… ofxtools is for you!

    Licence MIT

    cryptography is a package which provides cryptographic recipes and primitives to Python developers. Our goal is for it to be your “cryptographic standard library”. It supports Python 3.6+ and PyPy3 7.2+.

    cryptography includes both high level recipes and low level interfaces to common cryptographic algorithms such as symmetric ciphers, message digests, and key derivation functions.

    Licence BSD License

    The dateutil module provides powerful extensions to the standard datetime module, available in Python.

    Licence BSD License

    Pure-Python bindings to glibc (based on ctypes).

    Licence GNU Lesser General Public License v3

    Six is a Python 2 and 3 compatibility library. It provides utility functions for smoothing over the differences between the Python versions with the goal of writing Python code that is compatible on both Python versions. See the documentation for more information on what is provided.

    Licence MIT

    A python (3.5+) module that wraps pdftoppm and pdftocairo to convert PDF to a PIL Image object.

    Licence MIT

    Easily download, build, install, upgrade, and uninstall Python packages.

    Licence MIT

    Python bindings for the Qt cross platform application toolkit.

    Licence GNU Lesser General Public License v3

    Informations

    Copyright (c)2020-2024 Christophe LEMOINE

    https://sourceforge.net/projects/kotidien/

    Date de création 05/11/2020

    Kotidien est sous licence libre et open-source GNU GPL v3. Cette licence vous permet de redistribuer, modifier et améliorer Kotidien à votre guise. Elle vous interdit de revendre l’application ou ce qu’elle contient. Toute modification, redistribution ou amélioration devra citer l’auteur original dans le respect de la licence.

    Licence de Kotidien

    GNU General Public License v3

    Contribuer / Compiler

    Utiliser un conteneur Docker. Tout terrain, simple et efficace.

    Benoit485 propose d’utiliser Docker pour compiler et lancer Kotidien sur votre machine sans vous soucier des versions de Python et des dépendances requises. Pratique non? 😉

    Pour ce faire, vous retrouverez toutes les instructions nécessaires dans son dépot dédié: Kotidien_docker

    Compiler manuellement. J’aime le cambouis, j’y mets les mains…

    1) Créer un environement virtuel

    $ pip3 install virtualenv
    $ python3 -m venv env
    $ source env/bin/activate

    2) Installer les dépendances

    $ pip3 install pycountry nh-currency pyqtgraph fpdf2 ofxtools cryptography python-dateutil glibc six pdf2image setuptools PyQt5

    3) Compiler les ressources

    $ cd code
    $ pyrcc5 resources.qrc -o resources.py

    4) [Facultatif] – Traduire et compiler les traductions

    # créé le catalogue
    $ lupdate * -ts fr_FR.ts -verbose
    # complète le catalogue avec le contenu des scripts Pythons
    $ pylupdate5 ./ui/*.py -ts fr_FR.ts -verbose
    # corrige certains accents
    $ python3 lupdate_ts_repair.py fr_FR.ts
    # compile le catalogue
    $ lrelease fr_FR.ts -qm fr_FR.qm -verbose

    5) Construire l’éxécutable avec ‘pyinstaller’

    # linux
    # installer pyinstaller
    $ pip3 install pyinstaller
    # freezer l'application
    $ pyinstaller --clean --distpath ../dist/Kotidien.linux --workpath ../build/linux -y Kotidien.spec
    
    # windows
    # installer pyinstaller
    > pip install pyinstaller
    # freezer l'application
    > pyinstaller.exe --clean --distpath ../dist/Kotidien.win --workpath ../build/win -y Kotidien.spec

    Fichiers de données

    appinfos.py

    Contient les informations relatives à l’application.

    globalsv.py

    Paramètres par défaut et données globales utilisées par l’application.

    Kotidien.spec / Kotidien.rc.tpl / Kotidien.rc

    Paramètres utilisés par pyinstaller.

    • Kotidien.spec : Fichier de configuration pour la compilation
    • *Kotidien.rc.tpl / Kotidien.rc : Fichier de configuration du manifest de l’exécutable pour Microsoft Windows

    resources.py / resources.qrc

    Liste des ressources utilisées dans l’application.

    datamodels.py

    Structure meme d’un portefeuille Kotidien. La base de toute l’application.

    Visit original content creator repository https://github.com/pantaflex44/kotidien
  • g10k

    Build Status Go Report Card

    g10k

    My r10k fork written in Go, designed to work somwhat similar like puppetlabs/r10k.

    Why fork?

    • Lack of caching/version-pre-checking in current r10k implementation hurt performance beyond a certain # of modules per Puppetfile
    • We need distinct SSHKeys for each source in the r10k.yaml and ‘rugged’ never really wanted to play nice (fixed in r10k 2.2.0)
    • Good excuse to try Go 😉

    Changes breaking complete r10k compatibility

    • No SVN support
    • Forge modules must be specified like this:
    mod 'theforeman/puppet'
    
    • Git modules must be specified like this:
    mod 'apache',
      :git => 'https://github.com/puppetlabs/puppetlabs-apache.git'
    

    Non-breaking changes to r10k

    • Download/Cache each git Puppet Module repository and each Puppetlabs Forge Puppet Module for each respective version only once
    • Most things (git, forge, and copy operations) done in parallel over each branch
    • Optional support for different ssh keys for each source inside the r10k.yaml

    Pseudo “benchmark”

    Using Puppetfile with 4 git repositories and 25 Forge modules https://github.com/xorpaul/g10k-environment/blob/benchmark/Puppetfile

    2016-10-14 w/o cache w/ cache
    r10k 1m14s,1m18s,1m12s 18s,17s,17s
    g10k 4.6s,5s,4.7s 1s,1s,1s

    Using go 1.7.1 and g10k commit 7524778 Using ruby 2.1.5+deb8u2 and r10k v2.4.3 On Dell PowerEdge R320 Intel Xeon E5-2430 24 GB RAM on Debian Jessie

    Benchmark w/o cache
    rm -rf /tmp/g10k ; GDIR=$RANDOM ; mkdir /tmp/$GDIR/ ; cd /tmp/$GDIR/ ; \
    wget https://raw.githubusercontent.com/xorpaul/g10k-environment/benchmark/Puppetfile ; \
    time g10k -puppetfile
    
    RDIR=$RANDOM ; mkdir /tmp/$RDIR/ ; cd /tmp/$RDIR/ ; \
    wget https://raw.githubusercontent.com/xorpaul/g10k-environment/benchmark/Puppetfile ; \
    time r10k puppetfile install
    
    Benchmark w/ cache
    cd /tmp/$GDIR/ ; time g10k -puppetfile
    cd /tmp/$RDIR/ ; time r10k puppetfile install
    

    installation

    You can just grab the most recent stable release here: https://github.com/xorpaul/g10k/releases

    • Before using g10k with a large Puppet setup with many modules, be sure to increase the amount of open file handles (nfiles) and number of child processes (nproc), see limits.conf(5) for details.
    • If you are using a private Git or Forge server think about adjusting the -maxworker parameter/config setting before DOSing your own infrastructure 😉 (default 50)
    • To protect your local machine use -maxextractworker parameter/config setting with wich you can limit the number of Goroutines that are allowed to run in parallel for local Git and Forge module extracting processes (git clone, untar and gunzip) (default 20)

    installation of g10k via Puppet module

    User @Conzar was so nice and shared his g10k Puppet module that you can check out here:

    Usage Docs

    Usage of ./g10k:
      -branch string
            which git branch of the Puppet environment to update. Just the branch name, e.g. master, qa, dev
      -cachedir string
            allows overriding of the g10k config file cachedir setting, the folder in which g10k will download git repositories and Forge modules
      -check4update
            only check if the is newer version of the Puppet module avaialable. Does implicitly set dryrun to true
      -checksum
            get the md5 check sum for each Puppetlabs Forge module and verify the integrity of the downloaded archive. Increases g10k run time!
      -clonegit
            populate the Puppet environment with a git clone of each git Puppet module. Helpful when developing locally with -puppetfile
      -config string
            which config file to use
      -debug
            log debug output, defaults to false
      -dryrun
            do not modify anything, just print what would be changed
      -environment string
            which Puppet environment to update. Source name inside the config + '_' + branch name, e.g. foo_master, foo_qa, foo_dev
      -force
            purge the Puppet environment directory and do a full sync
      -gitobjectsyntaxnotsupported
            if your git version is too old to support reference syntax like master^{object} use this setting to revert to the older syntax
      -info
            log info output, defaults to false
      -maxextractworker int
            how many Goroutines are allowed to run in parallel for local Git and Forge module extracting processes (git clone, untar and gunzip) (default 20)
      -maxworker int
            how many Goroutines are allowed to run in parallel for Git and Forge module resolving (default 50)
      -module string
            which module of the Puppet environment to update, e.g. stdlib
      -moduledir string
            allows overriding of Puppetfile specific moduledir setting, the folder in which Puppet modules will be extracted
      -outputname string
            overwrite the environment name if -branch is specified
      -puppetfile
            install all modules from Puppetfile in cwd
      -puppetfilelocation string
            which Puppetfile to use in -puppetfile mode (default "./Puppetfile")
      -quiet
            no output, defaults to false
      -retrygitcommands
            if g10k should purge the local repository and retry a failed git command (clone or remote update) instead of failing
      -tags
            to pull tags as well as branches
      -usecachefallback
            if g10k should try to use its cache for sources and modules instead of failing
      -usemove
            do not use hardlinks to populate your Puppet environments with Puppetlabs Forge modules. Instead uses simple move commands and purges the Forge cache directory after each run! (Useful for g10k runs inside a Docker container)
      -validate
            only validate given configuration and exit
      -verbose
            log verbose output, defaults to false
      -version
            show build time and version number
    

    Regarding anything usage/workflow you really can just use the great puppetlabs/r10k docs as the Puppetfile etc. are all intentionally kept unchanged.

    Using g10k behind a proxy

    Set the environment variables http_proxy or https_proxy to make g10k use a proxy. E.g. http_proxy=http://proxy.domain.tld:8080 ./g10k -puppetfile See https://golang.org/pkg/net/http/#ProxyFromEnvironment for details.

    additional Puppetfile features

    • link Git module branch to the current environment branch:
    mod 'awesomemodule',
        :git => 'http://github.com/foo/bar.git',
        :link => 'true'
    

    If you are in environment branch dev then g10k would try to check out this module with branch dev. This helps to be able to use the same Puppetfile over multiple environment branches and makes merges easier. See #6 for details.

    Now also supports the r10k setting name :branch => :control_branch See #73

    • only clone if branch/tag/commit exists
    mod 'awesomemodule',
        :git => 'http://github.com/foo/bar.git',
        :ignore-unreachable => 'true'
    

    In combination with the previous link feature you don’t need to keep all environment branches also available for your modules. See #9 for details.

    • use different Forge base URL for your modules in your Puppetfile
    forge.baseUrl http://foobar.domain.tld/
    
    • skip version checks for latest Forge modules for a certain time to speed up the sync
    forge.cacheTtl 4h
    

    You need to specify the TTL value in the form of golang Duration (https://golang.org/pkg/time/#ParseDuration)

    • try multiple Git branches for a Puppet module until one can be used
    mod 'stdlib',
        :git => 'https://github.com/puppetlabs/puppetlabs-stdlib.git',
        :fallback => '4.889.x|foobar|master'
    

    In this example g10k tries to use the branches:

    4.889.x -> foobar -> master

    Because there are no branches 4.889.x or foobar.

    All without failing or error messages.

    Tip: You can see which branch was used, when using the -verbose parameter:

    ./g10k -puppetfile -verbose
    2016/11/08 14:16:40 Executing git --git-dir ./tmp/https-__github.com_puppetlabs_puppetlabs-stdlib.git remote update --prune took 1.05001s
    2016/11/08 14:16:40 Executing git --git-dir ./tmp/https-__github.com_puppetlabs_puppetlabs-stdlib.git log -n1 --pretty=format:%H master took 0.00299s
    Synced ./Puppetfile with 4 git repositories and 0 Forge modules in 1.1s with git (1.1s sync, I/O 0.0s) and Forge (0.0s query+download, I/O 0.0s)
    

    Now also supports the r10k setting name :default_branch => 'master' See #73

    • additionl Git attribute :use_ssh_agent:

    Normally g10k adds the SSH key specified in the g10k config for each SSH+Git module in your Puppetfile. If you don’t want to use this SSH key, need a different key for a certain Git module or have the key encrypted in your SSH agent, then use this parameter to skip the ssh-add commands:

    mod 'example_module',
      :git => 'git@somehost.com/foo/example-module.git',
      :branch => 'foo',
      :use_ssh_agent => true
    

    See #171 for more details.

    • additional Forge attribute :sha256sum:

    For (some) increased security you can add a SHA256 sum for each Forge module, which g10k will verify after downloading the respective .tar.gz file:

    mod 'puppetlabs/ntp', '6.0.0', :sha256sum => 'a988a172a3edde6ac2a26d0e893faa88d37bc47465afc50d55225a036906c944'


    This does provide a very crude way to detect manipulated Forge modules and MITM attacks until the Puppetlabs Forge does support some sort of signing of Forge module releases.

    If the SHA256 sum does not match the expected hash sum, g10k will warn the user and retry a download until giving up:

    Resolving Forge modules (0/1)   --- [--------------------------------------------------------------------]   0%
    WARNING: calculated sha256sum a988a172a3edde6ac2a26d0e893faa88d37bc47465afc50d55225a036906c944 for ./tmp/puppetlabs-ntp-6.0.0.tar.gz does not match expected sha256sum a988a172a3edde6ac2a26d0e893faa88d37bc47465afc50d55225a036906c94
    2016/12/08 18:05:11 downloadForgeModule(): giving up for Puppet module puppetlabs-ntp version: 6.0.0


    (The Forge module retry count in case the Puppetlabs Forge provided MD5 sum, file archive size or SHA256 sum doesn’t match defaults to 1, but will be user configurable later.)

    • override g10k cache directory with environment variable

    You can use the following environment variable to make g10k use a different cache directory:

    g10k_cachedir=/var/tmp g10k ...
    

    This will also override the -cachedir parameter.

    additional g10k config features compared to r10k

    • you can enforce version numbers of Forge modules in your Puppetfiles instead of :latest or :present by adding force_forge_versions: true to the g10k config in the specific resource
    ---
    :cachedir: '/tmp/g10k'
    
    sources:
      example:
        remote: 'https://github.com/xorpaul/g10k-environment.git'
        basedir: '/tmp/example/'
        force_forge_versions: true
    

    If g10k then encounters :latest or :present for a Forge module it errors out with:

    2016/11/15 18:45:38 Error: Found present setting for forge module in /tmp/example/example_benchmark/Puppetfile for module puppetlabs/concat line: mod 'puppetlabs/concat' and force_forge_versions is set to true! Please specify a version (e.g. '2.3.0')
    
    • g10k can let you know if your source does not contain the branch you specified with the -branch parameter:
    ---
    :cachedir: '/tmp/g10k'
    
    sources:
      example:
        remote: 'https://github.com/xorpaul/g10k-environment.git'
        basedir: '/tmp/example/'
        warn_if_branch_is_missing: true
    

    If you then call g10k with this config file and the following parameter -branch nonExistingBranch. You should get:

    WARNING: Couldn't find specified branch 'nonExistingBranch' anywhere in source 'example' (https://github.com/xorpaul/g10k-environment.git)
    

    This can be helpful if you use a dedicated hiera repository/g10k source and you want to ensure that you always have a matching branch, see #45

    • By default g10k fails if one of your Puppet environments could not be completely populated (e.g. if one of your Puppet Git module branches doesn’t exist anymore). You can change this by setting ignore_unreachable_modules to true in your g10k config:
    ---
    :cachedir: '/tmp/g10k'
    ignore_unreachable_modules: true
    
    sources:
      example:
        remote: 'https://github.com/xorpaul/g10k-failing-env.git'
        basedir: '/tmp/failing/'
    

    If you then call g10k with this config file and debug verbosity level, you should get:

    DEBUG: Failed to populate module /tmp/failing/master/modules//sensu/ but ignore-unreachable is set. Continuing...
    

    See #57 for details.

    • abort g10k run if source repository is unreachable
    ---
    :cachedir: '/tmp/g10k'
    
    sources:
      example:
        remote: 'git://github.com/xorpaul/g10k-environment-unavailable.git'
        basedir: '/tmp/example/'
        exit_if_unreachable: true
    

    If you then call g10k with this config file. You should get:

    WARN: git repository git://github.com/xorpaul/g10k-environment-unavailable.git does not exist or is unreachable at this moment!
    WARNING: Could not resolve git repository in source 'example' (git://github.com/xorpaul/g10k-environment-unavailable.git)
    

    with an exit code 1

    • g10k can use the cached version of Forge and git modules if their sources are currently not available:
    ---
    :cachedir: '/tmp/g10k'
    use_cache_fallback: true
    
    sources:
      example:
        remote: 'git://github.com/xorpaul/g10k-environment-unavailable.git'
        basedir: '/tmp/example/'
    

    If you then call g10k with this config file and your github.com repository is unavailable your g10k run tries to find a suitable cached version of your modules:

    WARN: git repository https://github.com/puppetlabs/puppetlabs-firewall.git does not exist or is unreachable at this moment!
    WARN: Trying to use cache for https://github.com/puppetlabs/puppetlabs-firewall.git git repository
    

    if your g10k did manage to at least once cache this git repository.

    If there is no useable cache available your g10k run still fails.

    • You can let g10k retry to git clone or update the local repository if it failed before and was left in a corrupted state:
    ---
    :cachedir: '/tmp/g10k'
    retry_git_commands: true
    
    sources:
      example:
        remote: 'https://github.com/xorpaul/g10k-environment.git'
        basedir: '/tmp/example/'
    

    If you then call g10k with this config file and have a corrupted local Git repository, g10k deletes the local cache and retries the Git clone command once:

    WARN: git command failed: git --git-dir /tmp/g10k/modules/https-__github.com_puppetlabs_puppetlabs-firewall.git remote update --prune deleting local cached repository and retrying...
    

    See #76 for details.

    • Autocorrecting Puppet environment names

    Like in r10k for each source in your g10k config you can set the attribute invalid_branches with the following values:

    • correct_and_warn: Non-word characters will be replaced with underscores and a warning will be emitted.
    • correct: Non-word characters will silently be replaced with underscores.
    • error: Branches with non-word characters will be ignored and an error will be emitted.

    The default value is to leave the environment unchanged, which differs from the r10k default!

    Example:

    ---
    :cachedir: '/tmp/g10k'
    
    sources:
      example:
        remote: 'https://github.com/xorpaul/g10k-environment.git'
        basedir: '/tmp/example/'
        invalid_branches: 'correct'
    

    If you then call g10k with this config file and have a branch named something like single_autocorrect-%-fooo it will be renamed to single_autocorrect___fooo

    See #81 for details.

    • Support for older Git versions, like on CentOS 6

    To check for really existing objects, g10k uses master^{object} syntax, which is not supported in older Git versions, like on CentOS 6, see #91 g10k will skip this sanity check when the g10k config setting git_object_syntax_not_supported is set to true (defaults to false) Example:

    ---
    :cachedir: '/tmp/g10k'
    git_object_syntax_not_supported: true
    
    sources:
      example:
        remote: 'https://github.com/xorpaul/g10k-environment.git'
        basedir: '/tmp/example/'
    
    • Added support for r10k-like purge behaviour of stale content

    Starting with v.0.9.0 g10k supports the r10k-like purge behaviour of stale content with the different configuration settings purge_level and purge_allowlist as documented here for purge_levels and here for purge_allowlist

    Please check if you need to allowlist files/folders inside your Puppet environments!

    As an additional setting, you can also allowlist Puppet environments with deployment_purge_allowlist, that would’ve been purged by the deployment purge_level. This can be helpful if you have a similar source name or prefix set. E.g. having a source called foobar and another one foobar_hiera would have purged all foobar_hiera_* branches if there are not branches called hiera_master or similar in the foobar source.

    Example:

    ---
    deploy:
      purge_levels: ['deployment', 'puppetfile', 'environment']
      purge_allowlist: [ '.latest_revision', '.resource_types', 'resource_types/*.pp', '**/*.pp'. ]
      deployment_purge_allowlist: [ 'example_hiera_*', '.resource_types' ]
    
    sources:
      example:
        remote: 'https://github.com/xorpaul/g10k-environment.git'
        basedir: '/tmp/out/'
        prefix: true
      example_hiera:
        remote: 'https://github.com/xorpaul/g10k-hiera.git'
        basedir: '/tmp/out/'
        prefix: true
    

    Starting with v.0.7.1 g10k supports purge_skiplist feature to remove unnecessary files from the sync / Puppetservers.

    Example:

    ---
    deploy:
      purge_skiplist: [ 'spec', 'readmes', 'examples', '*.markdown', '*.md', 'junit', 'docs' ]
    
    sources:
      example:
        remote: 'https://github.com/xorpaul/g10k-environment.git'
        prefix: true
        basedir: './example/'
    

    Starting with v.0.8.12 g10k supports filtering branches via regex or an external script:

    Example using external script:

    ---
    sources:
      example:
        remote: 'https://github.com/xorpaul/g10k-environment.git'
        basedir: './example/'
        filter_command: 'tests/branch_filter_command.sh $R10K_BRANCH ^(single|master)$'
    

    or via regex

    ---
    sources:
      example:
        remote: 'https://github.com/xorpaul/g10k-environment.git'
        basedir: './example/'
        filter_regex: '^(single|master)$'
    

    See #166 for the discussion and #167 for the merge request.

    building

    # only initially needed to resolve all dependencies
    go get
    # actually compiling the binary with the current date as build time
    BUILDTIME=$(date -u '+%Y-%m-%d_%H:%M:%S') && go build -ldflags "-s -w -X main.buildtime=$BUILDTIME"
    

    execute example with debug output

    ./g10k -debug -config test.yaml
    
    Visit original content creator repository https://github.com/xorpaul/g10k
  • mispex

    MISP

    A wrapper around MISP’s HTTP API to provide native interaction.

    Build Status

    Installation

    If available in Hex, the package can be installed by adding mispex to your list of dependencies in mix.exs:

    def deps do
      [
        {:mispex, "~> 0.1.8"}
      ]
    end

    Configuration

    In your application config, add a block of the format

    config :mispex,
      url: "https://misp.local",
      apikey: "myapikey"

    Usage

    See the full documentation for full reference, but here are a few common usage examples

    Documentation can also be generated with ExDoc

    All functions that call the API in any way return a tuple of the format:

    {:ok, value}
    {:error, reason}

    To indicate whether the API call was successful or not.

    For example

    iex> MISP.Event.create(%MISP.EventInfo{info: "my event"})
    {:ok,
     %MISP.Event{
     }
    }
    
    iex> MISP.Event.create(%MISP.EventInfo{})
    {:error, "Event.info: Info cannot be empty."}

    Create an event

    {:ok, my_event} = %MISP.EventInfo{info: "my event"} |> MISP.Event.create()

    Retrive an event

    {:ok, my_event} = MISP.Event.get(15)

    Update an event

    {:ok, my_event} = MISP.Event.get(17)
    
    {:ok, my_updated_event} = 
      my_event
      |> put_in([:Event, :info], "my new info field")
      |> MISP.Event.update()

    Add an attribute

    {:ok, my_event} = MISP.Event.get(17)
    
    {:ok, updated_event} =
      my_event
      |> MISP.Event.add_attribute(%MISP.Attribute{value: "8.8.8.8", type: "ip-dst"})
      |> MISP.Event.update()

    Tag an event

    {:ok, my_event} = MISP.Event.get(17)
    
    {:ok, tagged_event} = 
      my_event
      |> MISP.Event.add_tag(%MISP.Tag{name: "my tag"})
      |> MISP.Event.update()

    Tag an attribute

    {:ok, matching} = MISP.Attribute.search(%{value: "8.8.8.8"})
    
    {:ok, updated_attr} =
      matching
      |> List.first() 
      |> MISP.Attribute.add_tag(%MISP.Tag{name: "my tag"})
      |> MISP.Attribute.update()

    Create an event with attributes and tags already applied

    %MISP.EventInfo{
        info: "my event",
        Attribute: [
            %MISP.Attribute{
                value: "8.8.8.8",
                type: "ip-dst",
                Tag: [
                    %MISP.Tag{name: "my attribute-level tag"}
                ]
            }
        ],
        Tag: [
            %MISP.Tag{name: "my event-level tag"}
        ]
    } |> MISP.Event.create()
    Visit original content creator repository https://github.com/FloatingGhost/mispex
  • moji

    About

    A file-like MogileFS client for Java.

    Start using

    You can obtain Moji from Maven Central:

    Maven Central GitHub license Javadocs

    Features

    • java.io.File like API
    • Supports writing streams of unknown length
    • Unit/Integration tests
    • Spring friendly
    • Tracker connection pooling with balancing between hosts and strategies for dealing with failed nodes
    • Local file system implementation for faking in tests (fm.last.moji.local.LocalFileSystemMoji)

    Configuration

    Using plain-old-Java

        SpringMojiBean moji = new SpringMojiBean();
        moji.setAddressesCsv("192.168.0.1:7001,192.168.0.2:7001");
        moji.setDomain("testdomain");
        moji.initialise();
        moji.setTestOnBorrow(true);
    

    Using the Spring framework

    Set some properties for your context:

        moji.tracker.address=192.168.0.1:7001,192.168.0.2:7001
        moji.domain=testdomain
    

    Import the Moji Spring context:

        <import resource="moji-context.xml" />
    

    Or create a Moji spring bean:

        <bean id="moji" class="fm.last.moji.spring.SpringMojiBean">
          <property name="addressesCsv" value="${moji.tracker.address}" />
          <property name="domain" value="${moji.domain}" />
          <property name="maxActive" value="${moji.pool.max.active:100}" />
          <property name="maxIdle" value="${moji.pool.max.idle:10}" />
          <property name="testOnBorrow" value="${moji.pool.test.on.borrow:true}" />
        </bean>
    

    Usage

    Create/update a remote file

        MojiFile rickRoll = moji.getFile("rick-astley");
        moji.copyToMogile(new File("never-gonna-give-you-up.mp3"), rickRoll);
    

    Or in a given storage class:

        MojiFile rickRoll = moji.getFile("rick-astley", "music-meme");
    

    Get the remote file size

        long length = rickRoll.length();
    

    Rename the remote file

        rickRoll.rename("stairway-to-heaven");
    

    Check the existence of a remote file

        MojiFile abba = moji.getFile("voulez-vous");
        if (abba.exists()) {
          ...
    

    Delete the remote file

        abba.delete();
    

    Download a remote file

        MojiFile fooFighters = moji.getFile("stacked-actors");
        fooFighters.copyToFile(new File("foo-fighters.mp3"));
    

    Modify the storage class of a remote file

        fooFighters.modifyStorageClass("awesome");
    

    Stream from a remote file

        InputStream stream = null;
        try {
          stream = fooFighters.getInputStream();
          // Do something streamy
          //   stream.read();
        } finally {
          stream.close();
        }
    

    Stream to a remote file

    This will either create a new file or overwrite an existing file’s contents

        OutputStream stream = null;
        try {
          stream = fooFighters.getOutputStream();
          // Do something streamy
          //   stream.write(...);
          stream.flush();
        } finally {
          stream.close();
        }
    

    List remote files by prefix

        List<MojiFile> files = moji.list("abba-");
        for(MojiFile file : files) {
          // abba-waterloo, abba-voulez-vous, abba-fernado, etc.
        }
    

    Impose a limit on the number of items returned:

        List<MojiFile> files = moji.list("abba-", 10);
        for(MojiFile file : files) {
          // abba-waterloo, abba-voulez-vous, abba-fernado, etc. - maximum of 10
        }
    

    Get the locations of a remote file

        File fooFighters = moji.getFile("in-your-honour"); 
        List<URL> paths = fooFighters.getPaths();
        // http://192.168.0.2:7500/dev2/0/000/000/0000000819.fid, http://192.168.0.4:7500/dev3/0/000/000/0000000819.fid, etc
    

    Get the attributes of a remote file

    Note: this is only supported on more recent versions of MogileFS.

        File fooFighters = moji.getFile("in-your-honour"); 
        MojiFileAttributes attributes = fooFighters.getAttibutes();
        
        String storageClass = attributes.getStorageClass();
        int deviceCount = attributes.getDeviceCount();
        int fid = attributes.getFid();
    

    Running the integration tests

    To run the integration tests, you can make use of ready-to-use docker image, or setup the environment manually. For manual setup, you need:

    MogileFS integration test properties config:

    • These properties should be set in /moji.properties on the classpath.

    • Set your Tracker address with the property:

        moji.tracker.hosts
      
    • Declare your Mogile domain with the property:

        moji.domain
      
    • Declare two storage classes (class assigned here should have devcount=1 if there are multiple storage nodes in the environment) in your Mogile instance and assign them with these properties:

        test.moji.class.a
        test.moji.class.b
      
    • Choose a key prefix to avoid any key clashes with real data (you’re using a test instance right?) or other tests. Otherwise we might get unexpected behaviour and file deletions:

        test.moji.key.prefix
      

    Building

    This project uses the Maven build system.

    Contributing

    All contributions are welcome. Please use the Last.fm codeformatting profile found in the lastfm-oss-config project for formatting your changes.

    Legal

    Copyright 2012-2017 Last.fm & The “mogilefs-moji” committers.

    Licensed under the Apache License, Version 2.0 (the “License”); you may not use this file except in compliance with the License. You may obtain a copy of the License at

    http://www.apache.org/licenses/LICENSE-2.0

    Unless required by applicable law or agreed to in writing, software distributed under the License is distributed on an “AS IS” BASIS, WITHOUT WARRANTIES OR CONDITIONS OF ANY KIND, either express or implied. See the License for the specific language governing permissions and limitations under the License.

    Visit original content creator repository https://github.com/mogilefs-moji/moji
  • Wealth-Management-App

    Access Product Click Here:

    Wealth-Management-App

    This is a Full Stack MERN Project With user register, login by using jwt, email notifications, CURD operations With Standard API, etc.

    Demo Account Credentials

    Overview

    cI3ovFGG1F

    Technology Stack

    Frontend

    Deployed on netlify. React, Sass or Scss, React Router Dom

    Backend

    Deployed on render. Node, express, JWT, bcryptjs, mongoose, mongodb

    Wealth Management App Tasks

    1. Create PRD
    2. Create Wireframe
    3. Create ERD or DB Design
    4. Create Backend API’S
    5. Create Frontend
    6. Make Connection between Frontend and Backend
    7. Deployment on frontend on netlify and backend server on render

    Basic Work Flow Of Product

    wealth

    PRD

    Functional Requirements

    1. signup and login with jwt apis

    2. user can store wealth like Assets , Equity , Fixed Income , Alternatives of logged in user.

    3. Users can update or delete above funds at any time

    4. save all expences like rent, food, travel, shopping, etc.

    5. calculate total expence, saving , income for current financial year or a current month.

    6. user should be able to filter result according to financial year or a month.

    7. detailed breakdown of an income and expences of that user user should be able to filter result according to financial year or a month.

    8. in expences user can able to upload any pdf bill, Invoice/bill or any pay slip.

    9. send email to logged in user when he/she update the income assets or a add expence

    Non Functional Requirements

    1. App should be work fine in all browsers
    2. should be secure

    Wireframes

    Figma Wireframes Link

    https://www.figma.com/file/ZyZZONgZWRm7PUVSG58vMJ/wealth-management?node-id=0%3A1&t=lzoBM35eM7ARDY9x-1

    Figma Prototype Link

    https://www.figma.com/proto/ZyZZONgZWRm7PUVSG58vMJ/wealth-management?page-id=0%3A1&node-id=1%3A124&viewport=1873%2C631%2C0.27&scaling=scale-down&starting-point-node-id=1%3A124

    ERD or DB Design

    • we are using mongodb as a database so we need to create a database and collection for this project. wealth-management-db

    Helpfull Resources I follwed while building this project

    1. Implement Authentication and Protect Routes in React: https://levelup.gitconnected.com/implement-authentication-and-protect-routes-in-react-135a60b1e16f

    https://www.youtube.com/watch?v=2k8NleFjG7I

    1. Authentication With JWT Tutorial https://www.youtube.com/watch?v=KgXT63wPMPc

    2. Email, password .etc, validation at backend side using express-validator https://express-validator.github.io/docs/

    3. React Redux Tutorial https://codecrunch.org/redux-from-scratch-implementation-205c5b3be018

    https://www.freecodecamp.org/news/how-to-use-redux-in-reactjs-with-real-life-examples-687ab4441b85/

    1. React api call traverse data https://www.pluralsight.com/guides/iterate-through-a-json-response-in-jsx-render-for-reactjs

    Contributors

    • Pradip Bedre
    Visit original content creator repository https://github.com/pradipbedre/Wealth-Management-App
  • aaudio-api-sample-app

    AAudio Api Sample Application

    alt text

    This sample demonstrates:

    • how to use the AAudio API
    • Communicate between java and C++
    • Load the audio file and convert to byte array
    • Creates an output playback stream and its configuration
    • Write buffer to the playback streamer and playing audio Using AAudio Api.

    Why to use AAudio Api?

    AAudio is a new Android C API introduced in the Android O release.

    It is designed for high-performance audio applications that require low latency.

    Project requirement in order to be effective

    To understand:

    • What is the difference between Mono and Stereo?
    • What Is PCM Audio?
    • Understanding Sample Rate! and wich sample rate you shold use?
    • Understanding Bit Depth! to use int16 or float?
    • What is sound? – not a requirement but it’s necessary for a deeper understanding

    Misc

    You may also want to view the I/O 2017 Best practices for Android audio session
    which covers technical and business best practices for developing high-performance audio apps. And take a look at
    Official AAudio documentation.

    License

    Copyright (C) 2018 Ali Asadi
    
    Permission is hereby granted, free of charge, to any person obtaining a copy of this software and associated 
    documentation files (the "Software"), to deal in the Software without restriction, including without limitation 
    the rights to use, copy, modify, merge, publish, distribute, sublicense, and/or sell copies of the Software, and 
    to permit persons to whom the Software is furnished to do so, subject to the following conditions:
    
    The above copyright notice and this permission notice shall be included in all copies or substantial portions of the Software.
    
    THE SOFTWARE IS PROVIDED "AS IS", WITHOUT WARRANTY OF ANY KIND, EXPRESS OR IMPLIED, INCLUDING BUT
    NOT LIMITED TO THE WARRANTIES OF MERCHANTABILITY, FITNESS FOR A PARTICULAR PURPOSE AND NONINFRINGEMENT.
    IN NO EVENT SHALL THE AUTHORS OR COPYRIGHT HOLDERS BE LIABLE FOR ANY CLAIM, DAMAGES OR OTHER LIABILITY,
    WHETHER IN AN ACTION OF CONTRACT, TORT OR OTHERWISE, ARISING FROM, OUT OF OR IN CONNECTION WITH THE SOFTWARE
    OR THE USE OR OTHER DEALINGS IN THE SOFTWARE.


    Contributing

    Just make a pull request. You are in!

    Visit original content creator repository
    https://github.com/AliAsadi/aaudio-api-sample-app

  • extended-angular-firestore

    extended-angular-firestore

    Lightweight extension of Angular Firestore. Provides a more intuitive API. Create, Update, Insert-or-Update (Upsert), Check for Existence, Download Once, Download and listen for changes.

    1. Installation
    2. Sample Usage
    3. Design Concept
    4. Setup

    Next page: API

    Installation

    npm install extended-angular-firestore --save

    Sample Usage

    import { ExtendedAngularFirestore } from 'extended-angular-firestore';
    
    export class Example {
      
      constructor(eaf: ExtendedAngularFirestore) {
      
        const ref = 'reference string to Firestore database location';
        const doc: DocType = documentOfYourChoiceHere;
        
        eaf.createNewDocument<DocType>(ref, doc); // creates a new doc at reference ref
        eaf.updateExistingDocument<DocType>(ref, doc); // updates existing document with value doc
        eaf.upsert<DocType>(ref, doc); // updates the document if it exists
                                       // otherwise, creates a new document at reference ref
      }
    }
    

    Design Concept

    The goal of the API is to help the programmer manage Observable Subscriptions, so you only ask for exactly what you want. You can either ask to download a document or a collection exactly once, in which case you get back a Promise that resolves to the value of the document you are requesting. Or you can listen to a document or a collection, in which case you get back an Observable you can subscribe to (and might have to unsubscribe from). This structure has helped me avoid annoying double-request errors where I failed to unsubscribe from a stream I hadn’t realized I was still subscribed to.

    This package also handles existence/nonexistence gracefully, which has been a weakness of both Firebase and Firestore in the past. To create or modify a document, simply use the Upsert method, which does the existence checking for you.

    Finally, the API extension is lightweight — about 100 lines of TypeScript and three RXJS operators (which AngularFire may already need).

    Setup

    In app.module.ts, import ExtendedAngularFirestoreModule, instead of AngularFireModue, as follows.

    Delete this line:

    AngularFireModule.initializeApp(FIREBASE_CONFIG);
    

    Replace it with this line:

    ExtendedAngularFirestoreModule.forRoot(FIREBASE_CONFIG);
    

    In more complete context:

    import { ExtendedAngularFirestoreModule } from 'extended-angular-firestore';
    import { FirebaseAppConfig } from 'angularfire2';
    
    const FIREBASE_CONFIG: FirebaseAppConfig = {
        apiKey: '<your-key>',
        authDomain: '<your-project-authdomain>',
        databaseURL: '<your-database-URL>',
        projectId: '<your-project-id>',
        storageBucket: '<your-storage-bucket>',
        messagingSenderId: '<your-messaging-sender-id>'
      }
    
    @NgModule({
      declarations: [],
      imports: [
        ExtendedAngularFirestoreModule.forRoot(FIREBASE_CONFIG)
      ],
      providers: [],
      bootstrap: []
    })
    export class AppModule { }
    

    AngularFire2 is a peer dependency of ExtendedAngularFirestore, so if you use npm to install this library, angularfire2 will be available to import from as well.

    Next page: API

    Visit original content creator repository
    https://github.com/Aaron-Sterling/extended-angular-firestore

  • Weather-App

    Logo

    Weather App 2.0 – Flutter

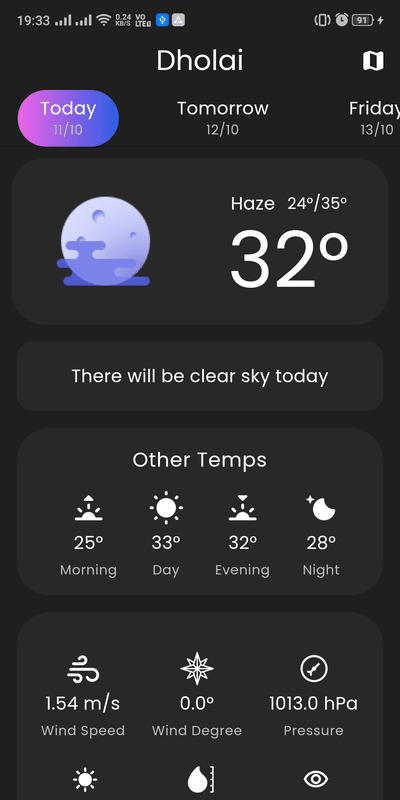
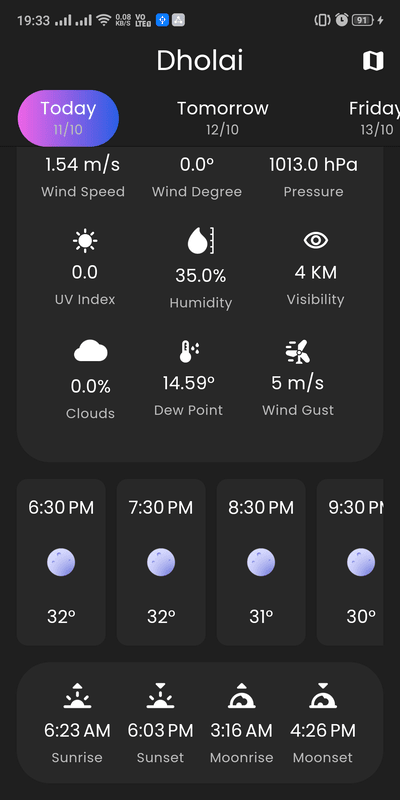
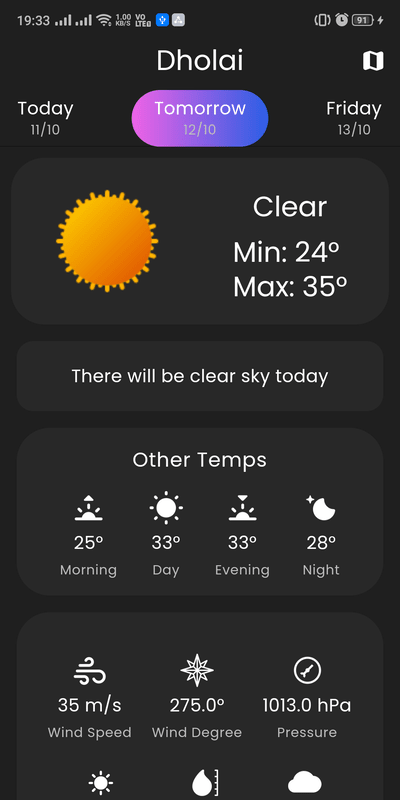
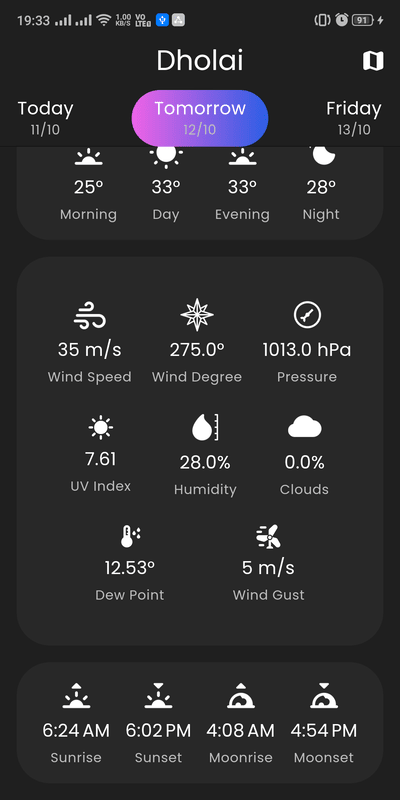
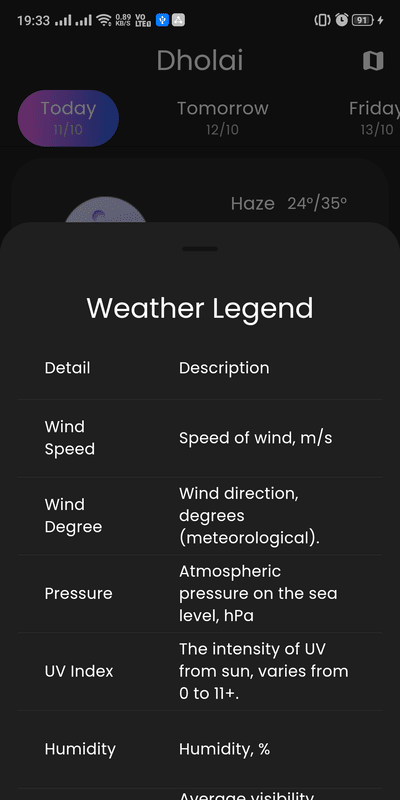
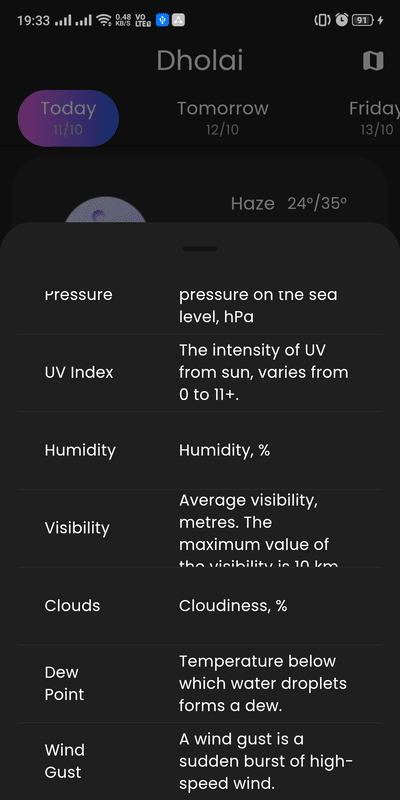
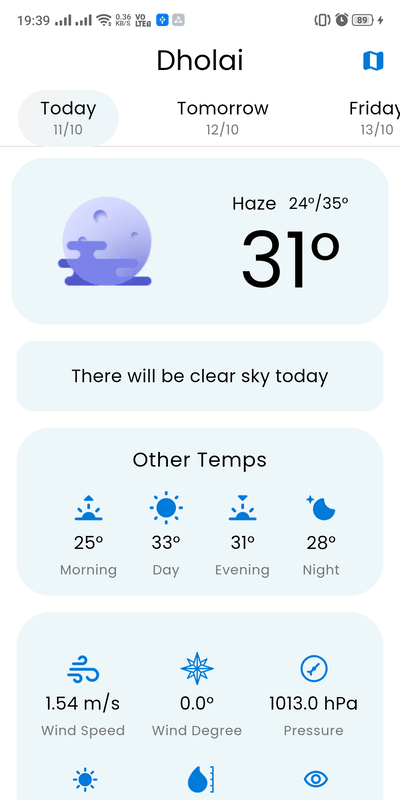
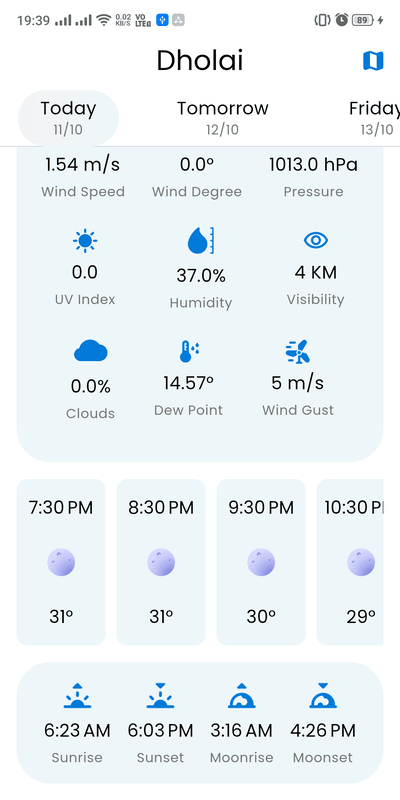
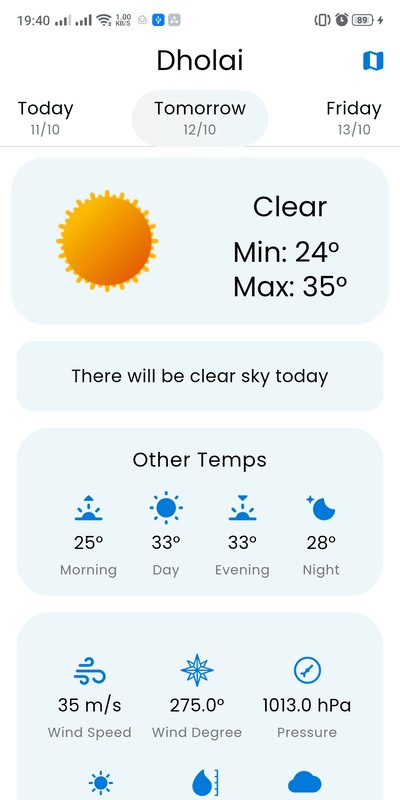
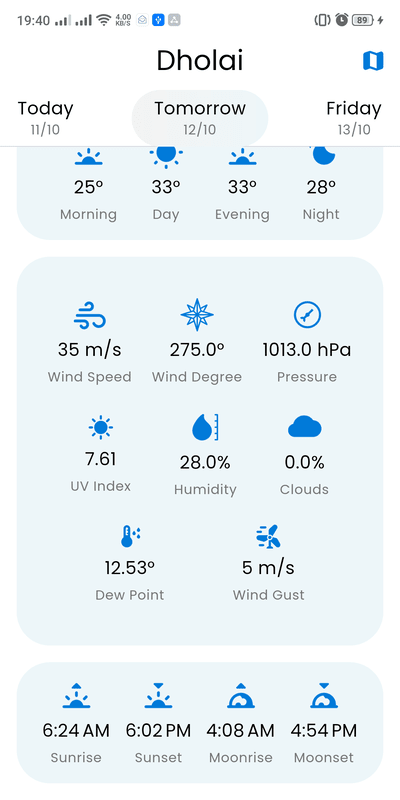
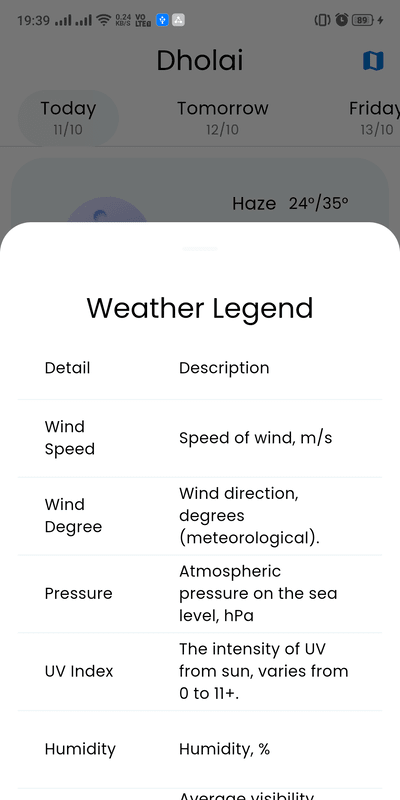
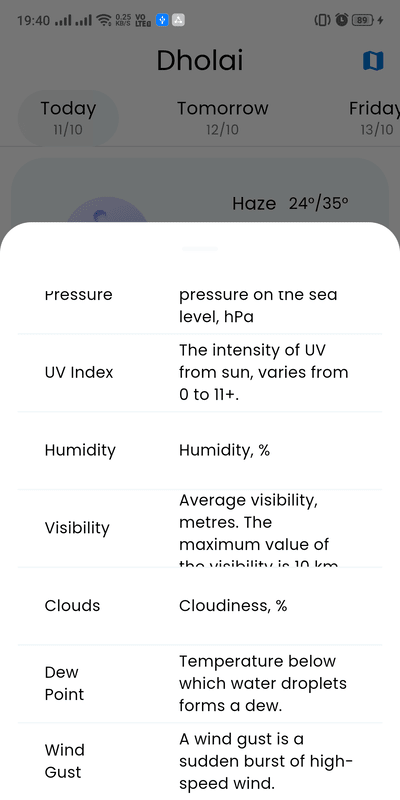
    The “Weather App 2.0” project utilizing the OpenWeatherMap API is a mobile application designed to provide users with up-to-date weather information. Users can easily access current weather conditions, forecasts, and related data for current location. This project leverages the OpenWeatherMap API to fetch real-time weather data for current day & forecast of 7 days ahead, making it a valuable tool for users seeking accurate weather information on the go.

    Tech Stack

    Client: Flutter, Dart

    Pub Packages: geocoding, geolocator, http, intl

    API Reference

      lib/api/openweather_api.dart
    Parameter Type Description
    apiKey string Required. YOUR OpenAI KEY HERE

    OpenWeather Map API Docs v3.0

    If you don’t have an API Key then CREATE HERE

    Features

    • Live weather info
    • Hourly forecast for 48 hours
    • Daily forecast for 8 days
    • Cross platform
    • Smooth animations
    • Weather based on live location
    • Light & Dark Theme options

    Screenshots

    Dark Theme

    Loading Home Screen Tab(Today) Home Screen Tab(Today) 2 Home Screen Tab(Tomorrow) Home Screen Tab(Tomorrow) 2 Weather Legend Weather Legend 2

    Light Theme

    Loading Home Screen Tab(Today) Home Screen Tab(Today) 2 Home Screen Tab(Tomorrow) Home Screen Tab(Tomorrow) 2 Weather Legend Weather Legend 2

    Color Reference

    Dark Theme

    Color Hex
    Primary Color #1F1F1FFF #1F1F1FFF
    Secondary Color #282828FF #282828FF
    Gradient From Color #2B5EE5FF #2B5EE5FF
    Gradiant To Color #EF63E6FF #EF63E6FF
    Active Text Color #FFFFFFFF #FFFFFFFF
    Inactive Text Color #BDBDBDFF #BDBDBDFF

    Light Theme

    Color Hex
    Primary Color #FFFFFFFF #FFFFFFFF
    Secondary Color #EDF6F9FF #EDF6F9FF
    Gradient From Color #F3F3F3FF #F3F3F3FF
    Gradiant To Color #EDF6F9FF #EDF6F9FF
    Active Text Color #000000FF #000000FF
    Inactive Text Color #757575FF #757575FF
    Icon Color #007AD9FF #007AD9FF

    Fonts

    Poppins

    Icon Assets

    Weather Icons Folder

    Icons Folder

    Installation

    git clone "https://github.com/SheershBhatnagar/Weather-App-2.0---Flutter.git"
    cd Weather-App-2.0---Flutter-master

    Open the project in your desired editor.

    Paste your API Key in openweather_api.dart

    Build your flutter App

    Terminal

    flutter build android
    flutter build ios
    flutter build linux
    flutter build macos
    flutter build web
    flutter build windows

    Android Studio

    Build > Flutter > Build AAR

    Build > Flutter > Build APK

    Build > Flutter > Build App Bundle

    Build > Flutter > Build iOS

    Build > Flutter > Build Web

    License

    GNU General Public License v3.0

    GPLv3 License

    Support

    For support, email i@sheershbhatnagar.me

    🔗 Links

    linkedin twitter

    Visit original content creator repository https://github.com/SheershBhatnagar/Weather-App
  • zabbix-traefik-ssl-certificate-docker-swarm

    Zabbix with SSL Certificate in a Docker Swarm

    Install Docker Swarm by following my guide.

    Configure Traefik and create secrets for storing the passwords on the Docker Swarm manager node before applying the configuration.

    Traefik configuration.

    Create a secret for storing the password for Zabbix database using the command:

    printf "YourPassword" | docker secret create zabbix-postgres-password -

    Clear passwords from bash history using the command:

    history -c && history -w

    Run zabbix-restore-database.sh on the Docker Swarm node where the container for backups is running to restore database if needed.

    Run docker stack ps zabbix | grep zabbix_backups | awk 'NR > 0 {print $4}' on the Docker Swarm manager node to find on which node container for backups is running.

    Deploy Zabbix in a Docker Swarm using the command:

    docker stack deploy -c zabbix-traefik-ssl-certificate-docker-swarm.yml zabbix

    Author

    I’m Vladimir Mikhalev, the Docker Captain, but my friends can call me Valdemar.

    🌐 My website with detailed IT guides
    🎬 Follow me on YouTube
    🐦 Follow me on Twitter
    🎨 Follow me on Instagram
    🧵 Follow me on Threads
    🐘 Follow me on Mastodon
    🧊 Follow me on Bluesky
    🎸 Follow me on Facebook
    🎥 Follow me on TikTok
    💻 Follow me on LinkedIn
    🐈 Follow me on GitHub

    Communication

    👾 Chat with IT pros on Discord
    📧 Reach me at ask@sre.gg

    Give Thanks

    💎 Support on GitHub
    🏆 Support on Patreon
    🥤 Support on BuyMeaCoffee
    🍪 Support on Ko-fi
    💖 Support on PayPal

    Visit original content creator repository
    https://github.com/heyvaldemar/zabbix-traefik-ssl-certificate-docker-swarm

  • DALL-E

    AIVANA

    AIVANA – Aivart

    I have not active api that why it not work on live site

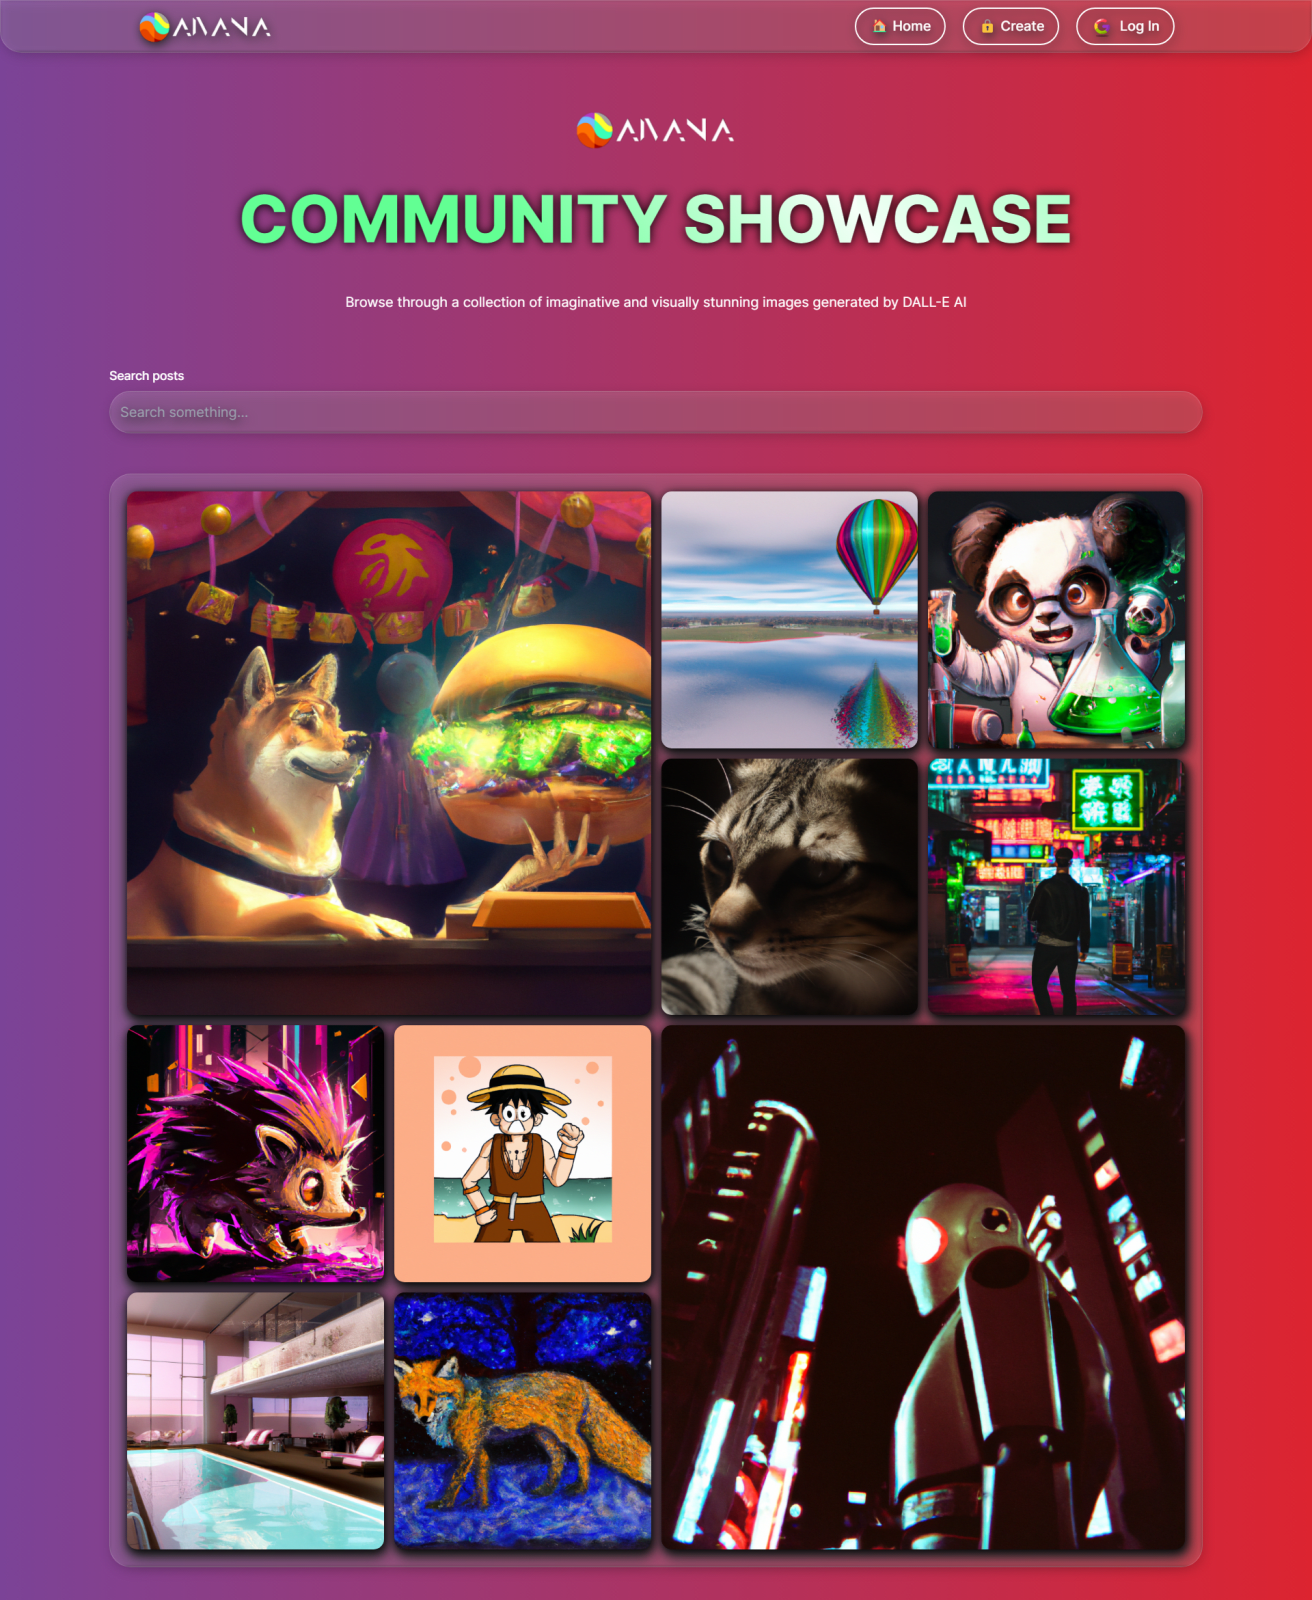
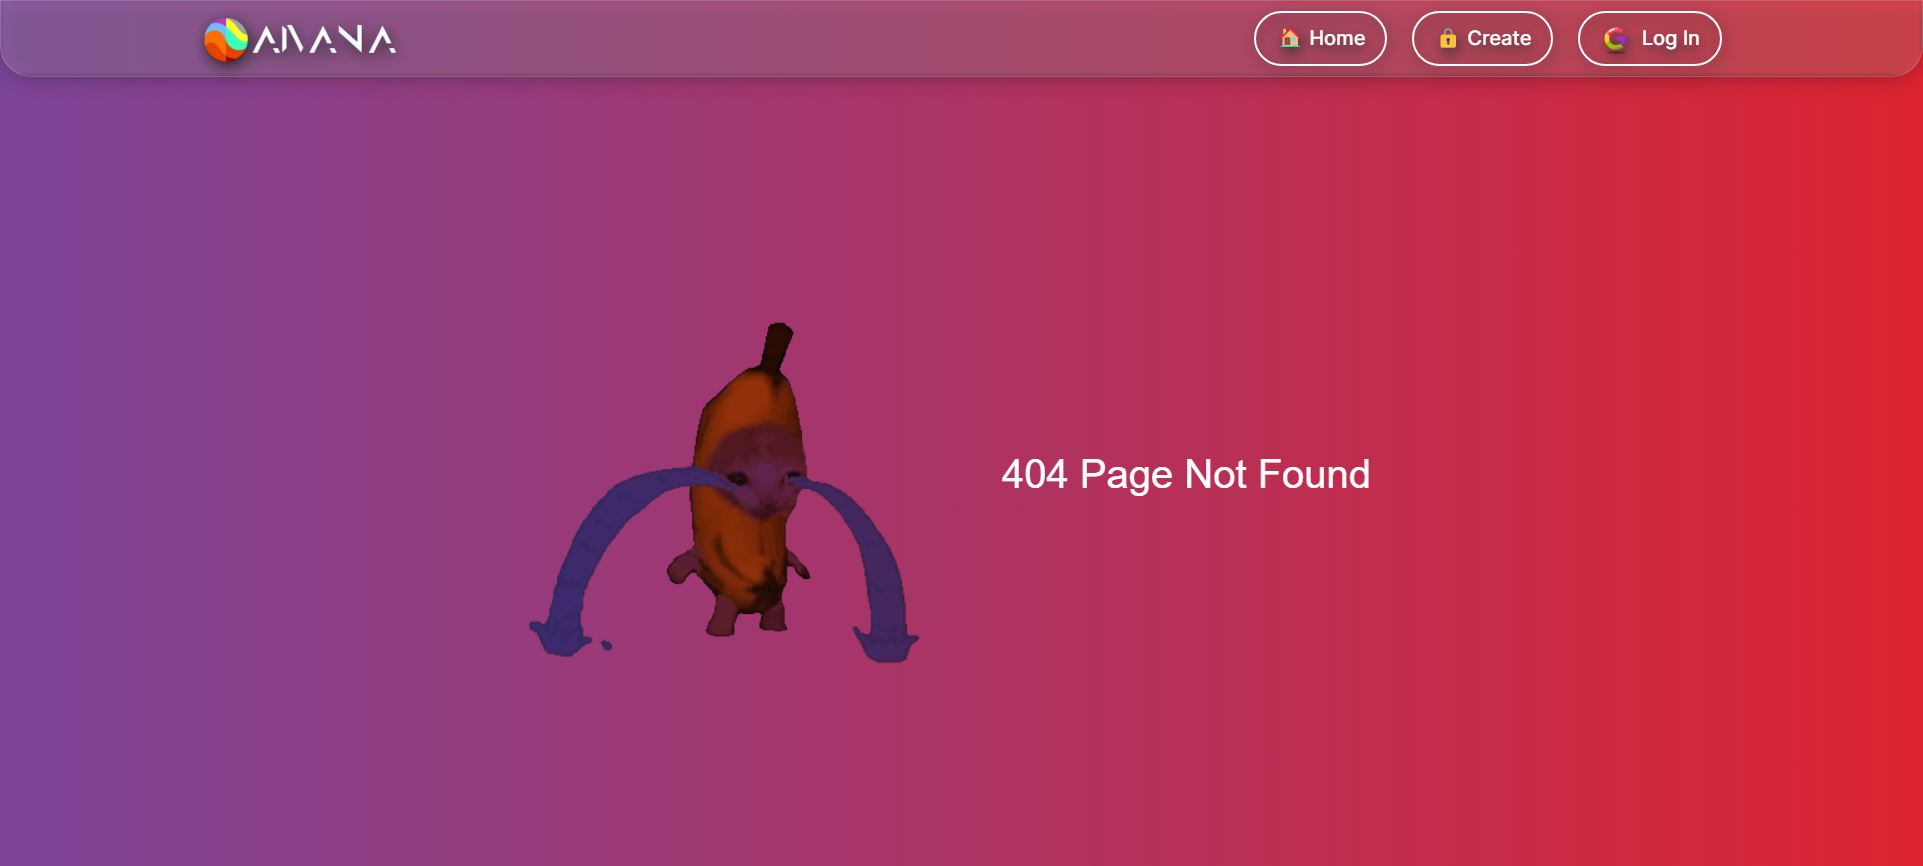
    AIVANA – Aivart is a web application that lets you generate unique and creative artwork from textual prompts, using OpenAI’s DALL-E API. With AIVANA – Aivart, you can explore the possibilities of generative art and see your words come to life in stunning images that are both unexpected and delightful.

    Table of contents

    Features

    • TEXT-TO-IMAGE GENERATE: AIVANA – Artify allows you to enter any text prompt and generate a corresponding image using the DALL-E API.
    • INTERACTIVE INTERFACE: AIVANA – Artify’s user-friendly interface lets you easily enter text, preview and download the generated images, and share them on social media.
    • CUSTONIZABLE OPTIONS: AIVANA – Artify gives you control over various parameters, such as image size, background color, and number of image samples, to tailor your art generation experience to your liking.
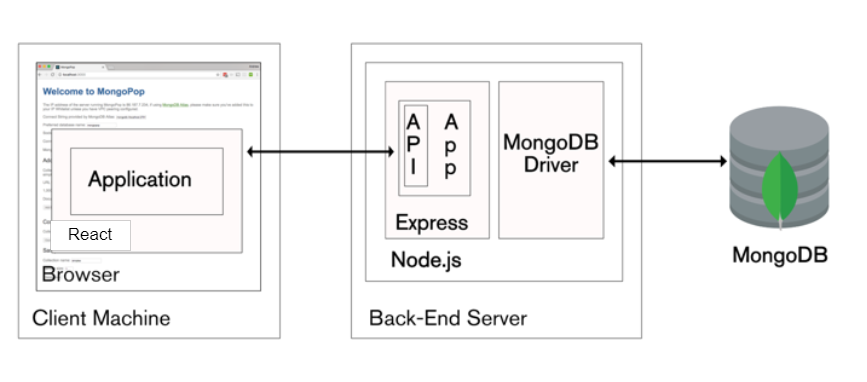
    • MERN STACK: AIVANA – Artify is built using the MERN stack, a popular web development framework that combines MongoDB, Express, React, and Node.js, to provide a fast and scalable application that can handle a large number of users and requests.

    Getting started

    To get started with AIVANA – Artify, you will need to have a valid OpenAI API key, which you can obtain from the OpenAI website. Once you have your API key, follow these steps:

    1. Clone or download this repository to your local machine.
    2. Install the necessary dependencies using npm install in both ‘server’ & ‘client’.
    3. Create a .env file in the server directory of the project and add your API keys as :-
      OPENAI_API_KEY=””
      MONGODB_URL=””
      CLOUDINARY_CLOUD_NAME=””
      CLOUDINARY_API_KEY=””
      CLOUDINARY_API_SECRET=””
      CLOUDINARY_URL=””
    4. Replace https://artify-teyv.onrender.com in client’s CreatePost.jsx and Home.jsx by https://localhost:8080.
    5. Start the server using npm start & client using npm run dev.
    6. Open your web browser and navigate to http://localhost:5173 to see the AIVANA – Artify app in action.

    Getting API’s

    1. Create account and get api from CLOUDINARY https://cloudinary.com/
    2. Create account and get api from MONGODB https://www.mongodb.com/atlas/database
    3. Create account and get api from OPENAI https://platform.openai.com/account/api-keys

    Contributing

    We welcome contributions from the community to help improve AIVANA – Artify and make it even more amazing. Whether you’re a developer, designer, or artist, you can contribute in various ways, such as:

    • Reporting bugs and issues
    • Suggesting new features and improvements
    • Creating pull requests to fix bugs or add new features
    • Sharing your generated art on social media and spreading the word about AIVANA – Artify

    License

    AIVANA – Artify is open-source software licensed under the Apache-2.0 license, which allows for free use, modification, and distribution of the codebase, subject to certain conditions. By contributing to AIVANA – Artify, you agree to abide by the terms of this license and to respect the intellectual property of the original authors and contributors.

    Screenshots

    Home Page (you can access this page even without login)
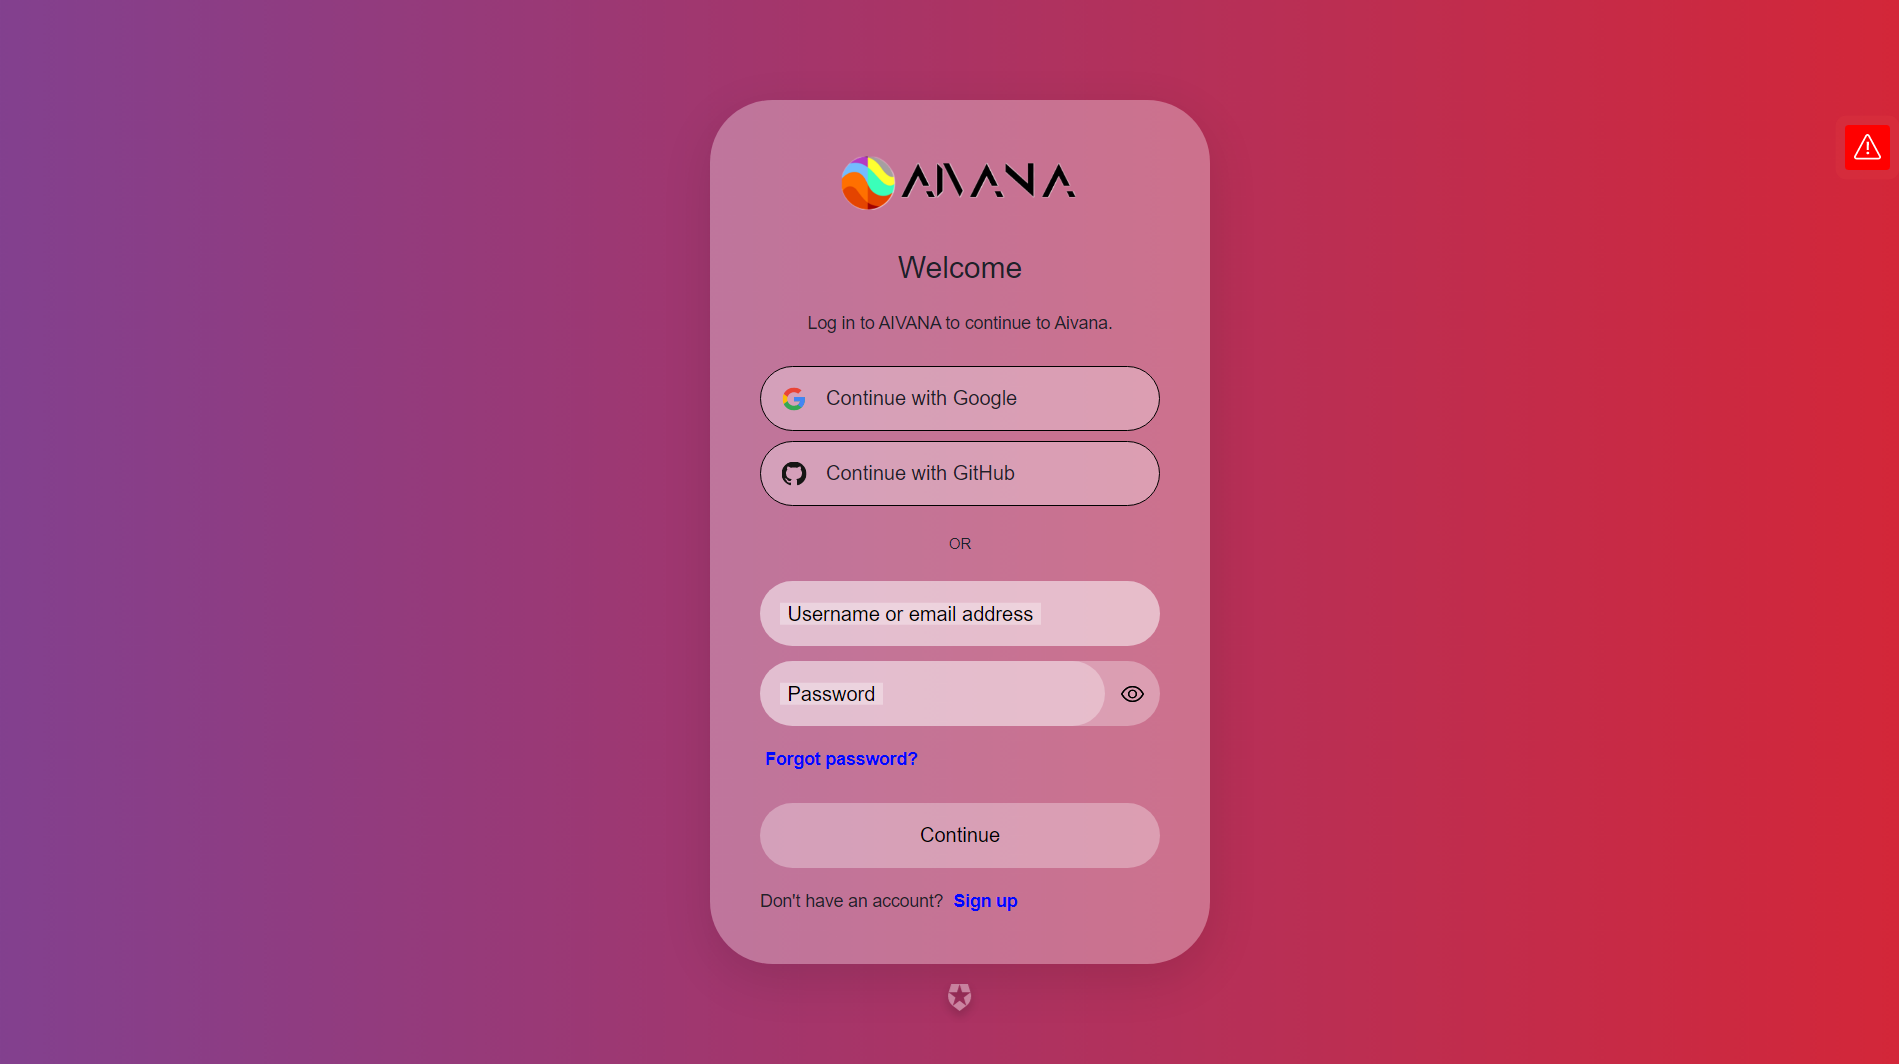
    Image Generation App

    Login Page

    Image Generation App

    Create Page (only accessable after login)

    Image Generation App

    404 Page (when you enter wrong url with the domain)

    Image Generation App

    Visit original content creator repository https://github.com/20Sunny/DALL-E