Welcome to Skirnir, a sophisticated Open Source Intelligence (OSINT) tool designed to empower your online presence discovery. In the digital era, maintaining awareness of your footprint across popular social networks is crucial. Skirnir is specialized in scraping platforms like Instagram, Facebook, Twitter, and LinkedIn to uncover any trace of your online identity or lost accounts.
Key Features
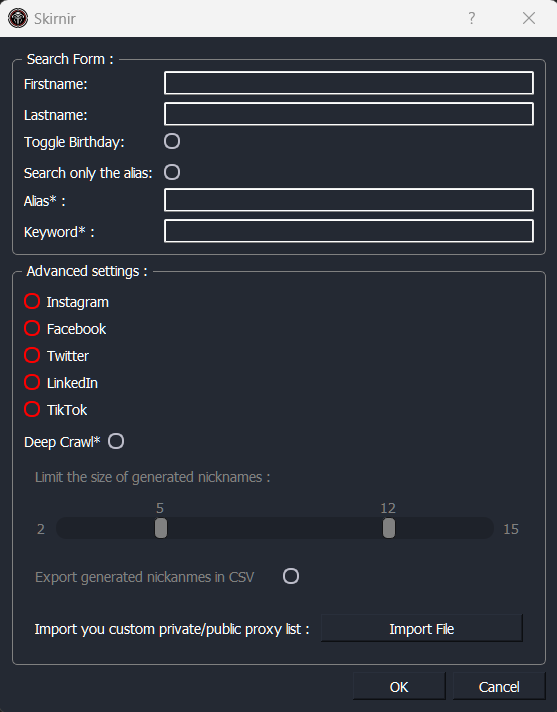
Surface crawl: Utilize various queries of firstname, lastname, diminutives, nicknames and keyword to crawl Google.
Deepcrawl: Perform in-depth searches to reveal private or deleted profiles using thousands of generated nicknames.
Customizable Settings: Customize your search with advanced options, including deepcrawl preferences, network selection and length of generated nicknames.
Intuitive Interface: Skirnir’s user-friendly interface simplifies the process of refining and filtering search results.
CLI: Command Line Interface is also available for nerds experienced users.
Proxy Handling: Import your own proxies (public/private) in Skirnir.
Please remember that Skirnir is intended for educational purposes only.
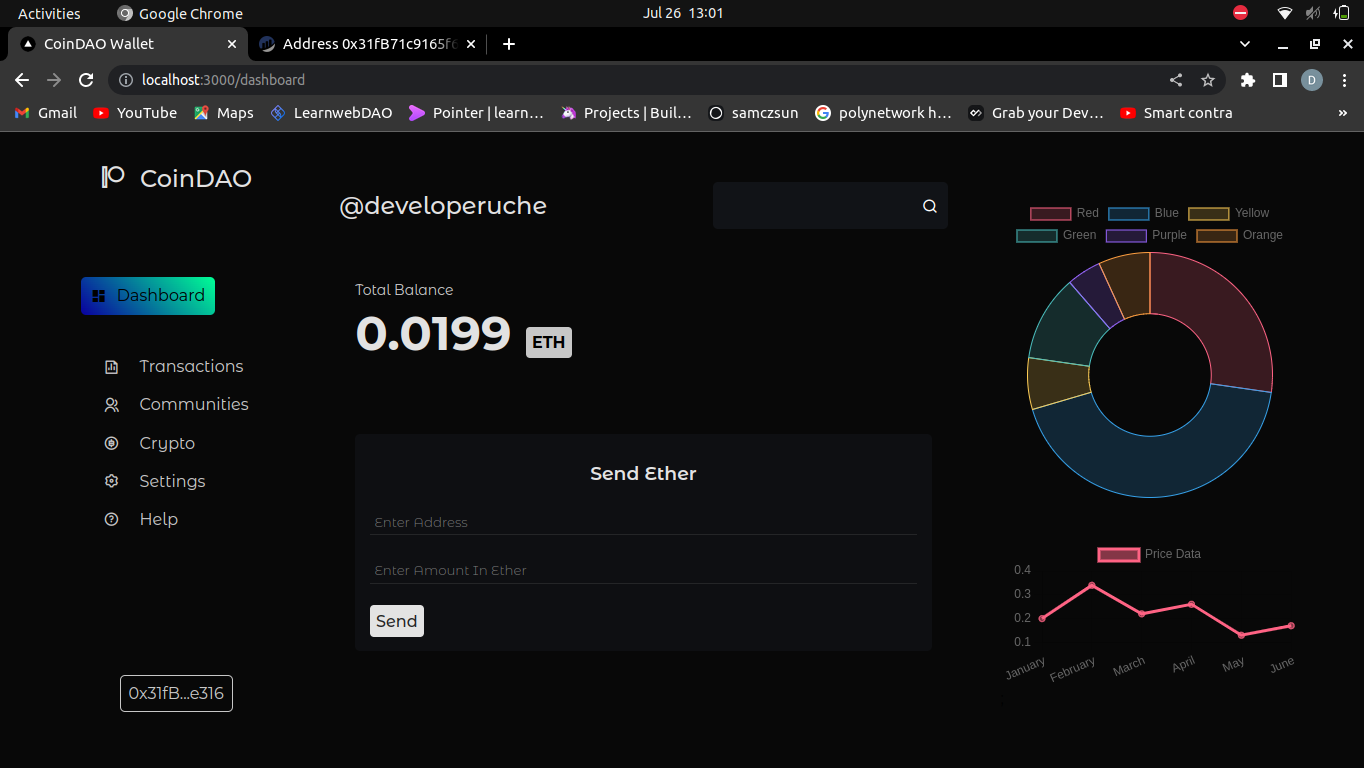
Screenshot
Getting Started
Create a Python Environment
python3 -m venv env
Activate the Python Environment
Linux/MacOS
source env/bin/activate
Windows
.\env\Scripts\activate
Install Requirements
pip install -r requirements.txt
Launch the Skirnir Program (User Interface)
Linux/MacOS
python3 main.py --ui
Windows
.\env\Scripts\python.exe main.py --ui
Documentation
You can have a look at the documentation here: Wiki
Use the ColoredCow\LaravelAudit\Events\Auditable trait in the events you want to audit. And add this to the contructor of the event.
$this->setAudit([
    'ip' => 'ip-of-user-here',
    'referer' => 'referer-address',
    'action' => 'description of event and action being audited'
]);
Use the ColoredCow\LaravelAudit\Listeners\AuditActivities listener to listen to the events to want to audit. Map it in the EventServiceProvider of your laravel application.
Audit Facade
Add AuditFacade in your app to make a audit directly from the applications.
AuditFacade::make(['action' => 'Audit Action']);
You can also overide other properties like ip, userid and descriptions.
seriously like the best async child process library
(I’m joking, you may want to use execa which has a lot more features. The minor advantages of this package are,
it’s a dual CJS/ESM package, and it provides wrappers for all the async child_process functions.)
Based upon child-process-async,
but more thorough, because that package doesn’t seem very actively maintained.
promisify-child-process provides a drop-in replacement for the
original child_process functions, not just duplicate methods that
return a Promise. So when you call exec(...) we still return a
ChildProcess instance, just with .then(), .catch(), and .finally() added to
make it promise-friendly.
Install and Set-up
npm install --save promisify-child-process
If you are using a old version of Node without built-in Promises or
Object.create, you will need to use polyfills (e.g. @babel/polyfill).
You must now pass maxBuffer or encoding to spawn/fork if you want to
capture stdout or stderr.
Resolution/Rejection
The child process promise will only resolve if the process exits with a code of 0.
If it exits with any other code, is killed by a signal, or emits an 'error' event,
the promise will reject.
Capturing output
exec and execFile capture stdout and stderr by default. But spawn and
fork don’t capture stdout and stderr unless you pass an encoding or
maxBuffer option:
asyncfunction(){const{ stdout, stderr }=awaitexec('ls -al');// OR:constchild=exec('ls -al',{});// do whatever you want with `child` here - it's a ChildProcess instance just// with promise-friendly `.then()` & `.catch()` functions added to it!child.stdin.write(...);child.stdout.pipe(...);child.stderr.on('data',(data)=> ...);const{ stdout, stderr }=awaitchild;}
spawn()
asyncfunction(){const{ stdout, stderr, code }=awaitspawn('ls',['-al'],{encoding: 'utf8'});// OR:constchild=spawn('ls',['-al'],{});// do whatever you want with `child` here - it's a ChildProcess instance just// with promise-friendly `.then()` & `.catch()` functions added to it!child.stdin.write(...);child.stdout.pipe(...);child.stderr.on('data',(data)=> ...);const{ stdout, stderr, code }=awaitchild;}
This arkworks library describes an interface and contains an implementation for proof-carrying data (PCD).
PCD (introduced in [CT10]) is a cryptographic primitive that allows the incremental verification of a distributed computation that can continue indefinitely. A computation defined by a (possibly infinite) directed acyclic graph is augmented by attaching a succinct proof of correctness to each message, allowing any intermediate state of the computation to be verified efficiently. PCD is a generalization of IVC [Val08], or incrementally-verifiable computation, which is PCD in the case of a linear computation (that is, the graph is a path graph).
This library is released under the MIT License and the Apache v2 License (see License).
WARNING: This is an academic proof-of-concept prototype, and in particular has not received careful code review. This implementation is NOT ready for production use.
The PCD interface is here and relies on a cycle of elliptic curves (e.g. the MNT cycle). Separate CircuitSpecificSetupPCD and UniversalSetupPCD interfaces are included depending on the underlying SNARK type(s). Note that the underlying main SNARK and helper SNARK do not have to be the same, although both must implement either CircuitSpecificSetupSNARK or UniversalSetupSNARK.
Build guide
The library compiles on the stable toolchain of the Rust compiler. To install the latest version of Rust, first install rustup by following the instructions here, or via your platform’s package manager. Once rustup is installed, install the Rust toolchain by invoking:
rustup install stable
After that, use cargo, the standard Rust build tool, to build the libraries:
git clone https://github.com/arkworks-rs/pcd.git
cd pcd
cargo build
Tests
This library comes with comprehensive unit and integration tests. Run the tests with:
cargo test --all
License
The crates in this repo are licensed under either of the following licenses, at your discretion.
Unless you explicitly state otherwise, any contribution submitted for inclusion in this library by you shall be dual licensed as above (as defined in the Apache v2 License), without any additional terms or conditions.
The master branch is set up to run with etcd so if you want to run locally
then you’ll need to uncomment the seed-node config in src/main/resources/application.conf
// src/main/resources/application.conf...cluster {
roles = [frontend, backend]
// uncomment this if running locallyseed-nodes = [
"akka.tcp://ClusterSystem@127.0.0.1:2551"
]
}
Then you can run the project and curl the HTTP endpoint.
➜ curl "http://localhost:8080?msg=about+a+hotdog"
Hot Dog! (from fe: xxxxxxxx be: xxxxxxxx)%
➜ curl "http://localhost:8080?msg=about+a+dog"
Not Hot Dog :( (from fe: xxxxxxxx be: xxxxxxxx)%
Package into Docker
➜ sbt assembly
# outputs target/scala-2.12/akka-cluster-on-kubernetes-assembly-0.1.jar# now build that into a docker image
➜ docker build -t {your namespace}/akka-cluster .
Test Locally With Docker Compose
We still need etcd but we want it accessible from the same network as our app which
is now running on Docker, not on localhost. To do this we use Docker Compose.
➜ docker-compose up

Starting akkaclusteronkubernetes_etcd_1 ...
Starting akkaclusteronkubernetes_etcd_1 ... done
Starting akkaclusteronkubernetes_akka_1 ...
Starting akkaclusteronkubernetes_akka_1 ... done
Attaching to akkaclusteronkubernetes_etcd_1, akkaclusteronkubernetes_akka_1
etcd_1  | 2017-07-21 21:08:21.112937 I | etcdmain: etcd Version: 2.3.7
etcd_1  | 2017-07-21 21:08:21.113016 I | etcdmain: Git SHA: fd17c91
etcd_1  | 2017-07-21 21:08:21.113026 I | etcdmain: Go Version: go1.6.2
etcd_1  | 2017-07-21 21:08:21.113041 I | etcdmain: Go OS/Arch: linux/amd64
etcd_1  | 2017-07-21 21:08:21.113052 I | etcdmain: setting maximum number of CPUs to 2, total number of available CPUs is 2
etcd_1  | 2017-07-21 21:08:21.113058 W | etcdmain: no data-dir provided, using default data-dir ./default.etcd
etcd_1  | 2017-07-21 21:08:21.113834 N | etcdmain: the server is already initialized as member before, starting as etcd member...
etcd_1  | 2017-07-21 21:08:21.114360 I | etcdmain: listening for peers on http://localhost:2380
etcd_1  | 2017-07-21 21:08:21.114539 I | etcdmain: listening for peers on http://localhost:7001
etcd_1  | 2017-07-21 21:08:21.114584 I | etcdmain: listening for client requests on http://0.0.0.0:2379
etcd_1  | 2017-07-21 21:08:21.124405 I | etcdserver: name = default
etcd_1  | 2017-07-21 21:08:21.124445 I | etcdserver: data dir = default.etcd
etcd_1  | 2017-07-21 21:08:21.124453 I | etcdserver: member dir = default.etcd/member
etcd_1  | 2017-07-21 21:08:21.124461 I | etcdserver: heartbeat = 100ms
etcd_1  | 2017-07-21 21:08:21.124465 I | etcdserver: election = 1000ms
etcd_1  | 2017-07-21 21:08:21.124470 I | etcdserver: snapshot count = 10000
etcd_1  | 2017-07-21 21:08:21.124505 I | etcdserver: advertise client URLs = http://0.0.0.0:2379
etcd_1  | 2017-07-21 21:08:21.128006 I | etcdserver: restarting member ce2a822cea30bfca in cluster 7e27652122e8b2ae at commit index 424
etcd_1  | 2017-07-21 21:08:21.128122 I | raft: ce2a822cea30bfca became follower at term 10
etcd_1  | 2017-07-21 21:08:21.128165 I | raft: newRaft ce2a822cea30bfca [peers: [], term: 10, commit: 424, applied: 0, lastindex: 424, lastterm: 10]
etcd_1  | 2017-07-21 21:08:21.130984 I | etcdserver: starting server... [version: 2.3.7, cluster version: to_be_decided]
etcd_1  | 2017-07-21 21:08:21.134951 N | etcdserver: added local member ce2a822cea30bfca [http://localhost:2380 http://localhost:7001] to cluster 7e27652122e8b2ae
etcd_1  | 2017-07-21 21:08:21.135076 N | etcdserver: set the initial cluster version to 2.3
etcd_1  | 2017-07-21 21:08:22.431440 I | raft: ce2a822cea30bfca is starting a new election at term 10
etcd_1  | 2017-07-21 21:08:22.431735 I | raft: ce2a822cea30bfca became candidate at term 11
etcd_1  | 2017-07-21 21:08:22.431922 I | raft: ce2a822cea30bfca received vote from ce2a822cea30bfca at term 11
etcd_1  | 2017-07-21 21:08:22.432299 I | raft: ce2a822cea30bfca became leader at term 11
etcd_1  | 2017-07-21 21:08:22.432405 I | raft: raft.node: ce2a822cea30bfca elected leader ce2a822cea30bfca at term 11
etcd_1  | 2017-07-21 21:08:22.433347 I | etcdserver: published {Name:default ClientURLs:[http://0.0.0.0:2379]} to cluster 7e27652122e8b2ae
akka_1  | [INFO] [07/21/2017 21:08:24.309] [main] [akka.remote.Remoting] Starting remoting
akka_1  | [INFO] [07/21/2017 21:08:24.670] [main] [akka.remote.Remoting] Remoting started; listening on addresses :[akka.tcp://ClusterSystem@127.0.0.1:2551]
akka_1  | [INFO] [07/21/2017 21:08:24.696] [main] [akka.cluster.Cluster(akka://ClusterSystem)] Cluster Node [akka.tcp://ClusterSystem@127.0.0.1:2551] - Starting up...
akka_1  | [INFO] [07/21/2017 21:08:24.936] [main] [akka.cluster.Cluster(akka://ClusterSystem)] Cluster Node [akka.tcp://ClusterSystem@127.0.0.1:2551] - Registered cluster JMX MBean [akka:type=Cluster]
akka_1  | [INFO] [07/21/2017 21:08:24.936] [main] [akka.cluster.Cluster(akka://ClusterSystem)] Cluster Node [akka.tcp://ClusterSystem@127.0.0.1:2551] - Started up successfully
akka_1  | [INFO] [07/21/2017 21:08:25.005] [ClusterSystem-akka.actor.default-dispatcher-5] [akka.cluster.Cluster(akka://ClusterSystem)] Cluster Node [akka.tcp://ClusterSystem@127.0.0.1:2551] - No seed-nodes configured, manual cluster join required
akka_1  | [INFO] [07/21/2017 21:08:25.006] [ClusterSystem-akka.actor.default-dispatcher-2] [akka.tcp://ClusterSystem@127.0.0.1:2551/system/constructr] Creating constructr-machine, because no seed-nodes defined
akka_1  | [INFO] [07/21/2017 21:08:27.112] [ClusterSystem-akka.actor.default-dispatcher-4] [akka.cluster.Cluster(akka://ClusterSystem)] Cluster Node [akka.tcp://ClusterSystem@127.0.0.1:2551] - Node [akka.tcp://ClusterSystem@127.0.0.1:2551] is JOINING, roles [frontend, backend]
akka_1  | [INFO] [07/21/2017 21:08:27.143] [ClusterSystem-akka.actor.default-dispatcher-4] [akka.cluster.Cluster(akka://ClusterSystem)] Cluster Node [akka.tcp://ClusterSystem@127.0.0.1:2551] - Leader is moving node [akka.tcp://ClusterSystem@127.0.0.1:2551] to [Up]
➜ kubectl run bounce --image=markeijsermans/debug -it bash
If you don't see a command prompt, try pressing enter.(21:15 bounce-2304503334-6dqpw:/) curl etcd:2379/health{"health": "true"}
Now deploy the app! If you’ve been pushing your own Docker images, you’ll need to edit the kubernetes/nothotdog.yaml file to use your image. Specifically these lines
Executes a FFmpeg command. The second argument is an optional callback function (which only returns an error message). If you choose to enable the debug flag, the third argument should be set as true and the function will log all events during execution of the commang.
Usage
import{Component,OnInit}from"@angular/core";import{FFmpeg}from"nativescript-ffmpeg";import{VideoRecorder}from"nativescript-videorecorder";import*asPermissionsfrom"nativescript-permissions";import{isAndroid}from"tns-core-modules/platform";import*asdialogsfrom"tns-core-modules/ui/dialogs";declareconstandroid: any;
@Component({selector: "Home",moduleId: module.id,templateUrl: "./home.component.html"})exportclassHomeComponentimplementsOnInit{private_recorder=newVideoRecorder({format: "mp4",saveToGallery: true,hd: true,explanation: "We need to be able to record video"});constructor(){}ngOnInit(): void{}private_compress(src: string): void{constout=src.replace(/\.[^/.]+$/,"_COMPRESSED.mp4");FFmpeg.execute(["-i",src,"-vcodec","h264","-acodec","mp3",out],(err: string)=>{if(err){this._error(err);}else{console.log("Compressed file size "+this._getSize(out));}});}private_error(error: string|Error): Promise<void>{returndialogs.alert({title: "Uh oh...",message: (errorinstanceofError) ? error.message : error,okButtonText: "OK, got it"});}private_getSize(path: string): string{letlength: number=0;if(isAndroid){constfile=newjava.io.File(path);length=file.length();}else{constdefManager=NSFileManager.defaultManager;constfileAttributes=defManager.attributesOfItemAtPathError(path);length=fileAttributes.objectForKey(NSFileSize);}return`${(length/(1000*1000)).toFixed(2)} MB`;}private_takeVideo(): void{this._recorder.record().then((data)=>{console.log("Original file size "+this._getSize(data.file));this._compress(data.file);}).catch((error)=>{if(error.event!=="cancelled"){this._error("Couldn't record your video");}});}publictakeVideo(): void{if(isAndroid){Permissions.requestPermission([android.Manifest.permission.RECORD_AUDIO,android.Manifest.permission.CAMERA],"Demo needs Audio and Camera permissions to record a video").then(()=>{this._takeVideo();},(error)=>this._error("Demo needs Audio and Camera permissions to record a video"));}else{this._takeVideo();}}}
Runs the app in the development mode.
Open http://localhost:3000 to view it in your browser.
The page will reload when you make changes.
You may also see any lint errors in the console.
npm test
Launches the test runner in the interactive watch mode.
See the section about running tests for more information.
npm run build
Builds the app for production to the build folder.
It correctly bundles React in production mode and optimizes the build for the best performance.
The build is minified and the filenames include the hashes.
Your app is ready to be deployed!
See the section about deployment for more information.
npm run eject
Note: this is a one-way operation. Once you eject, you can’t go back!
If you aren’t satisfied with the build tool and configuration choices, you can eject at any time. This command will remove the single build dependency from your project.
Instead, it will copy all the configuration files and the transitive dependencies (webpack, Babel, ESLint, etc) right into your project so you have full control over them. All of the commands except eject will still work, but they will point to the copied scripts so you can tweak them. At this point you’re on your own.
You don’t have to ever use eject. The curated feature set is suitable for small and middle deployments, and you shouldn’t feel obligated to use this feature. However we understand that this tool wouldn’t be useful if you couldn’t customize it when you are ready for it.
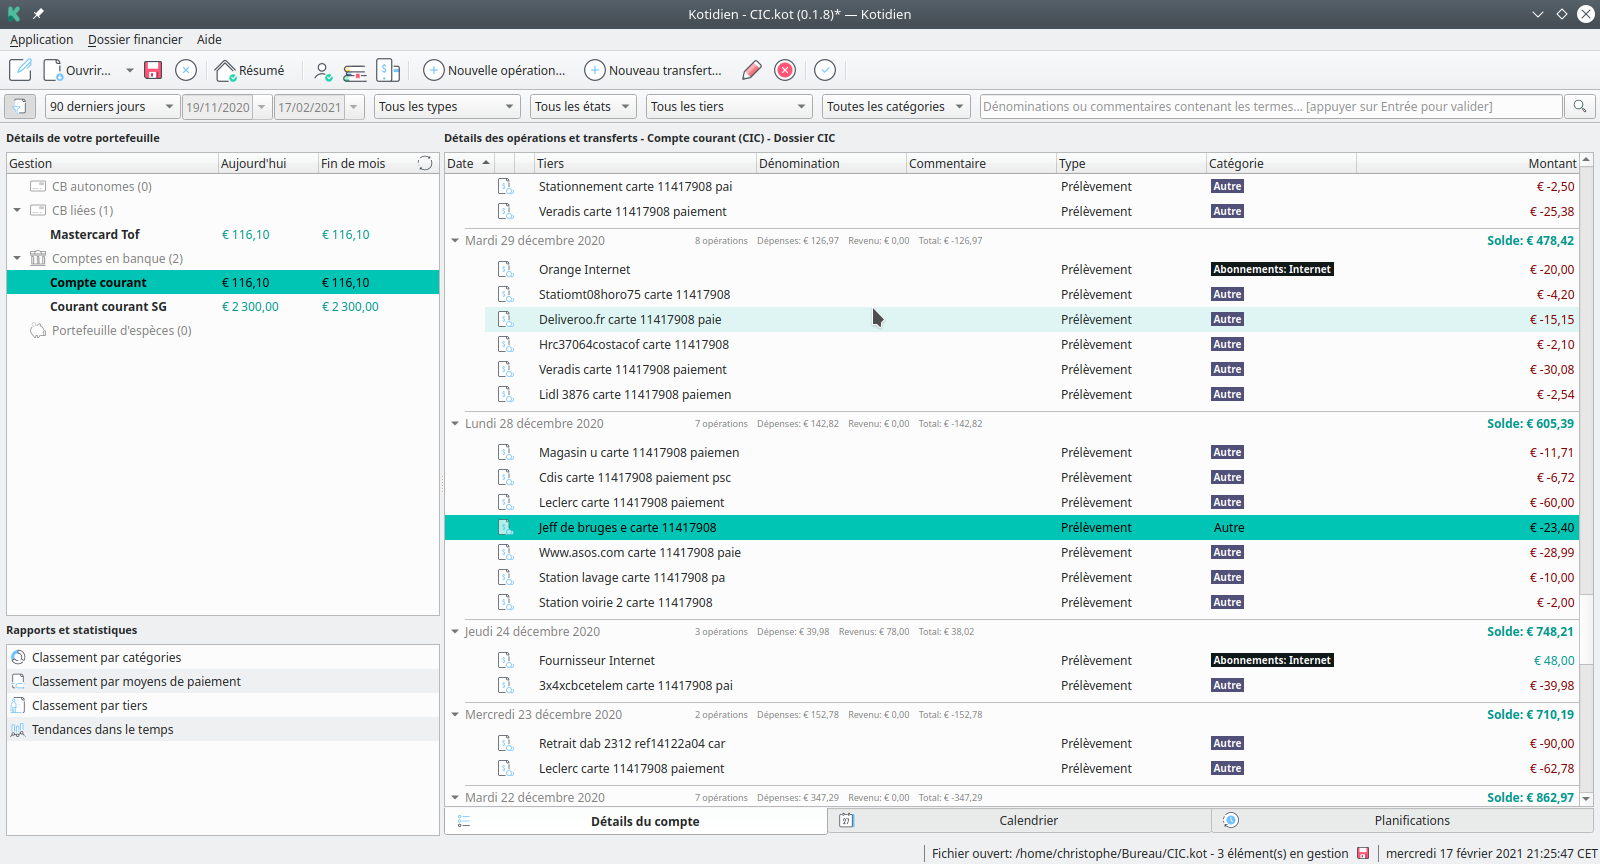
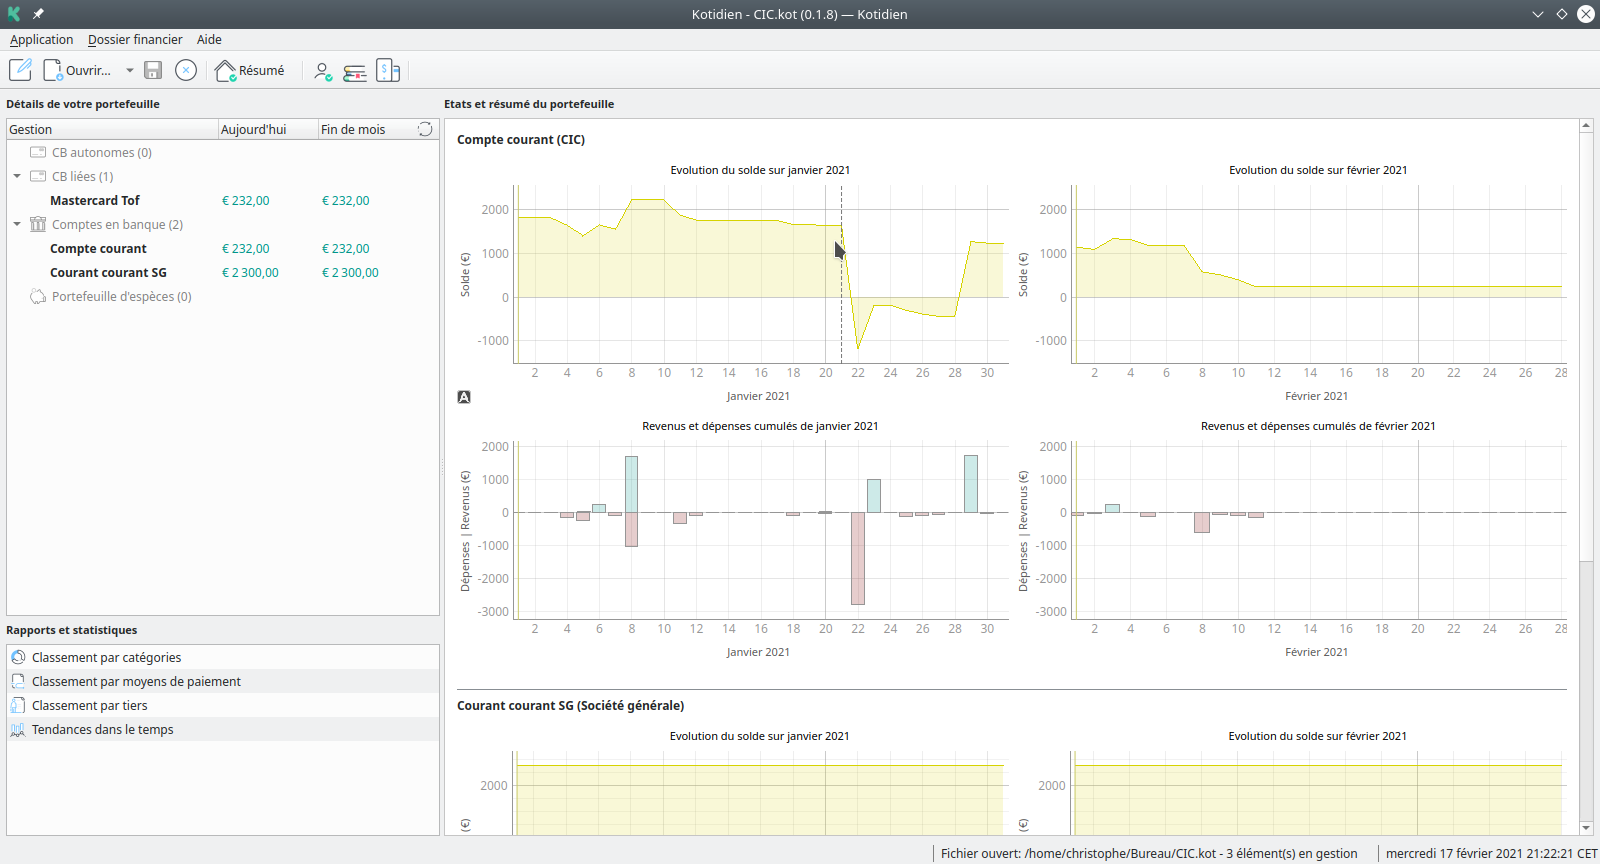
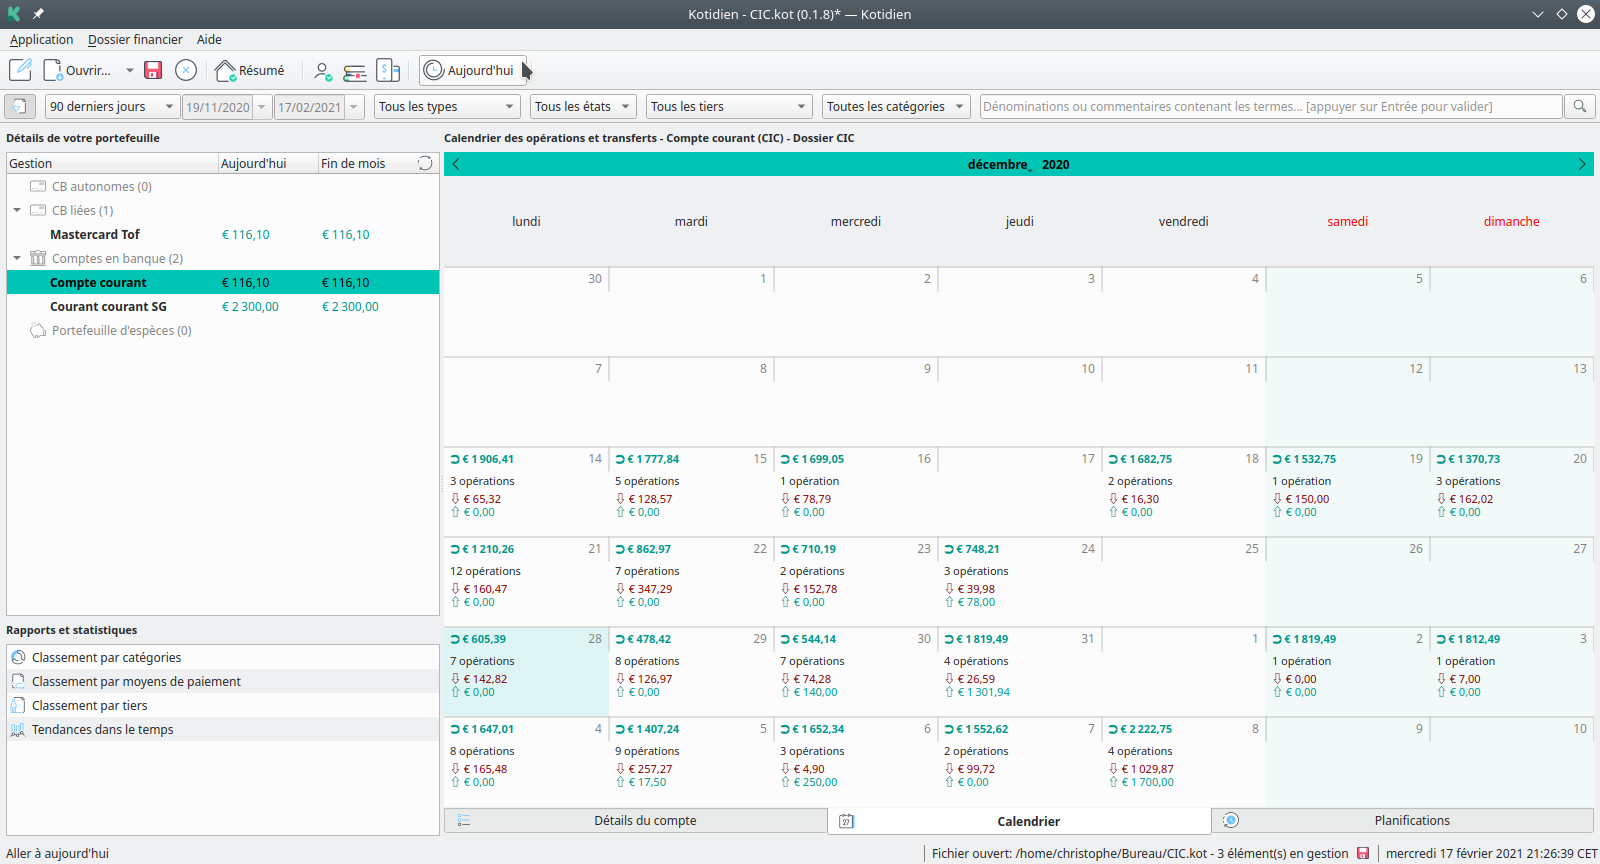
Kotidien est une application dédiée à la gestion de votre argent. Comptes bancaires, cartes de paiements autonomes, et portefeuille d’espèces. Totalement libre et gratuite, elle vous permets de tenir vos comptes d’une main de fer. Écrite en Python 3 et compatible Linux (intégration parfaite sous KDE via l’utilisation de QT 5.12), Microsoft Windows 7 et supérieurs, Mac OS 10.11 et supérieurs.
Kotidien vous donne un accès permanent et en temps réel sur vos différents soldes, permets aussi d’automatiser l’écriture de vos transaction récurrentes, de pointer celles mises à jour sur votre interface bancaire, etc
Agencées au jour le jour, supplantées par une vue calendrier, et synthétisées sur des graphiques clairs, toutes vos transactions sont réunies au sein de Kotidien.
La complétion automatique des différentes informations permet une saisie plus rapide des données.
Plusieurs languages vous sont proposés avec par défaut le Français.
Points forts
Protection du dossier financier Kotidien par mot de passe
Copie de sauvegarde (.bak) automatique à chaque ouverture d’un dossier.
Facilement transportable, ne nécessite pas d’installation!
Assistant de création de dossiers financiers
Supporte les comptes en banques, cartes de paiements autonomes et – portefeuilles d’espèces.
Personnalisation des types de transactions (carte bancaire, virement, prélèvement, etc.)
Personnalisation des catégories et sous catégories
Personnalisation des tiers
Calcul automatique du solde du jour
Prévision automatique du solde “fin de mois”
Classement des transactions par jours
Anticipation du solde à date souhaitée
Possibilité d’ajouter titre, mémo et commentaire pour chaque transaction
Complétion automatique des données pour une écriture rapide des transactions
Gestion du découvert
Gestion des transferts entre comptes bancaires d’un même dossier Kotidien
Planification automatique de transactions avec répétitions programmables
Importation et exportation des données au format CVS programmable
Importation et exportation des données au format OFX compatible Money 98-2003
Résumé graphique des différentes évolutions de votre dossier financier
Statistiques graphiques complètes
Fichier d’aide disponible directement depuis l’application
Traduction de l’application en plusieurs langues. Français par défaut.
Possibilité de personnaliser l’apparence de Kotidien pour redistribuer l’application aux couleurs de votre système.
Incorporation facile par dossier ‘vendor’
Totalement libre et gratuit! Licence open-source GNU GPL v3
Écrite en Python, utilise QT. Supporte Windows , Linux et Mac OS.
Aucune installation n’est nécessaire. Décompressez l’archive dans le dossier de votre choix et exécutez le fichier Kotidien ou Kotidien.exe pour lancer l’application
pycountry provides the ISO databases for the standards:
639-3 Languages
3166 Countries
3166-3 Deleted countries
3166-2 Subdivisions of countries
4217 Currencies
15924 Scripts
The package includes a copy from Debian’s pkg-isocodes and makes the data accessible through a Python API.
Translation files for the various strings are included as well.
PyQtGraph is a pure-python graphics and GUI library built on PyQt4/PyQt5/PySide/PySide2 and numpy.
It is intended for use in mathematics / scientific / engineering applications. Despite being written entirely in python, the library is very fast due to its heavy leverage of numpy for number crunching, Qt’s GraphicsView framework for 2D display, and OpenGL for 3D display.
fpdf2 is a minimalist PDF creation library for Python:
It is a fork and the successor of PyFPDF. Compared with other PDF libraries, fpdf2 is simple, small and versatile, with advanced capabilities, and is easy to learn, extend and maintain.
ofxtools is a Python library for working with Open Financial Exchange (OFX) data – the standard format for downloading financial information from banks and stockbrokers. OFX data is widely provided by financial institutions so that their customers can import transactions into financial management software such as Quicken, Microsoft Money, or GnuCash.
If you want to download your transaction data outside of one of these programs – if you wish to develop a Python application to use this data – if you need to generate your own OFX-formatted data… ofxtools is for you!
cryptography is a package which provides cryptographic recipes and primitives to Python developers. Our goal is for it to be your “cryptographic standard library”. It supports Python 3.6+ and PyPy3 7.2+.
cryptography includes both high level recipes and low level interfaces to common cryptographic algorithms such as symmetric ciphers, message digests, and key derivation functions.
Six is a Python 2 and 3 compatibility library. It provides utility functions for smoothing over the differences between the Python versions with the goal of writing Python code that is compatible on both Python versions. See the documentation for more information on what is provided.
Kotidien est sous licence libre et open-source GNU GPL v3. Cette licence vous permet de redistribuer, modifier et améliorer Kotidien à votre guise. Elle vous interdit de revendre l’application ou ce qu’elle contient.
Toute modification, redistribution ou amélioration devra citer l’auteur original dans le respect de la licence.
Utiliser un conteneur Docker. Tout terrain, simple et efficace.
Benoit485 propose d’utiliser Docker pour compiler et lancer Kotidien sur votre machine sans vous soucier des versions de Python et des dépendances requises. Pratique non? 😉
Pour ce faire, vous retrouverez toutes les instructions nécessaires dans son dépot dédié: Kotidien_docker
Compiler manuellement. J’aime le cambouis, j’y mets les mains…


 https://github.com/Hyldem0er/Skirnir